Add Clusters
Introduction
Before Eyeglass can protect, replicate, or fail over a PowerScale cluster, the cluster must be added to Eyeglass as a managed device. This procedure covers adding a PowerScale cluster for Disaster Recovery (DR) monitoring, which is required before configuration replication, readiness validation, or failover can be configured for that cluster.
Adding a cluster for event monitoring only (no DR license) uses the same Add Managed Device workflow described below, but does not require a DR license key.
Prerequisites
- A dedicated Eyeglass service account on the PowerScale cluster, configured with the minimum required privileges.
- The cluster management IP address to be used for onboarding, which is typically the SmartConnect Service IP for the subnet used for HA IP address management.
- Network connectivity between the Eyeglass appliance and the cluster management IP address.
How to Add a PowerScale Cluster
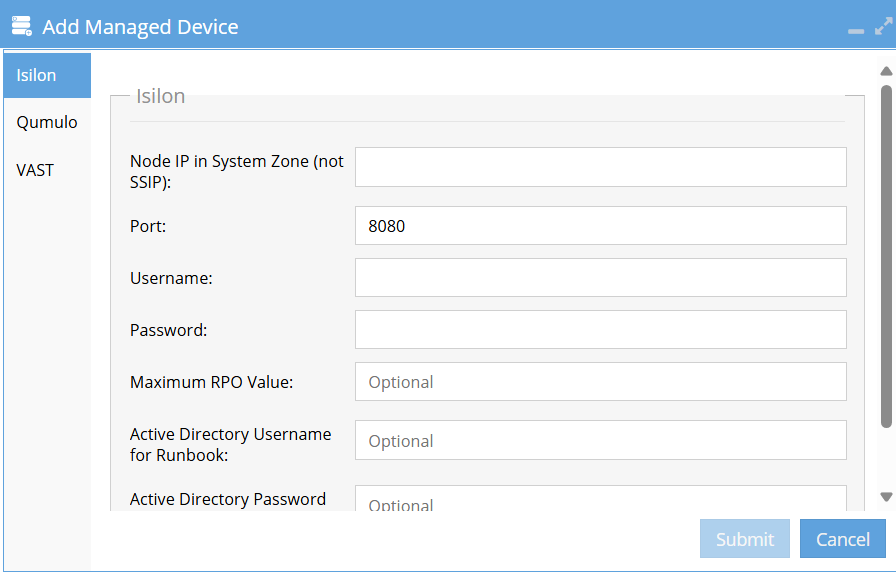
The screenshot below is from the legacy UI. In the 2.15.0 GUI, step 2's Add Managed Device button is now Inventory → Add Device, and "Verify Cluster Inventory Collection" below happens on the Inventory page rather than the legacy Inventory View icon — see Inventory View icon. The rest of this procedure (fields, prerequisites) is unaffected by this navigation change.
-
Log in to the Eyeglass appliance web page as
admin. -
Click Add Managed Device (Inventory → Add Device in the 2.15.0 GUI).
-
Enter the cluster management IP address (typically the SmartConnect Service IP for the subnet used for HA IP address management).
-
Enter the credentials for the Eyeglass service account, configured with minimum required privileges.
-
Optionally, set a Maximum RPO Value and enter Active Directory Username/Password for Runbook if you plan to use Runbook Robot automation.
tipThe Maximum RPO Value sets your target RPO in minutes for this cluster, used by RPO Trending and Reporting (a separately licensed feature) to calculate compliance in daily reports. You can also set or update this value later by editing the cluster from Inventory View.
-
Submit the form to begin cluster discovery.
Verify Cluster Inventory Collection
- Open the Inventory page (shared, top of sidebar) — the legacy Inventory View icon.
- Click the Refresh button (top right in the 2.15.0 GUI; bottom right in the legacy UI) to confirm the complete cluster inventory has been collected.
- Confirm the cluster and its configuration (Access Zones, SyncIQ policies, shares, exports) are visible in the inventory tree.
If the cluster status continues to display Adding..., discovery is either still in progress or has encountered an error. If Adding... persists for more than 10 minutes, open a support case.
When a cluster is added, its node count is detected during discovery and deducted from your available node count licenses.
See Also
Cluster Check
Verify that an added cluster remains reachable, is free of configuration replication errors, and is correctly reflected in Eyeglass Reports.
Appliance Check
Check the overall health of the Eyeglass appliance itself, including services, disk space, and diagnostic reporting.