Installation for Disaster Recovery for Dell
Introduction
The Superna Disaster Recovery (DR) Edition installation guide provides instructions for successfully deploy the Superna DR solution. This page gives an high-level overview of the full installation process and the phases it includes, such as reviewing system requirements, deploying a Superna virtual appliance, configuring hardware clusters, and the initial setup of the Superna DR Solution environment. At the end of this guide are some recommended next steps for after you have successfully installed and initially configured Superna DR Edition.
Requirements and Prerequisites
Before installing Superna Disaster Recovery, review the comprehensive prerequisites including platform compatibility, system requirements, and network configurations.
The prerequisites page includes detailed requirements specific to this installation.
System Requirements
Confirm the following before deploying the virtual appliance — see Prerequisites for the complete, current requirements list (supported virtualization platforms, vCenter versions, network, authentication, and browser requirements):
- CPU: 4 vCPU
- Memory: 24 GB RAM (may need to be upgraded based on scalability requirements — see the Scalability Limits table below)
- Disk Space: 58 GB (OS partition) + 140 GB (additional) = 198 GB total in VMware
Ports Requirements
| Port | Protocol | Source --> Destination | Description |
|---|---|---|---|
| DNS 53 UDP | DNS | Appliance --> DNS server OR Appliance --> GroupNet (DNS configured on all clusters) | Functional DNS is a requirement for multiple validations needed for failover and Failover Readiness |
| TLS 443 | TCP TLS 1.2 | Appliance --> Internet | DR Remote Monitoring or Phone Home remote log upload for support and health checks |
| NTP 123 | UDP | Appliance --> NTP server in your environment | Time sync should use same NTP as the clusters. Always disable VMware host VM time sync option. |
| SMTP 25 | TCP | Appliance --> Mail server in your environment | Email of alarms from Eyeglass to your mail server |
| HTTP 80 | TCP | Appliance --> Open Suse Mirror Repositories | URL to allow security updates: Open Suse Download Security patches come directly from Open Suse and requires the appliance to have access to download the patches and apply on a weekly schedule. |
| HTTPS 8080 | TCP TLS 1.2 | Appliance --> Isilon/PowerScale OneFS cluster | REST API is authenticated using the service account created here. Authentication uses Isilon session authentication method. |
| SSH 22 | AES | Appliance --> Isilon/PowerScale OneFS cluster | SSH access for some CLI commands |
| HTTPS 443 | TCP TLS 1.2 AES - Unsigned certificate | Admin PC browser --> Appliance | Secures client to browser access |
| Target Port 80 --> Destination random TCP source port on the browser | Only used to redirect to 443, can be blocked if needed | Admin PC browser --> Appliance | If connection on IP address port 80 is made, an HTTP 301, 302 redirect is returned on port 80 to switch the browser to https and url https:/x.x.x.x/eyeglass. No services run on port 80 and this is only used to redirect to port 443 HTTPS. |
| HTTPS 2011 Websocket | TCP TLS 1.2 AES | Admin PC browser --> Appliance | Websocket for real-time appliance to browser updates (redirected to 2012) |
| TLS 2012 Websocket | TCP TLS 1.2 AES | Admin PC browser --> Appliance | Websocket for real-time appliance to browser updates (redirected to 2012) |
| SSH 22 | TCP AES | Admin PC browser --> Appliance | Secure shell access |
| Proxy login SMB 2 (only) 445 | TCP | Appliance --> Isilon/PowerScale OneFS | Used to authenticate to AD through Isilon/PowerScale OneFS using standard Microsoft SMB authentication request for Role based login proxy interface |
| Dual DNS Delegation | UDP | Appliance Port 53 UDP DNS --> Groupnet(x) DNS servers | New in 2.5.6 or later, requires Eyeglass to be able to access the Groupnet DNS servers to validate Dual DNS delegation is configured correctly. The OS DNS is not used since the DNS that must be configured correctly is used by Isilon/PowerScale OneFS itself. |
| Internet Control Message Protocol | ICMP | Appliance --> Isilon/PowerScale OneFS | If for any reason ICMP is disabled, or PMTUD is not supported, this causes PowerScale OneFS to default the MTU to 536 bytes, which typically leads to performance degradation. |
Phone Home Requirements
The TLS 443 port above covers DR Remote Monitoring / Phone Home log upload for Disaster Recovery, Ransomware Defender, Easy Auditor, and Performance Auditor. The sections below cover the specific URLs to whitelist, how to test connectivity, and what data Phone Home actually sends.
Eyeglass Support and Phone Home Whitelist URLs
Admin PC browser access to the Superna support site (support.superna.net) requires:
https://*.zopim.comhttps://licenses.supernaeyeglass.comhttps://support.superna.nethttps://supernahelp.zendesk.comhttps://cloudapps.supernaeyeglass.com
Downloading software and license keys from the support site requires:
https://software.supernaeyeglass.comhttps://licenses.supernaeyeglass.com
Appliance-to-internet Phone Home/monitoring URLs:
https://cloudapps.supernaeyeglass.com— IP35.244.217.10https://na-static-phonehome.supernaeyeglass.com— IP35.207.34.234
Chrome, and Edge (Chromium-based).
Phone Home Remote Monitoring Test Steps
To confirm the appliance can reach the required Phone Home URLs through your firewall:
-
SSH to the Eyeglass appliance as
admin. -
Test the GET path:
wget https://na-static-phonehome.supernaeyeglass.com -
Test the POST path:
curl -X POST -k http://na-static-phonehome.supernaeyeglass.com -
Send the output of both commands to Superna Support if you need help confirming connectivity.
Phone Home Message Flow
Once Phone Home is enabled from the About icon, the appliance and the Superna monitoring service exchange the following messages. No inbound firewall rule from the Internet is required at any point in this flow, no remote-control action is possible through Phone Home, and no PHI is included in the data collected — only the support logs also obtainable from About → Backup. A proxy device can be used to reach the Internet if your environment requires one.
- Registration — on initial enable, the appliance sends an HTTPS POST to
https://na-static-phonehome.supernaeyeglass.comwith its appliance ID and version information. - Heartbeat — twice per 24 hours, the appliance sends an HTTPS POST to the same URL to confirm it is still running.
- Poll for upload requests — every 5 minutes (at a randomized offset within the window), the appliance sends an HTTPS GET to the same URL to check whether a remote log upload has been requested.
- Log upload — if a log upload was requested, the appliance packages a support logs ZIP and sends it via HTTPS POST to
https://cloudapps.supernaeyeglass.com. If no upload was requested, no action is taken until the next 5-minute poll.
Scalability Limits
Eyeglass Scalability Limits and Appliance Memory Minimum Requirements
| Scaling Limit Area | Tested Scaling Limits | Notes |
|---|---|---|
| Number of Managed Clusters (1 appliance) | Manages up to 22 clusters | Contact Support for RAM requirements |
| SyncIQ Policies Across All Clusters | Supports > 100 policies with 64 GB RAM Supports > 200 policies with 84 GB RAM | |
| Access Zones | Handles > 10 zones with 32 GB RAM Handles > 30 zones with 64 GB RAM Handles > 50 zones with 84 GB RAM | Requires 32 GB to 84 GB of RAM |
| Failover Job Limitations | Supports 100 policies in a single failover | Requires 64 GB RAM |
| Total Object Count (shares + exports + quotas) | Handles < 5,000 objects with 16 GB RAM Handles 5,000 - 10,000 objects with 32 GB to 48 GB RAM Handles > 10,000 objects with 64 GB RAM Handles > 20,000 objects with 84 GB RAM | |
| Clusters Added to the Appliance | Supports 4 clusters with 32 GB RAM Supports 4 - 8 clusters with 64 GB RAM Supports > 10 clusters with 84 GB RAM | |
| Performance Auditor | Requires a minimum of 32 GB RAM when the Performance Auditor is licensed | Minimum 32 GB RAM |
| Concurrent Administrators (3 or more) | Adds 8 GB RAM to the above requirements for each logged-in administrator using RBAC or not using RBAC |
Each release of the software may adjust memory requirements, and the alarm code (SCA0094) will recommend memory for the supported configuration. The recommendation from Alarm Code SCA0094 takes priority over this documentation.
Download and Deploy Virtual Appliance
Download Virtual Appliance
Start the process by downloading the latest version of the Superna Core Agent Appliance.
Download them from our support site: https://support.superna.net.
-
To start, sign in.
-
Once in the Superna support site, scroll down to display the links to latest version of Superna Eyeglass.
-
If this is a fresh installation of Superna Disaster Recovery Edition, select Download VM Install Files. For appliances to be hosted with VMWare, select Download OVF Installer.
-
Accept the Subscription Terms and Conditions.
-
Click the link to download the Core Agent Appliance installer.
Deploy Virtual Appliance
Unzip the download package on a machine with vSphere installed. Select both .ovf and .vmdk files under the OVF template deployment.
Select required VM settings for VM name and folder, computer resource, datastore, and networking. Complete the networking section as requested.
Deploy on Hyper-V
The appliance ships as a VHDX for Hyper-V deployments as an alternative to the VMware/OVF procedure above. Download the VHDX from the same support site as the OVF package.
Create the Eyeglass Hyper-V Virtual Machine
- In Hyper-V Manager, select New > Virtual Machine.
- Enter a Name for the virtual machine.
- On the Generation step, select Generation 1.
- Set Startup memory to
16384MB. - Select the appropriate Network Adapter.
- On the disk step, select Use an existing virtual hard disk, and browse to the downloaded VHDX file.
- Complete the wizard.
Configure the Eyeglass Data Disk
- After the VM is created, right-click it and select Settings.
- Under IDE Controller 0, select Add a Hard Drive, then choose Create New.
- For Disk Format, select VHDX.
- For Disk Type, select Fixed size.
- Name the new data disk.
- Set the disk size to
80GB. - Complete the wizard.
Configure Eyeglass Post-Boot Settings
After the VM boots, populate the local OVF-equivalent environment settings from the console (these replace the networking properties normally entered through the vSphere OVF deployment wizard):
sudo su
/opt/superna/bin/ovf set-value --force net.eth0.ipv4.ip=x.x.x.x
/opt/superna/bin/ovf set-value --force disk_size=80
/opt/superna/bin/ovf set-value --force net.eth0.ipv4.gateway=x.x.x.x
/opt/superna/bin/ovf set-value --force net.eth0.ipv4.netmask=255.255.255.0
/opt/superna/bin/ovf set-value --force net.nameservers=x.x.x.x
/opt/superna/bin/ovf set-value --force net.ntp=x.x.x.x
/opt/superna/bin/ovf set-value --force net.searchlist=example.lan
/opt/superna/bin/ovf set-value --force vm.hostname=eyeglass
Replace x.x.x.x and example.lan with the IP addresses, gateway, DNS servers, NTP server, and search domain for your environment.
Next, confirm the .firstboot marker file exists:
ls -l /opt/superna | grep .firstboot
Expected output is similar to:
-rw-r--r-- 1 sca users 0 Sep 10 15:38 .firstboot
If the file is missing, recreate it:
sudo su
touch /opt/superna/.firstboot
chown sca:users /opt/superna/.firstboot
Restart the onboot service and confirm it returns a CLI prompt within about 30 seconds:
systemctl restart superna-on-boot
Review the log to confirm the first-boot process completed and detected the Hyper-V platform:
cat /var/log/superna-on-boot.log
Once first boot completes successfully on a Hyper-V deployment, it prompts you to finish setup with the Hyper-V-specific setup command:
sudo su
spy-hypervisor-setup
Follow the prompts to enter the requested environment variables, then log in to the Eyeglass VM at https://x.x.x.x and continue with the standard post-deployment steps below (NTP, licensing, adding clusters, and so on).
spy-hypervisor-setup is the same setup command used for ECA-on-Hyper-V deployments — see Eyeglass, ECA, and Mini-ECA Installation for the ECA equivalent of this step.
Post-Deployment Verification and Configuration Steps
-
Power on Eyeglass VM
- SSH to the Eyeglass VM as the
adminuser. - The default password for both
adminandrootusers is3y3gl4ss.
- SSH to the Eyeglass VM as the
-
Verify First Boot Process
-
Use the following command to check the status of the first boot process:
sudo systemctl status superna-on-boot -
The output's last line should read:
"Finished Superna OnBoot Service."
-
-
Confirm Eyeglass VM
-
View the Message Of The Day (MOTD) file to confirm the Eyeglass VM:
cat /etc/motd
-
-
Verify Network Configuration
-
Verify the IP address and subnet:
ip a -
Verify the default gateway:
ip r
-
-
Validate Date and Timezone
-
Use the following command to validate the date and timezone:
date
-
-
Verify NTP Server
-
Check the NTP server details with:
chronyc sources -
The output should show your NTP server with an
*next to it. -
If an update is needed, update the NTP server using:
sudo /sbin/yast2 ntp-client
-
-
Verify DNS Servers
-
To verify DNS server IPs, use:
cat /etc/resolv.conf
-
-
Verify System Resources
- Verify the total RAM:
free -h-
Verify the total disk space:
df -kh
Disable Host Time Sync (Mandatory)
Disabling host time synchronization is mandatory to prevent time skew errors between the Superna appliance and storage clusters. Time synchronization conflicts can cause authentication failures, replication issues, and data integrity problems. The VM must use NTP directly instead of inheriting time from the hypervisor host.
VMware Configuration
-
Access VM Settings
Right-click the VM and select Edit Settings. -
Navigate to VM Options
Click the VM Options tab. -
Open VMware Tools Settings
Expand the VMware Tools section. -
Disable Time Synchronization
Under Synchronize guest time with host, uncheck both options:- Synchronize at startup and resume (recommended)
- Synchronize periodically (recommended)
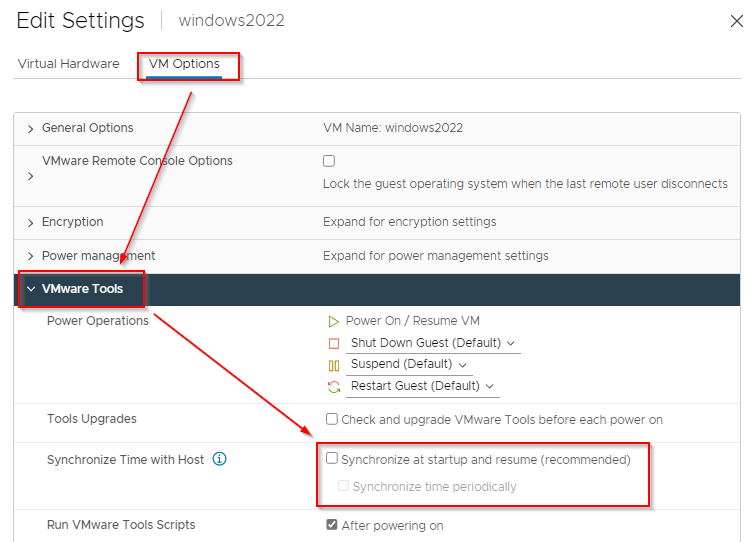
This configuration prevents time skew errors.
Post-Deployment Hardware Setup
Setup Time Zone and NTP
The virtual machines that make up the Superna solution are required to be time synchronized with the PowerScale OneFS clusters in the environment. Please make sure the Eyeglass appliance and the ECA nodes are connected to the same NTP server as the PowerScale OneFS clusters, and that the timezone is appropriately set on all.
Create Eyeglass Service Account and Update Sudoers File on PowerScale
-
Start by logging into the PowerScale OneFS cluster via an SSH session using the
rootuser credentials. This provides the necessary administrative privileges to create new user accounts. -
Run the following command to create the
eyeglassservice account:isi auth users create eyeglass --enabled yes --password 3y3gl4ssThis command sets up the account with an initial password and enables it for immediate use.
- Restricted Characters: Ensure your password does not include restricted characters such as brackets, tilde, back quote, forward slash, ampersand, asterisk, and dollar sign. These characters can cause issues in scripting and command execution within the PowerScale OneFS environment.
- Password Length: Ensure the password is no longer than 20 characters.
Modify user account properties and create roles
-
Disable the password expiration for the
eyeglassaccount to ensure continuous access without the need for periodic password updates.isi auth users modify eyeglass --password-expires no -
Establish a role named
EyeglassAdminto centralize administrative privileges for managing the cluster.isi auth roles create --name EyeglassAdmin --description "EyeglassAdmin role" -
Add the
eyeglassuser to theEyeglassAdminrole to grant necessary administrative permissions.isi auth roles modify EyeglassAdmin --add-user eyeglass
Assign privileges to the admin role
Assign necessary privileges to the EyeglassAdmin role to ensure it has the required access across various system functionalities.
General Administrative Privileges: Provide broad administrative capabilities such as authentication, role management, and configuration oversight:
isi auth roles modify EyeglassAdmin --add-priv ISI_PRIV_AUTH
isi auth roles modify EyeglassAdmin --add-priv ISI_PRIV_ROLE
isi auth roles modify EyeglassAdmin --add-priv ISI_PRIV_CONFIGURATION
System and Network Management: Grant permissions related to network settings, NFS, SMB, and system quotas:
isi auth roles modify EyeglassAdmin --add-priv ISI_PRIV_NFS
isi auth roles modify EyeglassAdmin --add-priv ISI_PRIV_SMB
isi auth roles modify EyeglassAdmin --add-priv ISI_PRIV_NETWORK
isi auth roles modify EyeglassAdmin --add-priv ISI_PRIV_QUOTA
Security and Compliance: Enable privileges related to security measures, audit capabilities, and compliance:
isi auth roles modify EyeglassAdmin --add-priv ISI_PRIV_AUDIT
isi auth roles modify EyeglassAdmin --add-priv-ro ISI_PRIV_HARDENING
isi auth roles modify EyeglassAdmin --add-priv-ro ISI_PRIV_WORM
Data Protection and Recovery: Add privileges for managing snapshots, disaster recovery, and data replication:
isi auth roles modify EyeglassAdmin --add-priv ISI_PRIV_SNAPSHOT
isi auth roles modify EyeglassAdmin --add-priv ISI_PRIV_SYNCIQ
isi auth roles modify EyeglassAdmin --add-priv-ro ISI_PRIV_REMOTE_SUPPORT
Storage Optimization: Enhance the role with capabilities to manage storage pools, devices, and file filtering:
isi auth roles modify EyeglassAdmin --add-priv-ro ISI_PRIV_SMARTPOOLS
isi auth roles modify EyeglassAdmin --add-priv-ro ISI_PRIV_CLOUDPOOLS
isi auth roles modify EyeglassAdmin --add-priv-ro ISI_PRIV_DEVICES
isi auth roles modify EyeglassAdmin --add-priv-ro ISI_PRIV_FILE_FILTER
Monitoring and Statistics: Provide read-only access for monitoring and statistics to support performance analysis:
isi auth roles modify EyeglassAdmin --add-priv-ro ISI_PRIV_STATISTICS
isi auth roles modify EyeglassAdmin --add-priv-ro ISI_PRIV_MONITORING
isi auth roles modify EyeglassAdmin --add-priv-ro ISI_PRIV_HTTP
isi auth roles modify EyeglassAdmin --add-priv-ro ISI_PRIV_NTP
isi auth roles modify EyeglassAdmin --add-priv-ro ISI_PRIV_EVENT
isi auth roles modify EyeglassAdmin --add-priv-ro ISI_PRIV_ANTIVIRUS
Specialized Access: Enable specialized access for system features such as HDFS and NDMP:
isi auth roles modify EyeglassAdmin --add-priv-ro ISI_PRIV_HDFS
isi auth roles modify EyeglassAdmin --add-priv-ro ISI_PRIV_NDMP
Data Security (Optional): If you are deploying Ransomware Defender or Easy Auditor, add the following privileges:
isi auth roles modify EyeglassAdmin --add-priv-ro ISI_PRIV_IFS_BACKUP
isi auth roles modify EyeglassAdmin --add-priv-ro ISI_PRIV_IFS_RESTORE
isi auth roles modify EyeglassAdmin --add-priv-ro ISI_PRIV_NS_TRAVERSE
Update the Sudoers File
Some critical administrative commands for managing PowerScale OneFS clusters are not available through the PowerScale OneFS Platform API. These commands must run directly from the command-line interface with root privileges.
Update the sudoers file to allow the eyeglass account to run these commands
without a password.
-
Open the Sudoers File
Use theisi_visudocommand to safely open and edit the sudoers file.isi_visudo -
Add Authentication Entries
Add the following lines to the sudoers file. These entries allow theeyeglassuser to run specific administrative commands without a password.eyeglass ALL=(ALL) NOPASSWD: /usr/bin/isi auth ads*
eyeglass ALL=(ALL) NOPASSWD: /usr/bin/isi_classic domain info*If your PowerScale OneFS version is below 9.5.0, also add the following line:
eyeglass ALL=(ALL) NOPASSWD: /usr/bin/isi_classic auth ads* -
Add Unlock My Files Entries
The entries required for Unlock My Files depend on your OneFS version.OneFS below 9.3 — Add the following entries:
eyeglass ALL=(ALL) NOPASSWD: /usr/bin/isi_for_array -s isi_run -z ?* isi_classic smb file*
eyeglass ALL=(ALL) NOPASSWD: /usr/bin/isi_for_array isi_run -z ?* isi_classic smb file*
OneFS 9.3 and above — Add the following entries:
eyeglass ALL=(ALL) NOPASSWD: /usr/bin/isi_for_array -s isi smb openfiles list *
eyeglass ALL=(ALL) NOPASSWD: /usr/bin/isi_for_array isi smb openfiles close *
Post-Deployment Environment Setup
Register Superna License
Retrieve the Superna Disaster Recovery Edition license keys from the Zendesk case by following these steps:
-
Login to the Superna Support Desk.
noteEnsure a valid support account is logged in to access the license key download dialog box.
Submit the license request by entering the Appliance ID and Transaction Token as provided in the license email.
noteThe Appliance ID and Transaction Token must be entered exactly as shown on the license email, with all dashes and without any leading or trailing spaces.
Ex. EMC-xxx-xxx-xxx-xxx
-
Download the provided zipped license file.
warningDo not unzip the license file; the .zip file will be uploaded in the next step.
-
Upload License File Open Inventory → License Management, then select + License to browse to the license file
Upload the zipped file downloaded in the previous step.
noteAfter clicking Upload, the Eyeglass EULA must be accepted to continue the process.
Add Clusters
Ensure that both the source and target clusters comply with the support feature matrix. Additionally, all PowerScale OneFS cluster replication pairs should operate on a PowerScale OneFS version that is listed and supported as per the System Requirements / Feature Release Compatibility matrix.
-
Open the Eyeglass UI to get started.
-
In the Eyeglass Main Menu, select Add Managed Device to start adding cluster configurations.
-
Provide the cluster details as prompted by the interface.
- PowerScale OneFS
-
Node IP in System Zone (not SSIP): Provide an IP address allocated for the System Access Zone. Avoid using SSIP, as it is unsuitable for administrative connections.
noteStarting from release 2.5.5, it is mandatory to use a node IP with dynamic IP allocation within a subnet that is part of the System Access Zone. This requirement is due to a CSRF security patch that disables basic authentication and prevents session tokens from being shared between PowerScale OneFS nodes. For further details, refer to the associated technical documentation.
-
Port: Default to
8080unless there is a requirement for a different port number. -
Username and Password: Input the username and password of the Eyeglass service account.
-
Maximum RPO Value: (Optional) Define the recovery point objective in minutes, if desired.
-
Active Directory Username and Password for Runbook: (Optional) Enter if you're using AD credentials for Runbook automation.
-
Submit the form to add the cluster to Eyeglass.
Verify Inventory Collection
After adding a cluster, Superna DR Edition initiates an automatic inventory task (typically 5–10 minutes) to identify and catalog the cluster's components. Open Inventory → Manage Devices to confirm the cluster and its components are correctly displayed — the page does not auto-refresh, so reopen it or use its refresh control to see the latest collection.
See Add Clusters — Verify Cluster Inventory Collection for the full verification procedure, including what to do if a cluster status remains Adding... for more than 10 minutes.
Enable/Disable Jobs
After adding clusters, review the jobs Eyeglass created and enable or disable them (individually or in bulk) as needed for your environment from the Jobs icon on the main dashboard.
See Configuration Replication — Enable/Disable Jobs for the full step-by-step procedure.
Setup Notifications
Configure email notification so administrators are alerted to configuration replication errors, failover events, and appliance conditions. Open Settings (gear icon, top-right of any page) → Notifications to configure the SMTP server (host, port, from address, authentication, TLS, and alarm severity filter) and to add email recipients.
See Monitoring and Alerts — Configure Email Notifications for the full field-by-field procedure, including Microsoft Exchange relay configuration.
Confirming Installation Is Complete
The appliance is ready for configuration once:
- The Post-Deployment Verification and Configuration Steps above all pass (first boot service, network, date/timezone, NTP source, DNS, and system resources).
- Each added cluster's inventory shows as fully collected in Inventory View rather than Adding... (see Add Clusters above).
- The appliance reports healthy status — run
igls admin healthover SSH, or see Appliance Check for the full set of built-in health checks.
Next Steps
- Upgrades – Keep the appliance current and review upgrade-specific known issues.
- Configuration Guide – Configure jobs, replication, RBAC, and other ongoing operational settings.
- Release Notes – Current release features, fixes, and known limitations.