ServiceNow Security Operations Incident Integration with Zero Trust Alerts
Support Statement
This documentation is provided "as is" without support for 3rd party software. The level of support for this integration guide is best effort without any SLA on response time. No 3rd party product support can be provided by Superna directly. 3rd party components require support contracts. See EULA for more details.
Overview
This solution creates security incidents in the Security Operations module within ServiceNow for customers that have this module installed and perform incident response from this module.
Supported Products
- Data Security Edition
- Data Security Edition Essentials
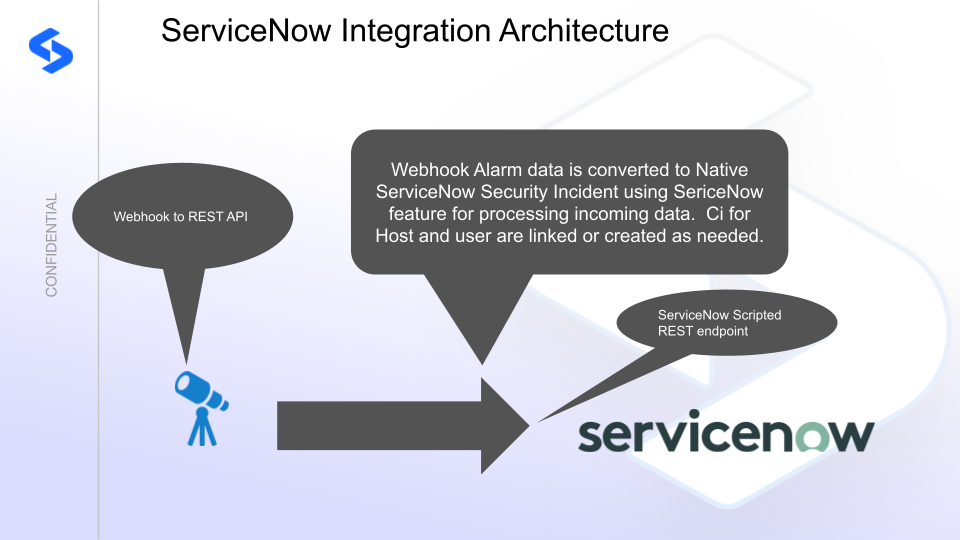
Architecture Overview
How to Configure
This integration shows how to configure Security Edition webhook alarms to create a security incident in ServiceNow with the alert details in the description.
This is a basic example only and requires customization to map fields in the webhook payload to specific ServiceNow fields.
Using the guide on how to integrate webhooks into ServiceNow, create a ServiceNow Scripted REST Resource Webhook.
Integration Script
Features
- Creates new security incidents in the Security Operations workspace for each incoming alert
- Supports Airgap Alarm webhook processing
- Updates existing security incidents when event IDs match — documents state changes in working notes showing the history and state changes of the event
- Monitor mode — creates closed incidents for testing without generating open tickets
- CMDB features:
- Creates a new user object if needed and associates the affected user to the SIR
- Creates a new computer CI class with the client IP address populated
- The integration code only creates a CI if a CI with the affected client IP is not already found
- Associates the user and host to the security incident, enabling integration with other tools that use the client IP or username fields
Download the code for Security Operations Integration here. Open the file and copy and paste the script text into the endpoint script editor.
Steps to Integrate the Endpoint with Security Edition Integration Code
-
Paste the script into the resource script editor and save.
-
Disable security on the endpoint for the testing phase.
-
Get the endpoint URL for the webhook in Security Edition — the resource format is:
https://yourInstance.service-now.com/<resource_Path>The resource path is displayed in the script editor after saving.
-
Configure the webhook in the Security Edition Zero Trust UI:
-
Non-authenticated endpoint: Add the HTTP header
Content-Type: application/json -
Airgap support (optional): Open Eyeglass Main menu → Notification center → Webhooks and use the same endpoint URL and headers
-
Authenticated endpoint: Create a ServiceNow service account, assign the
rest_servicerole, and generate a base64-encoded token:echo -n "username:password" | base64Add the HTTP header
Authorization: Basic <encoded_token>to the webhook configuration.
-
-
Click Save, then click the Test button. A successfully configured endpoint returns an incident number in the response.
How to Test the Integration
- Download the curl command sample and edit the URL to match your ServiceNow instance DNS name and resource path.
- Run the curl command to send a webhook payload lockout critical event to the endpoint.
- Check the Security Operations dashboard for a new security incident.
Sample Security Incident
Once configured, security incidents appear in the ServiceNow Security Operations dashboard with the Zero Trust event details. Example screenshots are available in the legacy portal.
Configure Data Security Essentials (DSE)
Overview
Data Security Essentials saves alerts to the Windows Event log under a custom application log. This integration extracts the log entries and the JSON payload within them, formats the data as webhook events, and sends them to the ServiceNow Scripted Endpoint.
Requirements
-
Follow the ServiceNow integration steps above to configure the Scripted REST API endpoint.
-
Install Python for Windows on the Data Security Essentials host.
noteEnsure Python is installed for all users — enable the for all users option during installation.
-
The integration code matches event log entries from the following sources:
Superna Data Security Essentials BOT ServiceSuperna Data Security Policy Engine
Features
- Execution logs are stored alongside the Python code
- Each execution stores the event log record ID, date time, and event number of the last processed event in
last_processed_record.txt— read on each execution to continue from the last record - The scheduled sync runs every minute and processes only events since the last record
- Only Warning level and above events are processed — informational events are ignored
- The ServiceNow Scripted endpoint code updates SIR incidents when the event ID matches an existing incident
Steps to Configure Event Sync to ServiceNow Security Incident Response Module
-
Download the integration code (right-click, save as).
-
Open the file and locate the
# Your ServiceNow webhook detailssection. Edit the URL to match your ServiceNow instance URL and the Scripted Webhook URL created above. -
Copy the Python code to
C:\Program Files\Superna\cgi-binon the Data Security Essentials host and name the filedse-servicenow-sir-integration.py. -
Install Python dependencies:
noteOpen a command prompt as the service account (hold down Shift and right-click the command prompt icon → Run as). This is required to install the Python packages under the correct user account.
pip install pywin32 requests -
Test the script from a command prompt:
cd "C:\Program Files\Superna\cgi-bin"
python dse-servicenow-sir-integration.py
The output should display event log entries that match, ignoring Informational level events, and show the data sent to the ServiceNow endpoint.
-
Grant the Data Security Essentials AD service account the Log on as a batch job right via Local Security Policy (
secpol.msc). -
Download the Task Scheduler XML file (right-click, save as).
-
Open Task Scheduler (
taskschd.msc), right-click Task Scheduler Library, and select Import Task. -
In the task definition, update the service account name, domain, and password. All other settings are pre-configured. Click OK to save.