Zero Trust with Commvault Backup and PowerScale
Support Statement
This documentation is provided "as is" without support for 3rd party software. The level of support for this integration guide is best effort without any SLA on response time. No 3rd party product support can be provided by Superna directly. 3rd party components require support contracts. See EULA for more details.
Overview
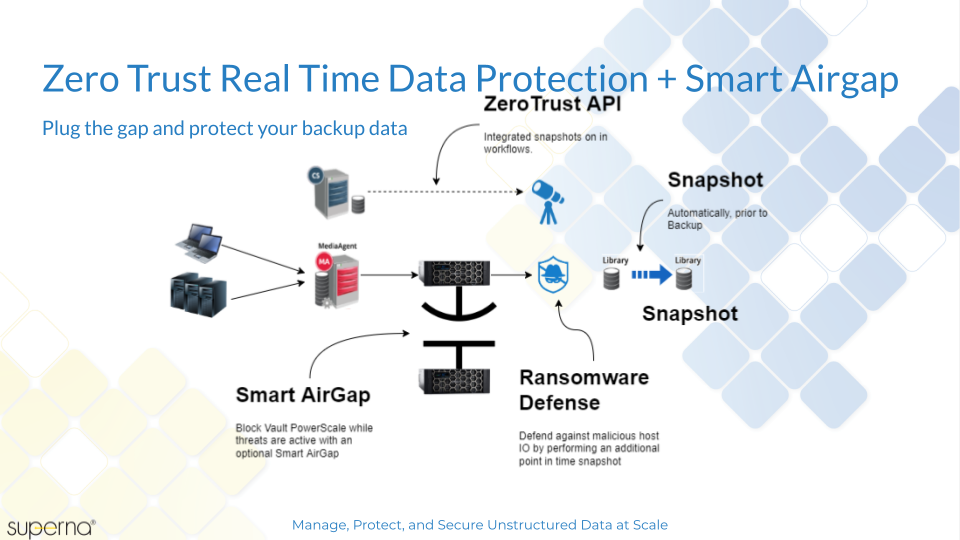
This solution guide explains how to configure the Zero Trust API and integrate with Commvault to ensure a point-in-time recovery at the disk level exists automatically. Your backup infrastructure is mission critical and a target for bad actors. This solution enhances protection by:
- Creating a rollback point before any job runs to back up corporate data, using an HttpClient workflow in Commvault that calls the Superna Zero Trust API to create critical snapshots on PowerScale storage where backup data is stored.
- Integrated job pre-processing snapshots to protect the target backup data and allow rollback if a cyber attack or disaster impacts backup hosts.
- Creating snapshots via workflows and integrating NAS target storage into workflows.
Optionally, integrate with endpoint protection systems or IDS/IPS systems to monitor attacks over the network targeting your backup infrastructure and create proactive automatic immutable snapshots of your backup data.
Solution Components
- Commvault Command Center
- Ransomware Defender for PowerScale
- Ransomware Defender Zero Trust API license
- PowerScale storage (SMB or NFS protocol)
Solution Deployment Diagram
Method 1: Job-Integrated Pre-Backup Script
Step 1: Create the SMB Share and Backup Library
- Create an SMB share on PowerScale to store backup data — for example, create an SMB share named
Commvaultat path/ifs/cvMedia. - Create a PowerScale Backup Library in Commvault Control Center using this share. This library is used to back up data to PowerScale for all clients.
Step 2: Create the Zero Trust API Token
- Log in to Eyeglass as admin.
- Navigate to Main Menu → Eyeglass REST API.
- Click Create token and enter
commvaultas the token name. - Save and copy the API key.
Step 3: Get the curl Command
- Select the API Explorer tab.
- Paste the token into the token field.
- Scroll down to Ransomware Defender v2 APIs.
- Click Try out — this triggers a snapshot on all configured critical paths.
- Copy the curl syntax from the API Explorer to use in the script steps below.
Step 4: Prepare the Backup Host
-
On the Commvault backup target host, create the scripts directory:
c:\zero-trust-scripts -
Optional: If the host OS does not include the
curlcommand, download it from curl-7.64.1.cab:- Right-click and extract all files.
- Copy the contents of the
i386folder toc:\zero-trust-scripts\curl.
Step 5: Create the Pre-Backup Script
Create c:\zero-trust-scripts\zerotrust.cmd and paste the curl command copied from the API Explorer. Apply the following modifications:
- Replace all single quotes (
') with double quotes (") — required by Windows batch files. - Add
-d ""to provide an empty POST body. - Add
-kto ignore self-signed certificates. - Adjust the curl binary path to match the OS and installation location.
Example script:
Make sure the IP address or hostname of Eyeglass can be resolved or reached from the backup target host.
curl\curl.exe -k -d "" -X POST --header "Content-Type: application/json" --header "Accept: application/json" --header "api_key: igls-1sbevrp1mogkeg9q6r2usit6fpbkdk9md4umtlpinvm51cnbndqu" "https://172.31.1.102/sera/v2/ransomware/criticalpaths"
Optional: Add exit 0 as the second line to suppress non-zero return codes when a snapshot already exists from a previous run within the hold-off period.
The script creates a log.txt file in the same directory to record each execution.
Step 6: Configure the Pre-Backup Script in Commvault
- In Commvault Console, navigate to the subclient for the backup job.
- Configure the pre-backup script to point to
c:\zero-trust-scripts\zerotrust.cmd. See the Commvault pre-process and post-process commands guide for detailed steps. - Test the script from a command prompt before running a full backup job to verify the API responds correctly.
Step 7: Verify the Integration
-
Run the configured backup job.
-
Review the job execution logs to confirm the pre-backup script ran successfully.
noteIf the previous backup job already created a snapshot within the hold-off period, the script returns a non-zero exit code. This is expected behavior — add
exit 0as the second line ofzerotrust.cmdto suppress warnings on backup jobs. -
Check the Eyeglass running jobs view to confirm the Zero Trust API was reached during the backup run.
Method 2: Commvault Workflow (HttpClient)
This method uses the built-in HttpClient activity in a Commvault workflow to call the Zero Trust API, monitor backup progress, and send an email notification on completion.
The Commvault workflow method requires a valid SSL certificate on the Eyeglass VM. For self-signed certificate setup, see the Commvault Java keystore guide.
Snapshot Behavior
- The Zero Trust API has a hold-off timer that limits snapshot creation to 1 snapshot per hour per critical path.
- Each snapshot has a 4-hour expiry and is automatically deleted after that time.
- To change the default snapshot expiry, see the Zero Trust API administration guide.
Step 1: Create the API Token
Follow the same token creation steps from Method 1 to create a token named commvault.
Step 2: Create the Workflow
In Commvault Control Center, create a new workflow. The workflow:
- Creates a snapshot using the HttpClient activity.
- Monitors backup progress.
- Sends an email notification on backup success.
Step 3: Add HttpClient to the Workflow and Create Variables
-
Add an HttpClient activity to the workflow.
-
Create the following workflow variables:
Variable Type Value URI string https://<igls.fq.dn>/sera/v2/ransomware/criticalpathsapi_key string <igls_criticalPaths_api_key>data string {}
Step 4: Configure the HttpClient Inputs
Set the HttpClient activity inputs as follows:
| Input | Value |
|---|---|
| Post | xpath:{/workflow/variables/URI} |
| Accept header | application/json |
| Content-Type header | application/json |
| api_key header | xpath:{/workflow/variables/api_key} |
Step 5: Deploy and Verify the Workflow
- Save and deploy the workflow.
- The new workflow is now available to execute from the Workflow menu.
- Execute the workflow.
- Review the recent jobs view in Eyeglass to confirm the API was reached.
- Log in to PowerScale and verify that a new critical paths snapshot was created.