Eyeglass ServiceNow API Integration for Cluster Configuration Sync to CMDB
Support Statement
This documentation is provided "as is" without support for 3rd party software. The level of support for this integration guide is best effort without any SLA on response time. No 3rd party product support can be provided by Superna directly. 3rd party components require support contracts. See EULA for more details.
Overview
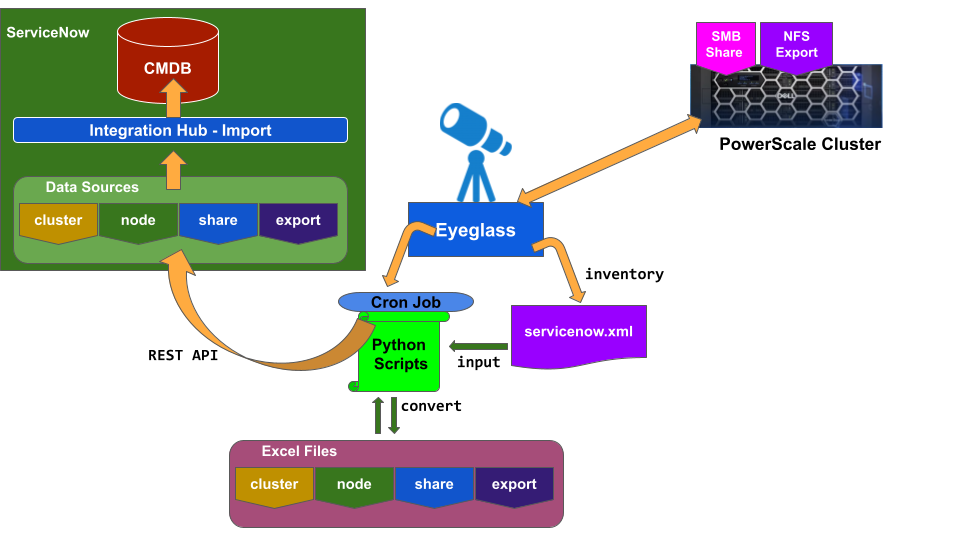
ServiceNow CMDB integration allows cluster storage inventory to be synchronized into a custom CI schema to capture key properties of the cluster — including hardware serial numbers, capacity, usage, SMB and NFS exports, protection status, and quota usage. Customers can fully leverage ServiceNow ITSM with NAS storage.
Eyeglass collects the inventory of PowerScale clusters and populates an XML file named servicenow.xml. This document uses that XML file as the input for importing into the ServiceNow CMDB.
Capabilities
- Create incidents against shares and exports
- Monitor cluster storage capacity and usage within ServiceNow
- Manage maintenance windows and calculate business-impacted services
- Link services and applications to IT resources based on file storage dependencies
- Fully integrate cluster NAS storage into ITSM workflows with ServiceNow
Configuration Diagram
Processes
- Eyeglass collects PowerScale Cluster inventory and populates the
servicenow.xmlfile. - Through the scheduler set in the Eyeglass crontab, Python scripts:
- Convert
servicenow.xmlinto 4 Excel files (Cluster, Node, SMB Share, NFS Export) - Attach those Excel files to ServiceNow Data Sources using the REST API
- Convert
- ServiceNow Integration Hub — Imports:
- Runs on a schedule to automatically import from Data Sources
- Transforms and maps to customized classes and populates the CMDB
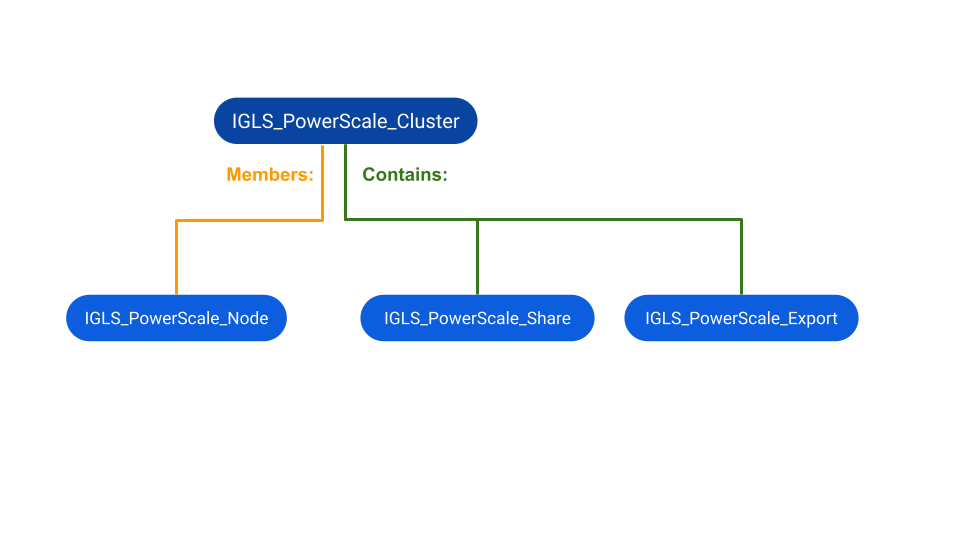
Mapping Class
For this integration, new customized CI classes are created with the following structures:
- Parent Class:
IGLS_PowerScale_Cluster - Child Class 1:
IGLS_PowerScale_Node(Member ofIGLS_PowerScale_Cluster) - Child Class 2:
IGLS_PowerScale_Share(Contained byIGLS_PowerScale_Cluster) - Child Class 3:
IGLS_PowerScale_Export(Contained byIGLS_PowerScale_Cluster)
Creating Customized CI Class Procedure
-
Open CI Class Manager.
-
Click Hierarchy to expand the CI Classes list, then select the class to extend from:
- For the new parent class
IGLS_PowerScale_Cluster: create as a new class directly under the top Configuration Item parent folder structure. - For the children classes (
IGLS_PowerScale_Node,IGLS_PowerScale_Share,IGLS_PowerScale_Export): create as new classes underIGLS_PowerScale_Cluster.
- For the new parent class
-
To create a new class, select the parent class, right-click, and select Add Child Class.
noteThe Add Child Class option only appears if the selected class is extendable.
-
On the Provide Basic Info tab, fill in the following fields:
Field Description Display name A unique label for the class (example: IGLS_PowerScale_Cluster). Appears on list and form views.Table name Auto-populated based on the label with prefix u_cmdb_ci. Can be modified (lowercase, alphanumeric, underscores only; max 80 characters).Description Explanation of the purpose of the class. Icon Icon associated with the class. Extensible Enable for the parent class IGLS_PowerScale_Cluster. Disable for children classes.Principal Class Optional. If enabled, CIs from this class appear in CI list views when the Principal Class filter is applied. -
Click Next and accept all default options for the remaining configuration until the new CI Class is created.
-
Once created, edit the parent class
IGLS_PowerScale_Clusterto add the following attributes:Attribute Type Description Cluster_Name String PowerScale Cluster Name Cluster_GUID String PowerScale Cluster GUID Cluster_LocalSerial String PowerScale Cluster Local Serial Number Cluster_OFSv_Build String PowerScale Cluster OneFS version Build Cluster_OFSv_Release String PowerScale Cluster OneFS version Release Cluster_OFSv_Type String PowerScale Cluster OneFS version Type Cluster_OFSv_Version String PowerScale Cluster OneFS version Version Cluster_OFSv_Revision Integer PowerScale Cluster OneFS version Revision Node_Health String PowerScale Node Health Node_SerialNumber String PowerScale Node Serial Number Node_HDDsize String PowerScale Node HDD Size Node_HDDused String PowerScale Node HDD Used Node_HDDavail String PowerScale Node HDD Avail Share_Name String PowerScale Share Name Share_Path String PowerScale Share Path Share_Zone String PowerScale Share Zone Share_Status String PowerScale Share Status Export_Paths String PowerScale Export Paths Export_Zone String PowerScale Export Zone Export_Status String PowerScale Export Status -
For children classes, set the relationships in the Suggested Relationship section:
Child Child Relationship Parent Parent Relationship IGLS_PowerScale_Node Member of IGLS_PowerScale_Cluster Member IGLS_PowerScale_Share Contained by IGLS_PowerScale_Cluster Contain IGLS_PowerScale_Export Contained by IGLS_PowerScale_Cluster Contain -
Once all 4 CI Classes are created, configure the Integration Import Jobs.
CI Class Relationship View
To view the CI Class relationship between parent and children, click Suggested Relationships from the parent CI Class menu.
Integration Import Configuration
-
Open IntegrationHub → Import tool.
-
Specify the name of the Integration Data Import and provide a short description.
-
Create 4 Integration Import jobs:
Import Job Name IGLS-PowerScale-Cluster IGLS-PowerScale-Node IGLS-PowerScale-Share IGLS-PowerScale-Export -
Set the Source Type to Excel File and upload the initial Excel file manually.
-
In the Map to Target tab, click Add a Mapping and select the target class:
Integration Import Name Mapping Target Class IGLS-PowerScale-Cluster IGLS_PowerScale_Cluster IGLS-PowerScale-Node IGLS_PowerScale_Node IGLS-PowerScale-Share IGLS_PowerScale_Share IGLS-PowerScale-Export IGLS_PowerScale_Export -
Configure the field mappings for each import job. Enable the Match toggle on fields used to identify existing records to support updates instead of creating duplicates.
IGLS-PowerScale-Cluster mapping:
Target Match Source name Enable name Cluster_Name Disable name Cluster_GUID Disable guid Cluster_LocalSerial Disable local_serial Cluster_OFSv_Build Disable build Cluster_OFSv_Release Disable release Cluster_OFSv_Type Disable type Cluster_OFSv_Version Disable version Cluster_OFSv_Revision Disable revision IGLS-PowerScale-Node mapping:
Target Match Source name Enable name\serial_number Cluster_Name Disable name Cluster_GUID Disable guid Node_Health Disable health Node_SerialNumber Disable serial_number Node_HDDsize Disable HDD_size Node_HDDused Disable HDD_used Node_HDDavail Disable HDD_avail IGLS-PowerScale-Share mapping:
Target Match Source name Enable name\zone\name2 Cluster_Name Disable name Cluster_GUID Disable guid Share_Name Disable name2 Share_Path Disable path Share_Zone Disable zone Share_Status Disable status IGLS-PowerScale-Export mapping:
Target Match Source name Enable name\zone3\paths Cluster_Name Disable name Cluster_GUID Disable guid Export_Paths Disable paths Export_Zone Disable zone3 Export_Status Disable status4 -
Set the import schedule (example: run periodically, every hour).
Data Source Table Name and Table Sys ID
For each ServiceNow Data Source, obtain the Table Sys ID to use when attaching the Excel file to the corresponding Data Source.
To get the Table Sys ID, open the Data Source menu, select the data source, and choose Copy sys id.
ServiceNow CMDB
CMDB CI Search
- Switch to the CMDB Workspace view.
- Specify CI search criteria (Class, Field, Operator, Value) and click Search.
- Customize the column view by clicking Edit Columns from the menu and selecting the columns to display.
CMDB Customized View
- Switch to the CMDB Workspace view.
- Click the List button from the left side menu, then click My Lists.
- Click Add New List at the bottom of the workspace.
- Specify a list name, source (CMDB table), and columns, then click Create.
Eyeglass Configuration
Prerequisites
-
Configure the ServiceNow output directory on the Eyeglass VM:
mv /srv/www/htdocs/{servicenow} /srv/www/htdocs/servicenow -
Install the required Python modules:
pip install pandas

pip install openpyxl
XML-to-Excel Conversion Scripts
Convert the servicenow.xml file into 4 Excel files using the following Python scripts placed in /home/admin:
| Script | Output |
|---|---|
igls-convert-cluster.py | igls-powerscale-cluster.xlsx |
igls-convert-node.py | igls-powerscale-node.xlsx |
igls-convert-share.py | igls-powerscale-share.xlsx |
igls-convert-export.py | igls-powerscale-export.xlsx |
igls-convert-cluster.py:
import xml.etree.ElementTree as ET
import pandas as pd

xml_file_path = '/srv/www/htdocs/servicenow/servicenow.xml'
tree = ET.parse(xml_file_path)
root = tree.getroot()
clusters = []

for element in root.findall('.//element'):
    cluster_name = element.find('.//cluster/name').text
    cluster_guid = element.find('.//cluster/guid').text
    cluster_local_serial = element.find('.//cluster/local_serial').text
    cluster_type = element.find('.//cluster/onefs_version/type').text
    cluster_release = element.find('.//cluster/onefs_version/release').text
    cluster_build = element.find('.//cluster/onefs_version/build').text
    cluster_version = element.find('.//cluster/onefs_version/version').text
    cluster_revision = element.find('.//cluster/onefs_version/revision').text
    clusters.append([cluster_name, cluster_guid, cluster_local_serial, cluster_type, cluster_release, cluster_build, cluster_version, cluster_revision])

df = pd.DataFrame(clusters, columns=['name', 'guid', 'local_serial', 'type', 'release', 'build', 'version', 'revision'])
output_file = '/home/admin/igls-powerscale-cluster.xlsx'
df.to_excel(output_file, index=False)
print(f'Data saved to {output_file}')
igls-convert-node.py, igls-convert-share.py, and igls-convert-export.py follow the same pattern — parsing the corresponding XML elements and writing to their respective Excel files. See the legacy portal for the complete scripts.
REST API Attachment Scripts
Attach the Excel files to ServiceNow Data Sources using the following Python scripts placed in /home/admin:
| Script | Task |
|---|---|
igls-snapi-cluster.py | Attaches igls-powerscale-cluster.xlsx to IGLS-PowerScale-Cluster Data Source |
igls-snapi-node.py | Attaches igls-powerscale-node.xlsx to IGLS-PowerScale-Node Data Source |
igls-snapi-share.py | Attaches igls-powerscale-share.xlsx to IGLS-PowerScale-Share Data Source |
igls-snapi-export.py | Attaches igls-powerscale-export.xlsx to IGLS-PowerScale-Export Data Source |
Each script uses the ServiceNow REST API endpoint /api/now/attachment to check for existing attachments, delete them, and upload the new file. Update the following placeholders in each script before running:
instance_url = "https://<servicenow-instance-name>.service-now.com"
username = "<servicenow-user-api>"
password = "<servicenow-password-api>"
table_sys_id = "<specify-target-table-sys-id>"
See the legacy portal for the complete script code.
Master Orchestration Script and Crontab
Combine all scripts into a single servicenow.py for scheduling:
import subprocess

subprocess.run("/opt/.pyenv/shims/python3 /home/admin/igls-convert-cluster.py", shell=True)
subprocess.run("/opt/.pyenv/shims/python3 /home/admin/igls-convert-node.py", shell=True)
subprocess.run("/opt/.pyenv/shims/python3 /home/admin/igls-convert-share.py", shell=True)
subprocess.run("/opt/.pyenv/shims/python3 /home/admin/igls-convert-export.py", shell=True)
subprocess.run("/opt/.pyenv/shims/python3 /home/admin/igls-snapi-cluster.py", shell=True)
subprocess.run("/opt/.pyenv/shims/python3 /home/admin/igls-snapi-node.py", shell=True)
subprocess.run("/opt/.pyenv/shims/python3 /home/admin/igls-snapi-share.py", shell=True)
subprocess.run("/opt/.pyenv/shims/python3 /home/admin/igls-snapi-export.py", shell=True)
As the admin user, create a crontab to schedule the script. Example to run every 30 minutes:
crontab -e
30 * * * * /opt/.pyenv/shims/python3 /home/admin/servicenow.py 2>&1 > /home/admin/mycronout.log