Tenable Vulnerability Management Integration
Support Statement
This documentation is provided "as is" without support for 3rd party software. The level of support for this integration guide is best effort without any SLA on response time. No 3rd party product support can be provided by Superna directly. 3rd party components require support contracts. See EULA for more details.
Overview
The Tenable integration offers static asset sync and Data Attack Surface tracking within Tenable Vulnerability Management (TVM). This allows reports on the Data Attack Surface assets and uses the asset as a target for more frequent scanning schedules. Vulnerability scan results are fully integrated into the AI prediction model within Superna Data Attack Surface Manager.
Solution Brief
Read the Solution Brief with Tenable Vulnerability Management
Key Capabilities
- DASM uses the tagging features in TVM to identify the data risk threat of an asset based on DASM's Data Risk Score. This provides unique data threat risk updates to assets using a continuous threat risk assessment AI-powered model. Assets are tagged with their DASM risk level so they appear in TVM dashboards filtered by data threat level.
- Data Attack Surface Reporting by threat level is now possible within TVM using tags to filter reports based on DASM risk levels.
- Accelerated Scheduling — DASM tags allow automated target scans from existing scan schedules, powered by the tagging feature in TVM.
- Filter Assets by Data Threat Risk — export asset lists for patch remediation filtered by DASM risk level. The asset list view in TVM shows each host with its assigned DASM risk tag (DASM LOW, DASM LOW-MED, DASM MEDIUM, DASM MED-HIGH, DASM HIGH) alongside standard TVM vulnerability data.
- Patch Remediation Automation — use tags to automatically filter remediation projects by data threat risk. Remediation projects in TVM can be scoped to specific DASM risk levels, allowing security teams to prioritize patching on the highest-risk data hosts first.
- Remediation Goals — track Data Risk remediation progress goals. TVM Remediation Goals can be configured per DASM risk level to measure time-to-remediate critical data infrastructure.
Integration Details with Tenable Vulnerability Management (TVM)
The integration between the Superna Data Attack Surface Manager (DASM) platform and Tenable Vulnerability Management (TVM) bridges the gap between asset management and vulnerability intelligence, enabling automated end-to-end vulnerability lifecycle management.
Key supported features:
- Vulnerability Retrieval — DASM regularly acquires vulnerability data from TVM, emphasizing CVE and CVSS scores from vulnerability reports, and uses it to fuel its risk analysis engine for accurate risk evaluation.
- Tag Creation — DASM programmatically generates new tags directly within TVM to categorize and organize assets based on their security context and risk priorities.
- Tag Assignment — DASM automatically assigns tags to the corresponding assets within TVM, enabling effective identification of assets relevant to a specific attack surface risk level.
- Missing Asset Import — DASM detects missing assets and imports them into TVM with the appropriate tags so existing scan schedules pick up previously unscanned hosts.
Video Overview
Integration Architecture
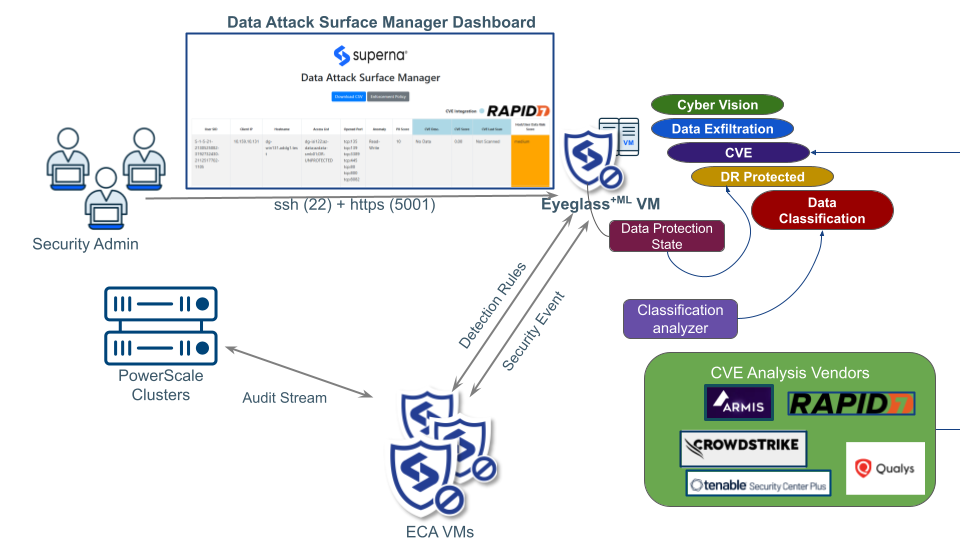
How it Works
- DASM creates a TVM tag with category
DASM Assetand tag valueDA, and sets a rule for dynamic tagging with sourcedasm. - When a new host IP is detected by DASM and is not yet in TVM, it is imported as a TVM asset with its IP address and source set to
dasm. - Based on the dynamic tagging rule, that asset is automatically tagged as
DASM Asset:DA. - Add the
DASM Asset:DAtag to your existing scan settings as a scan target — any new DASM-detected asset is automatically included in the next scan run. - The next scan schedule runs against all assets tagged
DASM Asset:DA. - On the next DASM run cycle, the module checks for available CVE reports for the listed asset IP addresses, extracts CVE information, and combines it with the DASM Data Risk Assessment.
- A separate tagging process applies
DASM Risk Leveltags to each asset based on its current DASM Data Risk Score.
Configuration
Integration Parameters
The integration is managed through two configuration files on the DVM VM.
cvm_ml_variables_update.py
This Python file defines the operational parameters for the TVM scan initiated by DASM. Run this script to update the TVM variables in the DASM–TVM module.
# TVM-TENABLE VM CVE (TENABLE Vulnerability Management)

# Tenable VM Tag variables (default)
TAG_CATEGORY_NAME = 'DASM RiskLevel'
TAG_CATEGORY_DESC = 'DASM Risk Level Category'
TAG_VALUE_1 = 'DASM LOW'
TAG_VALUE_2 = 'DASM LOW-MED'
TAG_VALUE_3 = 'DASM MEDIUM'
TAG_VALUE_4 = 'DASM MED-HIGH'
TAG_VALUE_5 = 'DASM HIGH'
Tenable VM Tag Variables (DASM Risk Level Mapping)
| Variable Name | Description | Default Value |
|---|---|---|
| TAG_CATEGORY_NAME | The name of the Tag Category created in TVM to house the risk level values. | DASM RiskLevel |
| TAG_CATEGORY_DESC | A brief description for the Tag Category. | DASM Risk Level Category |
| TAG_VALUE_1 | The tag value for the lowest risk classification. | DASM LOW |
| TAG_VALUE_2 | The tag value for the low-medium risk classification. | DASM LOW-MED |
| TAG_VALUE_3 | The tag value for the medium risk classification. | DASM MEDIUM |
| TAG_VALUE_4 | The tag value for the medium-high risk classification. | DASM MED-HIGH |
| TAG_VALUE_5 | The tag value for the highest risk classification. | DASM HIGH |
cvm_config_file.json
This JSON file stores the authentication credentials for the Tenable API. This file is stored as an encrypted file on the DVM VM.
{
  "tenablevm": {
    "TENABLEVM_ACCESS_KEY": "YOUR_ACCESSKEY",
    "TENABLEVM_SECRET_KEY": "YOUR_SECRETKEY",
    "TENABLEVM_BASE_URL": "https://cloud.tenable.com"
  }
}
| Parameter | Description | Security Context |
|---|---|---|
| TENABLEVM_ACCESS_KEY | The Public API Key generated from the Tenable VM user interface. | Required credential for authenticating DASM with the Tenable API. |
| TENABLEVM_SECRET_KEY | The corresponding Private API Key that authenticates the Access Key. | Must be protected and used exclusively for API communication. |
| TENABLEVM_BASE_URL | The primary URL endpoint for the Tenable Cloud platform API. | Standard public cloud endpoint. Modify only for air-gapped or government-specific deployments. |
The TENABLEVM_ACCESS_KEY and TENABLEVM_SECRET_KEY grant full programmatic access to the Tenable VM environment and must be treated as sensitive credentials. Obtain them from a user account with permissions to create and manage assets and apply tags within Tenable VM.
Generate API Keys in TVM
- Log in to the Tenable VM console.
- Open Settings → Access Control.
- Create a user for the DASM service account with the following permissions: create, manage scans, and apply tags within Tenable VM.
- Click the service account user and select the API Key tab.
- Generate an API token and record the Access Key and Secret Key for use in the DASM configuration files.
Prepare DASM Asset Tagging in TVM
This procedure is only applicable for the Tenable Vulnerability Management platform. It creates the DASM asset tags in TVM.
- Log in to the Eyeglass VM over SSH.
- Change to the ml-cvm directory:
cd /mnt/ml_data/ml-cvm
- Run the initial setup script:
./cvm_start_tenablevm_setup_tags.sh
- Grant permissions to the tags using the Permissions tab in the Access Control interface. The tags created by the script (
DASM AssetandDASM RiskLevelcategories) must be visible to the service account.
Update Configuration Files
- Edit
cvm_ml_variables_update.pywith your TVM tag variable values (or leave as defaults). - Edit
cvm_config_file.jsonwith your TVM Access Key, Secret Key, and Base URL. - Run the update script to apply the configuration:
cd /mnt/ml_data/ml-cvm
python3 cvm_ml_variables_update.py
Administration and Operations
Data Risk Reporting with TVM
- Open the TVM Reporting interface and select a report type.
- Configure the report name.
- Edit the filters to select the Data Threat risk level for the report — select the
DASM RiskLeveltag category and choose the risk level values to include (for example,DASM HIGHandDASM MED-HIGHfor a critical risk report). - Execute the report to see the scope of vulnerabilities on critical data hosts.
- Download PDF sample report
- Repeat these steps to focus a report on specific Data Attack Surface host risk levels.
Scanning Data Attack Surface
- Open the Scans interface in TVM.
- Create a new scan definition, set the name, and select the DASM risk level tags to use as scan targets.
Different scan schedules for different Data Risk Levels can be configured by selecting only the tag for the specific risk level — for example, schedule daily scans for DASM HIGH hosts and weekly scans for DASM MEDIUM hosts.
- Set the scan schedule based on your requirements.
- Launch the scan — all assets tagged with the selected DASM risk level tags will be included.
Patch Remediation with TVM
The TVM and DASM integration enables seamless reporting and goal setting to monitor Data Security Posture improvements through better risk assessment and prioritized vulnerability reduction.
Creating a Remediation Project:
- Open the TVM Remediation interface.
- Create a new remediation project and scope it using DASM asset tags to target specific risk levels.
- Set a remediation due date.
Remediation Goals:
Remediation Goals allow monitoring of your data attack surface patch goals to measure time-to-remediate critical data infrastructure. Configure a Remediation Goal per DASM risk level to track progress separately for each risk tier — for example, a goal to remediate all DASM HIGH vulnerabilities within 30 days and all DASM MEDIUM vulnerabilities within 90 days.