Event Processing and Actions Available
Introduction
This page covers how a security event is processed from initial detection through to closure, and the actions available to you at each stage — including extending snapshot expiry with Retain Snapshots. For the Investigate & Recover tabs you use to review an event in detail, see the subpages below: Snapshots Tab, Assets Tab, and Activity Log Tab.
For the severity-by-severity response playbook, see Triage workflow by severity on the main Threat Detections page.
Event lifecycle — detection through closure
Every security event follows the same path from initial detection through to closure. Application Fingerprinting (AFP) is the first gate in the process — it determines whether a new detection resembles known safe application behavior before it is surfaced as an active event requiring your attention.
The full event flow
1. Detection and AFP assessment
Audit events from the PowerScale cluster stream continuously into the ECA. The threat detectors evaluate these events in parallel. When Signal Strength crosses the Warning threshold for a user, a new security event is raised.
Before the event appears in the Active Events list, Application Fingerprinting evaluates it against its database of known safe behavioral patterns. Two outcomes are possible:
- AFP match — Known Behavior: The event closely resembles a pattern that has previously been classified as safe (confidence score above the configured threshold). The event enters Threat Assessment state, on the Active Events tab but filtered out by default — enable Show → Events in Assessment to see it. Once the event timer expires, it is automatically closed and moved to History as Known Behavior. No lockout occurs. No alert is sent. The full event detail is preserved for audit purposes.
- AFP no match — Active Event: The event does not sufficiently resemble any known safe pattern. It moves into the Active Events list with a severity of Warning, Major, or Critical.
2. Snapshots (if enabled)
If snapshots are enabled in your configuration, they are taken as soon as the event becomes active — before the lockout decision is made. Snapshot priority follows the configured budget logic: critical-path snapshots are taken first, then user-share snapshots, respecting the quota. This ensures recovery points exist even if the quota is hit before all shares are snapshotted.
3. Lockout (if enforcement is enabled)
- Warning severity: No lockout. A countdown timer begins. If the activity stops and no further signals arrive before the timer expires, the event auto-closes.
- Major severity: A delayed lockout timer begins. Administrators have the countdown window to investigate and either stop or accelerate the lockout.
- Critical severity: Immediate lockout. The user's SMB access is revoked across all accessible shares on all managed clusters with no grace period.
4. Investigation
Once the event is active, review the available information to determine whether this is a genuine threat, an expected behavior, or something in between.
Start with the event detail slide-out panel, which shows the threat categories that fired, the Signal Strength breakdown by detector, and the top file operations (Create, Delete, Rename, Other).
The Details section of the slide-out panel lists the following fields for the event:
| Field | Description |
|---|---|
| Severity | The event's current severity level (Warning, Major, or Critical). |
| Client IPs | The IP address(es) of the user's machine associated with the detected activity. |
| Device | The managed PowerScale or ECS cluster where the activity was detected. |
| Items Affected | The number of files associated with the event across all signals. |
| Threat Category | The specific detector(s) that fired for this event — for example, Suspicious Extension or Data Encryption. |
| State | The event's current lifecycle state — see Security Event States. |
| Time Detected | The timestamp when the event was first raised. |
| Locked Out | The timestamp when the user's access was revoked, shown only if a lockout has occurred for this event. |
| Event ID | The unique identifier for the event, referenced when opening a support case or cross-referencing alarms. |
Key questions to guide your investigation:
- How many threat detectors fired? A single detector firing is weaker evidence than three or four firing simultaneously. Check the Signal Strength breakdown.
- What shares are affected? Review the shares listed in the event — do they contain sensitive data?
- What operations were performed? Mass renames and extension changes are stronger signals than reads alone.
- What does the file activity look like? Open Investigate & Recover → Items & Recovery to see the affected file paths and operation types.
- Is there a plausible explanation? Contact the user directly or check with their manager. Was there a scheduled script, a backup job, a migration, or an application deployment that could explain the pattern?
- What is the user doing right now? Use WireTap to stream live file system events for the affected user and confirm whether the activity has stopped or is continuing.
- Is your security team involved? If you have integrated with a SIEM or SOAR platform, the system will have sent a payload with event details to your security tools. Your SecOps team can correlate this detection with other signals in their environment. For integration setup, see Integrations.
5. Closing the event
Based on your investigation, close the event with the appropriate closing state. See Closing Event for the full Close Event wizard walkthrough and the five closing states.
Actions menu reference
Each event row on the Threat Detections page has an Investigate button and a separate three-dot Actions menu (also referred to as Take an Action in the product). Investigate is a standalone button, not one of the Actions menu's list items — it opens the Investigate & Recover page for the event, showing the Items & Recovery, Snapshots, Assets, and Activity Log tabs.
The Actions menu itself groups its items into three families — Snapshots, User Lockout, and Event Processing. Available actions vary depending on the event's current state — see Available actions by event state below.
| Group | Action | What it does |
|---|---|---|
| Snapshots | Create Snapshot | Takes an on-demand snapshot of the affected shares, independent of the automatic event-detection snapshot. |
| Snapshots | Delete Snapshot | Deletes a snapshot taken for this event. |
| Snapshots | Retain Snapshots | Extends the expiry of the snapshots taken by this event, giving you more time to investigate and recover before they're purged. See Retain Snapshots below for the two ways to extend expiry and how they interact with the current expiry date. |
| User Lockout | Restore User Access | Removes the lockout (DENY permission) and restores the user's access to previously locked shares. Available only while the user is locked out. |
| User Lockout | Lockout Now | Immediately revokes the user's SMB access across all accessible shares, without waiting for a delayed-lockout timer to expire. |
| User Lockout | Stop Lockout Timer | Cancels a pending delayed lockout before it applies automatically — the control the Major-severity grace period exists for. See User lockout behavior by mode. |
| Event Processing | Mark as Recovered | Marks the event's affected data as recovered without running it through Recovery Manager. Only available for Security Guard–sourced events and for historical events — not a general action on standard active threat events. |
| Event Processing | Archive as Unresolved | Moves the event to History without a final classification, for cases where the event needs to be closed out administratively but does not fit one of the standard closing states. |
| Event Processing | Archive as False Positive | Marks the event as a false positive, contributing to Application Fingerprinting's learning of safe behavior patterns. |
| Event Processing | Comment | Adds a free-text note to the event's Activity Log timeline, without changing its state. |
Available actions by event state
| Event state | Available actions |
|---|---|
| Monitor / Warning (see Monitor and Warning) | Acknowledge · Lockout Now · Close Event · Comment · Create / Delete / Extend Snapshot |
| Delayed Lockout | Stop Lockout Timer · Lockout Now · Comment · Create / Delete / Extend Snapshot · Close Event |
| Locking (see Locking state) | Comment |
| Lockout | Restore User Access · Comment · Create / Delete / Extend Snapshot · Close Event |
| Restoring (see Restoring state) | None — this is a brief, automatic transition state |
| Restored Access | Close Event · Lockout, to re-apply if access should not have been restored · Comment |
Acknowledge transitions the event to Acknowledged state without closing it. Close Event opens the Close Event wizard on the Closing Event page. Extend Snapshot in this table refers to Retain Snapshots above. The action is labeled plain Comment in the 2.15.0 GUI.
Retain Snapshots
You can extend the expiry of the snapshots taken by a security event, giving yourself more time to investigate and recover from a threat before those snapshots are purged.
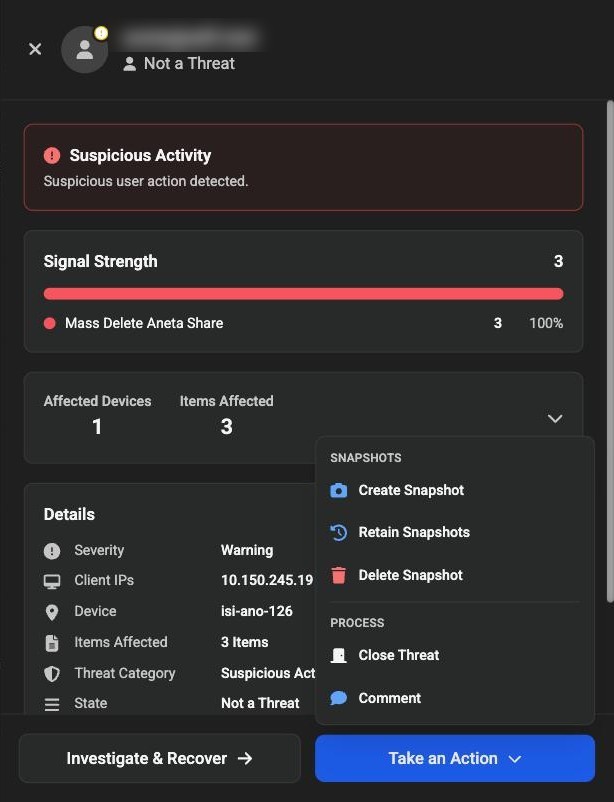
Select Take an Action → Retain Snapshots on the event to open the New Snapshot Retention dialog:
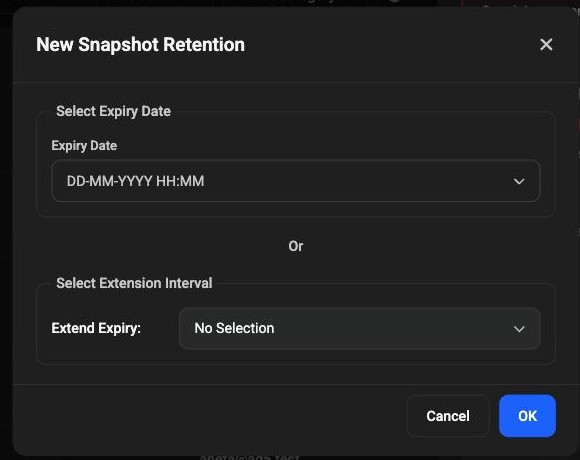
Choose one of two mutually exclusive ways to extend expiry:
- Select Expiry Date — pick a specific date and time (
DD-MM-YYYY HH:MM). All snapshots taken by this event will expire on this date — unless that date is earlier than the snapshots' existing expiry, in which case the existing (later) expiry wins. Extending never moves expiry earlier, only later or leaves it unchanged. - Select Extension Interval — pick a duration from the Extend Expiry dropdown. The interval is added to the snapshots' current expiry, not to today's date. For example, if the snapshots were already set to expire after 2 days and you apply a 3-day extension, they now expire after 5 days (2 + 3), not 3 days from now.
Click OK to apply the new expiry, or Cancel to close the dialog without making changes.
The default expiry period applied to snapshots when an event is first detected is configurable — see Snapshot Settings (Snapshot expiry setting). Retain Snapshots only affects the snapshots tied to this specific event; it doesn't change the default expiry applied to future events.
See also
- Snapshots Tab — Review the snapshots taken automatically when the event was detected.
- Assets Tab — Review share permissions for the affected user across all impacted shares.
- Activity Log Tab — Full chronological audit trail and investigation comments for the event.
- Recovery — Recover affected data using Recovery Manager.
- Closing Event — The Close Event wizard and the five closing states.
- Security Event States — Full state and available-actions reference.
- Threat Detections — Overview — Terminology and the severity-by-severity triage workflow.