Airgap for ECS
Introduction
The add-on solution for Data Security for ECS offers maximum data protection with an automated cyber vault. This solution provides Enterprise Airgap capabilities, ensuring secure data isolation and automated synchronization for your ECS environment. It fully integrates with existing ECS infrastructure, simplifying compliance with the NIST cybersecurity framework.
The Enterprise Airgap for ECS automates data synchronization using a containerized ECS Sync, providing high throughput and scalability. The Vault agent manages job scheduling directly, eliminating the need for complex out-of-band setups.
Limitations
ECS AirGap has the following limitations:
- 200 buckets
- 100 million objects per bucket
- No CAS support
Deployments exceeding these limitations are not supported and cannot be provisioned by Superna.
Data Security Compliance with NIST Key Framework Attributes
| Framework Attribute | How Data Security Complies | Compliance Status |
|---|---|---|
| Identify | Threat identified by user name and IP address | Compliant |
| Protect | Stops the threat with user lockout in real time | Compliant |
| Detect | User behavior-based, tripwire, and well-known extension detection | Compliant |
| Respond | Alerting email, syslog, and automated snapshot creation | Compliant |
| Recover | Object level tracking and recovery from bucket versions | Compliant |
Key Features
- S3 to S3 Airgap Support: Supports secure replication between S3 buckets.
- Inside-the-Vault Automation: Provides seamless automation capabilities within the vault environment.
- Enterprise Airgap: Hardened solution with in-band management, offering complete automation from a VM inside the vault.
- Smart Airgap Technology: Synchronizes data only when safe, reducing risks. Scheduling is managed by the Vault agent for reliable control.
- Per S3 Bucket Level Replication: Supports granular replication at the individual bucket level.
- Data Immutability: Uses ECS object lock and bucket versioning to protect data from unauthorized modifications.
- Rapid Recovery: The ECS cluster in the vault provides an immutable data copy at petabyte scale, ensuring integrity during recovery.
- Many-to-One Protection: Allows you to consolidate multiple source ECS clusters into a single ECS Vault cluster.
- IAM User Lockout: Locks out IAM users to prevent unauthorized actions.
- Job History and Reports: Access detailed job history and airgap reports through the user interface. Reports can also be emailed on a schedule.
- In-Band Management and Alerts: Monitor Vault storage capacity, hardware, and space availability with managed alerts.
Prerequisites
The following table outlines the different requirements for AirGap to work correctly on ECS.
| Category | Details |
|---|---|
| Server Requirements | Dell Server model PowerEdge R450 with VMware 7.x, RAID 1 SSD 800GB, 128GB RAM, dual 10G NIC, dual socket (48 threads), 128GB RAM (Cart #3000111987102). Support Options: - 3-year support NBD OR - Pro-deploy plus |
| Vault ECS | Sized to the quantity of data needed for vault protection. |
| Optional Equipment | Production Network: - Ethernet switch or Firewall to connect Vault Agent Host. Vault Network: - Ethernet switch to connect Vault Agent Host to private network connected to the Vault ECS cluster. |
| Load Balancer | Progress Kemp LoadMaster. Installation service required. |
| Dell Services | - Physical installation of Dell Server host. - ECS Vault cluster + Hardening configuration. |
| Superna Services | - Airgap Design and Implementation Service. - Ransomware Defender for ECS Installation, Configuration, and Knowledge Transfer. |
| Scalability | 1, 3, or 6 Vault Agent VMs in a cluster for high availability and high-throughput object-to-object async copying. |
| Software | - Ransomware Defender for ECS. - Enterprise Airgap. |
Performance Considerations
-
Get Up-to-Date Performance Estimates
For the latest performance metrics, refer to ECSSync's performance page: General Performance Metrics.
-
Recommendations and Best Practices
-
Use five job definitions per Airgap ECSSync instance for optimal performance.
-
Throughput rates per ECSSync instance are detailed in the link above. Enterprise Airgap can scale from 3 to 99 instances as needed.
-
Load Balancer Support
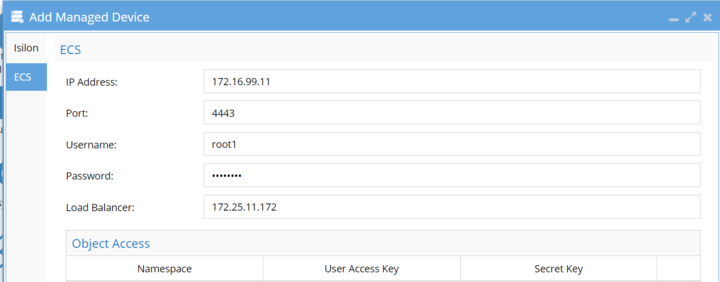
If you have a load balancer in front of your ECS, configure its IP during the "Add Managed Device" step. To access this option, navigate to Eyeglass Menu -> Add Managed Device -> ECS. This links the load balancer's IP to your ECS and ensures that airgap jobs managed by the vault agent connect to the correct ECS cluster.
Deployment Diagram
Configuration
-
Follow the Installation Guide for Ransomware Defender for ECS
Ransomware Defender for ECS. -
Deploy Dell Vault Hardware
Deploy the Dell Vault hardware with VMware pre-installed. -
Deploy Enterprise Vault Agent ECA Cluster
Deploy the Enterprise Vault Agent ECA cluster to the vault hardware. Refer to the guide for details. -
Configure Firewall Settings
Configure the firewall as specified in the port table in the "Firewall Requirements" section. -
Install Enterprise Airgap License Key Install the Enterprise Airgap license key in Eyeglass using the License Manager.
-
Access License Manager
- Go to Eyeglass Main Menu -> License Management.
- Navigate to: License Management > Manage Licenses > Browse.
- Upload the zipped file downloaded in the previous step.
tipFor more information, see Register Superna License
-
-
Set Up Eyeglass IP Address and )API Token on Vault Agent
-
Set Up Eyeglass
- Open the main menu in Eyeglass and select "Eyeglass REST API."
- Create a new token, name it "vault," and copy the token. Use this value where "yyyyyy" is required.
tipfor more information regarding "Eyeglass REST API", see "Token Generation and Authentication".
-
Configure Vault Agent
-
Log in to the vault agent as
ecaadmin. -
Open Configuration File
-
Run the following command to open the configuration file:
nano /opt/superna/eca/eca-env-common.conf
-
-
Add Eyeglass Location
-
Add the Eyeglass location:
export EYEGLASS_LOCATION=x.x.x.x
-
-
Add Eyeglass API Token
-
Add the Eyeglass API token:
export EYEGLASS_API_TOKEN=yyyyyy
-
-
Enable Object Services for Enterprise Airgap
-
Enable Object Services for Enterprise Airgap:
export ECS_SYNC_CFG=true
-
-
Save and Exit Configuration
- Save and exit the configuration file using
control + x.
- Save and exit the configuration file using
-
Restart ECA Cluster
-
Restart the ECA cluster:
ecactl cluster down
ecactl cluster up
-
-
-
-
Follow These Steps to Configure the Vault Agent
-
Add ECS Clusters to the Vault Agent
-
Run the following command to add ECS clusters to the vault agent:
ecactl ecs add --host x.x.x.x --user <user> -
Enter the IP address of the management interface and the service account user. Refer to the Eyeglass Service Account Minimum Privileges for details.
-
Repeat the process for each managed production and vault ECS cluster.
-
Verify Configuration
-
To verify the added clusters, run:
ecactl ecs list
-
-
-
One-Time ECS Sync Instance Configuration
-
Access the ECS Sync UI:
https://x.x.x.x/ecssyncui -
Login Credentials
- Log in with
ecaadminand the default password3y3gl4ss.
- Log in with
-
Configure Path and Email Address
- Click the Config tab and enter the config path
/opt/emc/ecs-sync/configand provide an email address
noteThis email will not be used for any alerting but is required as an input
- Click the Config tab and enter the config path
-
Update Sync Settings
- Uncheck the option labeled "Auto Archive: automatically archive completed syncs."
-
Configure ECS Sync Jobs
- Access ECS Sync UI
-
Access the ECS Sync UI:
https://x.x.x.x/ecssyncuiinfoEach vault agent has an ecssync container, enter the ip address of each instance to add jobs to the copy engine
-
Login Credentials
- Log in using
ecaadminand the default password3y3gl4ss.
noteAlways change the default password. Follow the steps provided in the ECA Cluster Operational Procedures guide for details.
- Log in using
-
Add Jobs
- See detailed steps below for adding jobs in the "How to Create ECSSync Jobs" section.
-
Save Jobs
- Save the job configurations after making changes.
-
- Access ECS Sync UI
-
Add ECSSync Jobs to Vault Agent
Add ECSSync jobs to the vault agent for management and integration with Eyeglass.-
List Configured Jobs
ecactl ecssync listjobsThis command lists all configured jobs.
-
Add Job to Managed List
ecactl ecssync addjob --job xxxx
infoReplace
xxxxwith the job name from the list. This adds the job to the managed job list. -
-
Push ECS Job Definitions to Eyeglass
- Register Jobs
-
Push all defined and added jobs to the vault agent for management, monitoring, and scheduling in Eyeglass.
ecactl ecssync updatejobs
-
- Register Jobs
-
Log in to Eyeglass
- Open Airgap Icon
- Access ECS Sync Config Tab
- The newly added jobs should appear automatically and show a status of "Not Scheduled."
- Enable Ransomware Defender Airgap Control
- Click the checkbox to enable Ransomware Defender Smart Airgap control and set the schedule for each ECS Sync job listed.
- Save Changes
- Click "Save" after making any changes to a policy.
- Set the schedule and save
- Repeat for each policy that displays not scheduled.
-
-
Open Jobs Icon to Enable the Job
- Click the jobs icon to enable the job.
- The default state is disabled, and no sync jobs will run until enabled.
-
Verify Vault Agent Schedule Change
-
Log in to the vault agent.
-
Run the command to list schedules:
ecactl ecssync schedules -
The schedule should be displayed for each policy configuration.
-
-
Test a Sync Job
-
Start a Job from Vault Agent CLI
-
Run the following command to force start a job:
ecactl ecssync startjob --job xxxxReplace
xxxxwith the name of the policy configured, which you can verify by running:ecactl ecssync checkjobs -
Verify Job Status in ECS Sync GUI
- Once the sync job has been started from the command line, you can verify the status directly in the ECS Sync GUI.
- Navigate to the "Status" tab in the ECS Sync UI.
- Look for the "Active Operations" section, where you will see the job listed along with its progress details.
- The job should display a progress bar indicating the completion percentage. It will show "100% Complete" once the job finishes successfully.
- Verify that there are no errors reported under the job entry. The "ETA" and "data transfer rate" will also be displayed for additional context.
noteDo not archive jobs. They are managed by the Vault Agent, and archiving them manually can disrupt job management.
- List All Jobs
- List all configured and active jobs in the Vault Agent for monitoring and review.
-
-
-
-
Done
Pre and Post-Script Hooks for ECS AirGap
This section explains how ECS AirGap uses pre- and post-scripts to provide an additional layer of network isolation for the Vault Agent by programmatically enabling and disabling network interfaces.
How the Network Isolation Works
Network Topology
The standard deployment uses a Vault Agent VM with two interfaces:
[PROD ECS] ----- [FIREWALL] ----- <eth1>[VAULT_AGENT]<eth0> ----- [VAULT ECS]
eth1is the external interface.eth0is the internal interface.
When opening or closing the Vault, ECS AirGap interacts only with the external interface.
Vault State Behavior
- When the Vault is closed,
eth1is disabled. - When the Vault is open,
eth1is enabled. - When the Vault is closed, the ECS source cannot be accessed by
ecssync, and replication does not occur.
Enabling the Feature
To activate this functionality, set the following variables in eca-env-common.conf:
export EVA_NTW_USE_SCRIPTS=true
export EVA_NTW_SCRIPTS_HOST_INT_IP=<internal-ip-address>
Where <internal-ip-address> is the IP assigned to the internal interface (eth0).
Script Files Used
The following files control network operations.
Interface Configuration
File: /opt/superna/eca/scripts/network-scripts/iface.config
Add the interface name that must be enabled or disabled:
eth1
Pre-Script (Open Vault)
File: /opt/superna/eca/scripts/network-scripts/pre-script.sh
This script enables the external interface and is automatically called before any operation that requires network connectivity.
Post-Script (Close Vault)
File: /opt/superna/eca/scripts/network-scripts/post-script.sh
This script disables the external interface after all operations finish.
Custom Script Locations
Customers can define custom paths for the scripts in eca-env-common.conf:
export EVA_NTW_SCRIPT_PRE="/opt/superna/eca/scripts/network-scripts/pre-script.sh"
export EVA_NTW_SCRIPT_POST="/opt/superna/eca/scripts/network-scripts/post-script.sh"
The directory must also contain the iface.config file.
If custom paths are used, upgrade processes will not overwrite these files. However, cluster startup will require a password so the sudoers file can be updated with the new paths.
When the Scripts Run
Automatic Execution
Pre- and post-scripts are triggered automatically before or after operations that require the Vault to be open:
- Running an ecssync job
- Sending jobs to Eyeglass
- Sending alerts from Vault ECS to Eyeglass
- Retrieving schedules from Eyeglass UI
- Uploading Vault Agent logs to Eyeglass
Manual Testing
You can test the scripts by running any command that requires the Vault to be opened:
ecactl ecssync startjob --job <jobName>
ecactl ecssync updatejobs --force true
ecactl ecs pushalerts
ecactl ecssync schedules
ecactl ecssync pushvaultagentlogs
Operations That Do Not Trigger Scripts
The following commands do not interact with networking:
- Add, clone, remove, or list jobs
checkjobs- Add, remove, or list ECS Vault
Operation Tracking Logic
ECS AirGap tracks running operations that require the Vault to remain open.
- The pre-script is skipped if the Vault is already open.
- The post-script runs only after the final active operation completes.
- This prevents unnecessary interface toggling.
Maintenance Window
A maintenance window keeps the network open for a defined time period even if no jobs are running.
Open Vault for a Fixed Interval
ecactl ecssync openvault --interval 10
Check Vault Status
ecactl ecssync checkopen
This displays:
- Remaining maintenance window time
- Active operations that require the Vault to stay open
Force Vault Closure
ecactl ecssync closevault
This command closes the Vault and cancels any maintenance window. Running jobs that require network access may stop.
Troubleshooting
Verify Environment Variables
Confirm eca-env-common.conf contains:
export EVA_NTW_USE_SCRIPTS=true
export EVA_NTW_SCRIPTS_HOST_INT_IP=<internal-ip-address>
Verify Interface Configuration
cat /opt/superna/eca/scripts/network-scripts/iface.config
Verify Sudo Configuration
Ensure the following exists in:
/opt/superna/eca/eca-env-defaults.conf
export EVA_NTW_SCRIPTS_NEED_SUDO=true
Verify Sudoers File
/etc/sudoers.d/ecssync_ntw
This file must include the full script paths.
Connectivity Check
From inside the Vault Agent container:
docker exec -it vaultagent bash
ssh ecaadmin@<internal-ip>
The connection must succeed without prompts.
The internal IP must exist in:
/home/ecaadmin/.ssh/known_hosts
How to Create ECSSync Jobs
-
Log in to each instance of ECSSync on each Vault Agent VM by using
https://x.x.x.x/ecssyncui/. (Each Vault VM hosts an instance of ECSSync to balance the workloads.) -
Select the Status Tab and click on the New Sync button.
IMPORTANT- The job name is mandatory and must be unique across all instances of ECSSync
- Select the same ECS for source and destination.
- Selecting the "Include Versions" checkbox will increase copy time significantly.
- The Key Prefix field allows you to select a location within a bucket.
- The source and target host IP address should specify the load balancer DNS name or ip address for the source production cluster and the load balancer in the secure network for the Vault ECS.
-
The following fields must be configured when creating the source side of the policy:
- Job Name: Add the desired AirGap job name with prefix
rw-airgap-. Must be unique across all instances of ECSSync. - Source: Always set to ECS S3.
- Protocol: Always set to http.
- Vdcs: Leave this field blank.
- Host: Data IP for the ECS production cluster. Use the Load Balancer DNS name or IP address.
- Port: Always set to 9020.
- Access Key: Bucket Owner user on ECS production.
- Secret Key: Key generated for the Bucket Owner user on ECS production.
- Bucket Name: Bucket name on ECS production.
- Key Prefix (Optional): Allows selecting a location within a bucket.
- Include Versions (Optional): Selecting this checkbox will significantly increase copy time. Enable only if Bucket Versioning is configured.
- Hide Advanced Options: Click this option and enable Mpu Enabled to allow high-performance multipart copies for large objects.
noteThis accelerates copy operations using multiple threads per object and is always recommended for larger objects.
- Job Name: Add the desired AirGap job name with prefix
-
To enable high performance multipart copies for large objects, click the Hide Advanced button. This will accelerate the copy with multiple threads per object. (This is always recommended for larger objects.)
Then configure the following fields for the target (Vault) configuration:
- Target: Always ECS S3
- Protocol: Always HTTP
- Vdcs: Leave blank
- Host: Data IP for Vault ECS cluster (Load Balancer in the secure network for the Vault ECS)
- Port: Always 9020
- Access Key: Bucket Owner user on ECS vault
- Secret Key: Key generated for the Bucket Owner user on ECS vault
- Bucket Name: Bucket name on ECS vault (must be created manually on Vault ECS before creating this job)
- Key Prefix: Allows selecting a location within a bucket (optional)
- Mpu Enabled: Optional
-
Click the start button to save the configuration and start the copy process.
If the Vault is open, the job can begin successfully. If the Vault is closed, the job will fail, and can be scheduled by Eyeglass for a later time.
How to Clone ECSSync Jobs
Use these steps to clone a job and change the source or destination bucket.
-
Run from Vault agent on the airgap VM
-
Execute the clone job command:
ecactl ecssync clonejob --job jobname --newname jobname1 -
View the full command help:
ecaadmin@cpvault01-1:~> ecactl ecssync clonejob --help
usage: ecactl ecssync clonejob [-h] --job JOB --newname NEWNAME [--sourcebucket SOURCEBUCKET] [--destbucket DESTBUCKET] [--sourceusername SOURCEUSERNAME] [--destusername DESTUSERNAME]
[--sourceuserkey SOURCEUSERKEY] [--destuserkey DESTUSERKEY] [--sourceconnstr SOURCECONNSTR] [--destconnstr DESTCONNSTR]

optional arguments:
-h, --help show this help message and exit
--job JOB Name of the ecs-sync job we want to clone in vault agent
--newname NEWNAME The name of the new job
--sourcebucket SOURCEBUCKET
The source bucket of the new job
--destbucket DESTBUCKET
The dest bucket of the new job
--sourceusername SOURCEUSERNAME
The user name on source for the new job
--destusername DESTUSERNAME
The user name on destination ECS for the new job
--sourceuserkey SOURCEUSERKEY
The user secret key on source for the new job
--destuserkey DESTUSERKEY
The user secret key on destination ECS for the new job
--sourceconnstr SOURCECONNSTR
--destconnstr DESTCONNSTR
-
-
To set the schedules of the jobs, use the eyeglass CLI
-
Execute the schedule set command:
igls airgap schedule set --job 10.152.0.73_rw-airgap-20-clona5_cpvault01 --cronstr '28 * * * *' -
The cron string sets the schedule.
noteFor a job called jobname in VA (Vault Agent), in eyeglass those jobs have format:
source_jobname_vaultagentid -
Airgap Operations
Monitoring Vault ECS Cluster Alarms and Free Space
- Log in to the Eyeglass VM.
- Review alarms retrieved from the vault cluster:
- Click on the Alarms icon on the Desktop of the Eyeglass Web UI.
Monitoring ECSync Job Success and Failures and Policy Sync Job Reports
- Log in to Eyeglass.
- Click on the Airgap icon.
- Click on Airgap Reports.
- Click the Open button to view the reports.
- Note: Reports are also emailed.
Monitoring Job History
- Log in to Eyeglass.
- Click on the Airgap icon.
- Click on Job History.
- Click each job to view details.
Vault Agent CLI Commands for Airgap
Adding ECS and Vault Clusters to the Vault Agent
Add an ECS Cluster
Use this command to add an ECS production cluster:
ecactl ecs add --host <host> --user <user>
<host>: Management IP address of the ECS.<user>: Service account created on the ECS.
List ECS Clusters
View all ECS clusters currently registered:
ecactl ecs list
Delete an ECS Cluster
Remove an ECS cluster from the Vault Agent:
ecactl ecs delete
Retrieve ECS Alerts
Forward alerts from all registered ECS clusters to Eyeglass:
ecactl ecs pushalerts
Managing ECS Sync Jobs, Schedules, Logs, and Updates
Starting a Job
Run an ECS Sync job immediately on the instance that owns it:
ecactl ecssync startjob --job <job_name>
<job_name>: The name of the ECS Sync job.
Checking Job Status
Retrieve the status and summary of all ECS Sync jobs across instances:
ecactl ecssync checkjobs
Viewing Job Schedules
Display the schedules configured in Eyeglass:
ecactl ecssync schedules
Pushing Support Logs
Send Vault Agent logs to Eyeglass for support or troubleshooting:
ecactl ecssync pushvaultagentlogs
Updating Eyeglass Jobs
Push ECS Sync jobs created in the GUI to Eyeglass for management and scheduling:
ecactl ecssync updatejobs
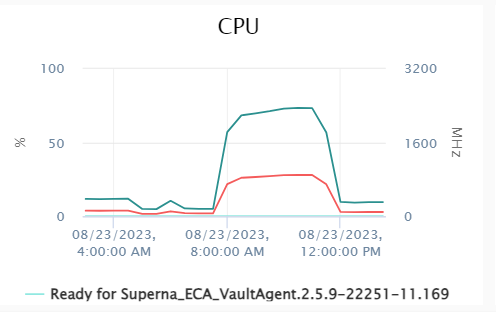
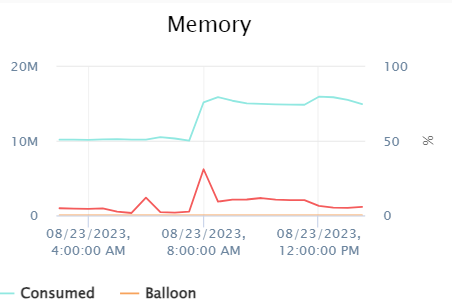
CPU and Memory Graphs During Copy
CPU Usage Graph:
Memory Usage Graph:
Troubleshooting
Resolving Certificate Issues in ECS
If you encounter certificate-related issues with the ECS container, follow these steps to resolve:
Step 1: Generate and Export Certificate
Run the following command to generate the certificate:
echo Q | openssl s_client -showcerts -connect <ECS_IP>:9021 | sed -ne '/BEGIN/,/END/{p}' > storage.cer
Editing storage.cer is not required as there is only one certificate.
Step 2: Copy Certificate to Container
Copy the certificate into the container:
docker cp storage.cer ecssync:/tmp
Step 3: Access Container Shell
Get into the ECS Sync container shell:
docker exec -it ecssync bash
Step 4: Add Certificate to Java CA Keystore
Run the following command to add the certificate to the Java CA keystore:
keytool -keystore /etc/pki/ca-trust/extracted/java/cacerts -storepass changeit -importcert -alias <cert_name> -file /tmp/storage.cer
Step 5: Verify Certificate Installation
Verify that the certificate is present:
keytool -list -keystore /etc/pki/ca-trust/extracted/java/cacerts -storepass changeit | grep <cert_name>
Step 6: Exit Container Shell
Run command to exit out of container shell:
exit
Step 7: Get Container ID
Get the Docker Container ID of ecssync container using command:
docker ps
Step 8: Commit Container Changes
Run command:
docker commit <Container_ID> eca/ecssync:<tag_name>
Run docker ps again to verify that the new image tag is present.
Step 9: Update Docker Compose Configuration
Update the docker-compose.vaultagent.yml with the new tag.
Run command:
vi /opt/superna/eca/docker-compose.vaultagent.yml
Add the following line with correct indentation and save:
image: "eca/ecssync:<tag_name>"
Step 10: Restart ECA Cluster
Do cluster down and up:
ecactl cluster down
ecactl cluster up
The certificate should now be properly configured and the issue resolved.
See Also
For installation and operations for Airgap for PowerScale, see the Airgap Installation guide and Airgap Jobs guide.