Alerts Handling
The Superna Data Security Essentials provides alerting capabilities through two primary channels:
- Email Notifications
- Windows Event Log Integration
Alerts are sent via email to designated recipients, ensuring immediate awareness of critical events. Administrators can specify the email accounts to receive notifications. See the Email Configuration section to review email setup instructions.
Additionally, the software supports Windows Event Log integration, allowing alerts to be seamlessly integrated with any Security Information and Event Management (SIEM) system. This integration enables comprehensive monitoring and centralized management of alerts across the organization's IT infrastructure.
The alert syntax allows filtering alarms within SIEM alarm forwarding.
Each alert is stored in the data section of every Windows event log entry generated by Data Security Essentials. The format is UTF-8 JSON.
ServiceNow Integration
How to Configure Data Security Essentials
Data Security Essentials saves alerts to the Windows Event log to a custom application log. This integration will extract the log entries and the json payload contained within them and format as webhook data to send to ServiceNow Scripted Endpoint.

Requirements
- Follow the ServiceNow integration steps above to configure the Scripted REST API endpoint.
- Install Python for Windows on the Data Security Essentials host, ensuring it's added to the system path during installation: Python for Windows.
note
Install for all users to allow service accounts access.
- The integration code matches event log entries from Custom Trigger BOT policies and File Management policies.
- Event log source names:
- Superna Data Security Essentials BOT Service
- Superna Data Security Policy Engine
Features
-
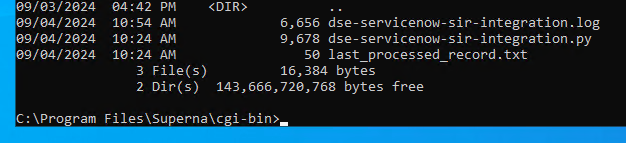
Logging: Logs for each execution are stored in a designated path with the Python code.
-
Event Record Tracking: Each execution saves the last processed event’s details (ID, date, and event number) in a file named
last_processed_record.txtto resume from the last processed point. -
Scheduled Sync: The script runs every minute, processing only new events since the last recorded one, logging each processed event.
-
Event Filtering: Only events of Warning level or higher are processed; informational events are skipped.
-
SIR Incident Updates: The ServiceNow Scripted endpoint will update Security Incident Response (SIR) incidents based on event IDs from Data Security Essentials.
Steps to Configure Event Sync to ServiceNow Security Incident Response module
-
Modify the Python code:
- Update the ServiceNow endpoint URL in the section labeled
# Your ServiceNow webhook details. - Make sure it matches your instance URL and the Scripted Webhook URL created earlier.
- Update the ServiceNow endpoint URL in the section labeled
-
Copy the Python code:
- Place it in
C:\Program Files\Superna\cgi-binon the Data Security Essentials host. - Name the file
dse-servicenow-sir-integration.py.
- Place it in
-
Install Python dependencies:
- Open a command prompt as the
dse-serviceaccount by right-clicking and choosing to run as that user. - Use the following command to install required libraries:
pip install pywin32 requests
- Open a command prompt as the
-
Test the script:
- Navigate to
C:\Program Files\Superna\cgi-bin. - Run the script with
python dse-servicenow-sir-integration.py. - Check that the output displays relevant event log entries (ignoring informational events) and sends JSON data to the ServiceNow endpoint, mapping the necessary data to the SIR incident.
- Example output

- Navigate to
-
Steps to Schedule sync alerts into ServiceNow Security Incidents:
- Open
secpol.mscand navigate to Local Policies. - Grant the Data Security Essentials AD service account (e.g.,
dse-service) the "Log on as a batch job" permission.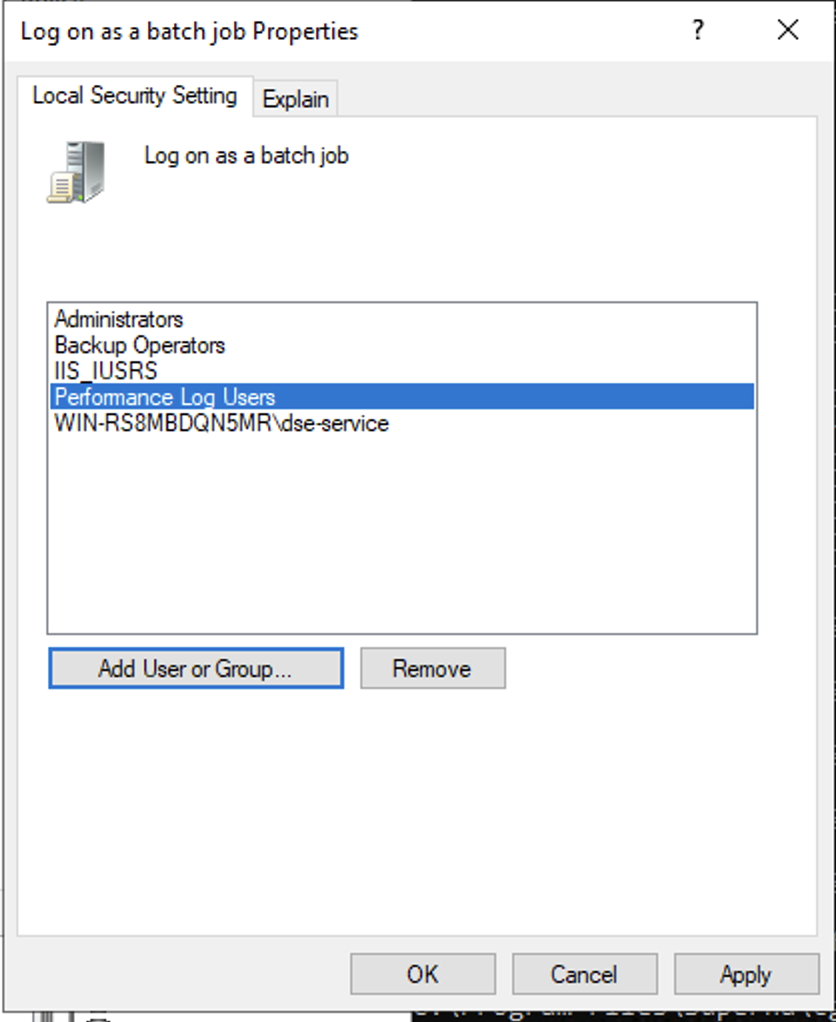
- Open
-
Save the Task Scheduler XML File:
- Download and save the Task Scheduler XML file linked in the instructions to your system.
-
Set Up the Task in Task Scheduler:
- Open Task Scheduler by running
taskschd.msc.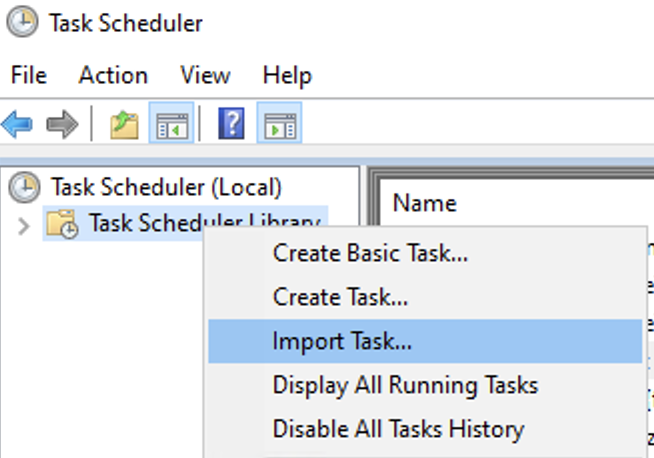
- Right-click on "Task Scheduler Library" and select "Import Task...".
- Import the previously saved XML file.
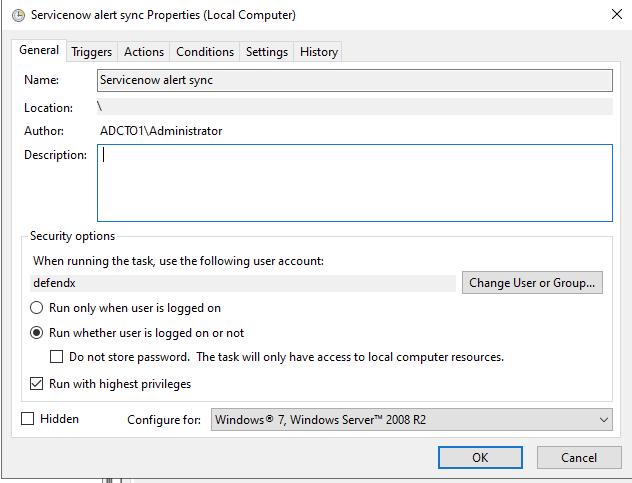
- You will be prompted with the task definition, update the service account information to match your specific account name and domain, then enter the password.
- Ensure all settings are correctly configured and adjust any necessary parameters as needed.
- Open Task Scheduler by running
SentinelOne Integration
How to Configure Data Security Essentials
Data Security Essentials saves alerts to the Windows Event log under a custom application log. This integration extracts those log entries and the JSON payload contained within them, formats the data as webhook events, and sends them to SentinelOne to issue host containment on the endpoint identified by the alert.
Requirements
- Install Python for Windows on the Data Security Essentials host, ensuring it's added to the system path during installation.
note
Install for all users to allow service accounts access.
- The integration code matches event log entries from Custom Trigger BOT policies and File Management policies.
- Event log source names:
- Superna Data Security Essentials BOT Service
- Superna Data Security Policy Engine
Features
- Logs for each execution are stored alongside the Python code.
- Each execution saves the last processed event's record ID, date, and event number to
last_processed_record.txt, so processing resumes from that point on the next run. Delete this file to have the script start reading from the oldest Windows event log entry. - The script runs on a schedule (every minute), processing only events newer than the last recorded one.
- Only events matching the configured trigger severities are processed — the sample code defaults to Major and Critical.
Steps to Configure Event Sync to SentinelOne Host Containment
-
Modify the Python code:
- Update the SentinelOne instance URL and API token in the section labeled
# SentinelOne instance URL and API token. - Update
trigger_severitiesandenable_isolation/enable_broadcast/enable_full_scanif you want different behavior than the defaults.
- Update the SentinelOne instance URL and API token in the section labeled
-
Copy the Python code:
- Place it in
C:\Program Files\Superna\cgi-binon the Data Security Essentials host. - Name the file
sentinelone-dse.py.
- Place it in
-
Install Python dependencies:
- Open a command prompt as the
dse-serviceaccount by right-clicking and choosing to run as that user. - Install the required libraries:
pip install pywin32 requests
- Open a command prompt as the
-
Test the script:
- Navigate to
C:\Program Files\Superna\cgi-bin. - Run the script with
python sentinelone-dse.py. - Confirm the output shows matched event log entries (ignoring severities that don't match your filter) and that the SentinelOne host containment API call returns success for a test IP.
- Navigate to
-
Steps to schedule sync alerts into SentinelOne:
- Open
secpol.mscand navigate to Local Policies. - Grant the Data Security Essentials AD service account (e.g.,
dse-service) the "Log on as a batch job" permission.
- Open
-
Save the Task Scheduler XML File:
- Download and save the Task Scheduler XML file to your system. You can rename it to
SentinelOne integration.xml.
- Download and save the Task Scheduler XML file to your system. You can rename it to
-
Set Up the Task in Task Scheduler:
- Open Task Scheduler by running
taskschd.msc. - Right-click on "Task Scheduler Library" and select "Import Task...".
- Import the previously saved XML file.
- Edit the task name to
SentinelOne Containment integration. - On the Actions tab, browse to select
C:\Program Files\Superna\cgi-bin\sentinelone-dse.py. - Update the service account name, domain, and password to match your environment, then click OK to save.
- Open Task Scheduler by running
CrowdStrike Integration
Data Security Essentials offers two independent CrowdStrike integrations: one issues host containment on the endpoint identified by an alert, and the other forwards alerts to CrowdStrike Next-Gen SIEM for log ingestion and indexing. Configure either or both depending on your requirements.
CrowdStrike Host Containment Integration
How to Configure Data Security Essentials
Data Security Essentials saves alerts to the Windows Event log under a custom application log. This integration extracts those log entries and the JSON payload contained within them, formats the data as webhook events, and sends them to CrowdStrike to issue host containment on the endpoint identified by the alert.
Requirements
- Install Python for Windows on the Data Security Essentials host, ensuring it's added to the system path during installation.
note
Install for all users to allow service accounts access.
- The integration code matches event log entries from Custom Trigger BOT policies and File Management policies.
- Event log source names:
- Superna Data Security Essentials BOT Service
- Superna Data Security Policy Engine
Features
- Logs for each execution are stored alongside the Python code.
- Each execution saves the last processed event's record ID, date, and event number to
last_processed_record.txt, so processing resumes from that point on the next run. - The script runs on a schedule (every minute), processing only events newer than the last recorded one.
- Only events matching the configured trigger severities are processed — the sample code defaults to Major and Critical.
Steps to Configure Event Sync to Crowdstrike Host Containment Integration
-
Modify the Python code:
- Update
client_id,client_secret, andbase_urlin the# CrowdStrike API credentialssection to match your CrowdStrike tenant. - Adjust
trigger_severitiesandenable_isolationif you want different behavior than the defaults.
- Update
-
Copy the Python code:
- Place it in
C:\Program Files\Superna\cgi-binon the Data Security Essentials host. - Name the file
crowdstrike-dse.py.
- Place it in
-
Install Python dependencies:
- Open a command prompt as the
dse-serviceaccount by right-clicking and choosing to run as that user. - Install the required libraries:
pip install pywin32 requests
- Open a command prompt as the
-
Test the script:
- Navigate to
C:\Program Files\Superna\cgi-bin. - Run the script with
python crowdstrike-dse.py. - Confirm the output shows matched event log entries (ignoring severities that don't match your filter) and that the CrowdStrike host containment API call returns success for a test IP.
- Navigate to
-
Steps to schedule sync alerts into CrowdStrike:
- Open
secpol.mscand navigate to Local Policies. - Grant the Data Security Essentials AD service account (e.g.,
dse-service) the "Log on as a batch job" permission.
- Open
-
Save the Task Scheduler XML File:
- Download and save the Task Scheduler XML file to your system. You can rename it to
Crowdstrike integration.xml.
- Download and save the Task Scheduler XML file to your system. You can rename it to
-
Set Up the Task in Task Scheduler:
- Open Task Scheduler by running
taskschd.msc. - Right-click on "Task Scheduler Library" and select "Import Task...".
- Import the previously saved XML file.
- Edit the task name to
Crowdstrike Containment integration. - On the Actions tab, browse to select
C:\Program Files\Superna\cgi-bin\crowdstrike-dse.py. - Update the service account name, domain, and password to match your environment, then click OK to save.
- Open Task Scheduler by running
CrowdStrike Next-Gen SIEM Integration
How to Configure Data Security Essentials
Data Security Essentials saves alerts to the Windows Event log under a custom application log. This integration extracts those log entries and the JSON payload contained within them and forwards them as webhook data to a CrowdStrike Next-Gen SIEM ingest endpoint for log indexing and detections.
This integration is separate from CrowdStrike Host Containment above. Follow the CrowdStrike Next-Gen SIEM marketplace connector setup first to obtain the ingest endpoint URL and API token used below.
Requirements
- Follow the CrowdStrike Next-Gen SIEM marketplace connector steps to create the data source and generate an API key and ingest endpoint URL.
- Install Python for Windows on the Data Security Essentials host, ensuring it's added to the system path during installation.
note
Install for all users to allow service accounts access.
- The integration code matches event log entries from Custom Trigger BOT policies and File Management policies.
- Event log source names:
- Superna Data Security Essentials BOT Service
- Superna Data Security Policy Engine
Features
- Logs for each execution are stored alongside the Python code.
- Each execution saves the last processed event's record ID, date, and event number to
last_processed_record.txt, so processing resumes from that point on the next run. Delete this file to have the script start reading from the oldest Windows event log entry. - The script runs on a schedule (every minute), processing only events newer than the last recorded one.
- Only events matching the configured trigger severities are forwarded — the sample code defaults to Major, Critical, and Warning.
Steps to Configure Event Forwarding to CrowdStrike Next-Gen SIEM
-
Modify the Python code:
- Update
CROWDSTRIKE_ENDPOINTandCROWDSTRIKE_API_TOKENin the# CrowdStrike Ingest endpoint and tokensection to match your CrowdStrike Next-Gen SIEM data source. - Adjust
trigger_severitiesif you want different severities to trigger forwarding.
- Update
-
Copy the Python code:
- Place it in
C:\Program Files\Superna\cgi-binon the Data Security Essentials host. - Name the file
crowdstrike-ngsiem-dse.py.
- Place it in
-
Install Python dependencies:
- Open a command prompt as the
dse-serviceaccount by right-clicking and choosing to run as that user. - Install the required libraries:
pip install pywin32 requests
- Open a command prompt as the
-
Test the script:
- Navigate to
C:\Program Files\Superna\cgi-bin. - Run the script with
python crowdstrike-ngsiem-dse.py. - Confirm the output shows matched event log entries (ignoring severities that don't match your filter) and that events are successfully posted to the CrowdStrike Next-Gen SIEM ingest endpoint.
- Navigate to
-
Steps to schedule sync alerts into CrowdStrike Next-Gen SIEM:
- Open
secpol.mscand navigate to Local Policies. - Grant the Data Security Essentials AD service account (e.g.,
dse-service) the "Log on as a batch job" permission.
- Open
-
Save the Task Scheduler XML File:
- Download and save the Task Scheduler XML file to your system. You can rename it to
Crowdstrike NGSIEM integration.xml.
- Download and save the Task Scheduler XML file to your system. You can rename it to
-
Set Up the Task in Task Scheduler:
- Open Task Scheduler by running
taskschd.msc. - Right-click on "Task Scheduler Library" and select "Import Task...".
- Import the previously saved XML file.
- Edit the task name to
Crowdstrike NGSIEM integration. - On the Actions tab, browse to select
C:\Program Files\Superna\cgi-bin\crowdstrike-ngsiem-dse.py. - Update the service account name, domain, and password to match your environment, then click OK to save.
- Open Task Scheduler by running
Microsoft Sentinel Integration
How to Configure Data Security Essentials
Data Security Essentials saves alerts to the Windows Event log under a custom application log. This integration extracts those log entries and the JSON payload contained within them and forwards them as webhook data to a Microsoft Sentinel Logic App endpoint for log ingestion and incident creation.
This integration sends data to a Sentinel Logic App workflow that writes to a Log Analytics custom table. Configure the Logic App HTTP trigger and Azure Log Analytics Data Collector "Send Data" step, and create the corresponding Sentinel Analytics Rule, before continuing below — the same Logic App endpoint URL is reused here.
Requirements
- Follow the Sentinel Logic App Webhook endpoint configuration steps to create the workflow and record its endpoint URL.
- Install Python for Windows on the Data Security Essentials host, ensuring it's added to the system path during installation.
note
Install for all users to allow service accounts access.
- The integration code matches event log entries from Custom Trigger BOT policies and File Management policies.
- Event log source names:
- Superna Data Security Essentials BOT Service
- Superna Data Security Policy Engine
Features
- Logs for each execution are stored alongside the Python code.
- Each execution saves the last processed event's record ID, date, and event number to
last_processed_record.txt, so processing resumes from that point on the next run. Delete this file to have the script start reading from the oldest Windows event log entry. - The script runs on a schedule (every minute), processing only events newer than the last recorded one.
- Only events matching the configured trigger severities are forwarded — the sample code defaults to Major, Critical, and Warning.
Steps to Configure Event Forwarding to Sentinel
-
Modify the Python code:
- Update
SENTINEL_HEC_URLin the# Sentinelsection with the Logic App workflow endpoint URL recorded earlier. - Adjust
trigger_severitiesif you want different severities to trigger forwarding.
- Update
-
Copy the Python code:
- Place it in
C:\Program Files\Superna\cgi-binon the Data Security Essentials host. - Name the file
sentinel-dse.py.
- Place it in
-
Install Python dependencies:
- Open a command prompt as the
dse-serviceaccount by right-clicking and choosing to run as that user. - Install the required libraries:
pip install pywin32 requests
- Open a command prompt as the
-
Test the script:
- Navigate to
C:\Program Files\Superna\cgi-bin. - Run the script with
python sentinel-dse.py. - Confirm the output shows matched event log entries (ignoring severities that don't match your filter) and that events are successfully posted to the Sentinel Logic App endpoint.
- Navigate to
-
Steps to schedule sync alerts into Sentinel:
- Open
secpol.mscand navigate to Local Policies. - Grant the Data Security Essentials AD service account (e.g.,
dse-service) the "Log on as a batch job" permission.
- Open
-
Save the Task Scheduler XML File:
- Download and save the Task Scheduler XML file to your system. You can rename it to
Sentinel integration.xml.
- Download and save the Task Scheduler XML file to your system. You can rename it to
-
Set Up the Task in Task Scheduler:
- Open Task Scheduler by running
taskschd.msc. - Right-click on "Task Scheduler Library" and select "Import Task...".
- Import the previously saved XML file.
- Edit the task name to
Sentinel Integration. - On the Actions tab, browse to select
C:\Program Files\Superna\cgi-bin\sentinel-dse.py. - Update the service account name, domain, and password to match your environment, then click OK to save.
- Open Task Scheduler by running
Splunk Integration
How to Configure Data Security Essentials
Data Security Essentials saves alerts to the Windows Event log under a custom application log. This integration extracts those log entries and the JSON payload contained within them, and sends them to a Splunk HTTP Event Collector (HEC) endpoint.
Requirements
- Install Python for Windows on the Data Security Essentials host, ensuring it's added to the system path during installation.
note
Install for all users to allow service accounts access.
- An HTTP Event Collector token configured in Splunk, with the endpoint reachable from the Data Security Essentials host.
- Event log source names:
- Superna Data Security Essentials BOT Service
- Superna Data Security Policy Engine
Features
- Execution logs are stored alongside the Python code.
- Each execution saves the last processed event's record ID, date, and event number to
last_processed_record.txt, so processing resumes from that point on the next run. - The script runs on a schedule (every minute), processing only events newer than the last recorded one.
- Only events matching the configured trigger severities are sent to Splunk — the sample code defaults to Major and Critical.
Steps to Configure Event Sync to Splunk
-
Modify the Python code:
- Update
SPLUNK_HEC_TOKENandSPLUNK_HEC_URLin the# Splunk HEC configurationsection to match your Splunk environment. - Adjust
trigger_severitiesif you want different severities to trigger forwarding.
- Update
-
Copy the Python code:
- Place it in
C:\Program Files\Superna\cgi-binon the Data Security Essentials host. - Name the file
splunk-dse.py.
- Place it in
-
Install Python dependencies:
- Open a command prompt as the
dse-serviceaccount by right-clicking and choosing to run as that user. - Install the required libraries:
pip install pywin32 requests
- Open a command prompt as the
-
Test the script:
- Navigate to
C:\Program Files\Superna\cgi-bin. - Run the script with
python splunk-dse.py. - Confirm the output shows matched event log entries and a successful post to the Splunk HEC endpoint.
- Navigate to
-
Steps to schedule sync alerts into Splunk:
- Open
secpol.mscand navigate to Local Policies. - Grant the Data Security Essentials AD service account (e.g.,
dse-service) the "Log on as a batch job" permission.
- Open
-
Save the Task Scheduler XML File:
- Download and save the Task Scheduler XML file to your system. You can rename it to
Splunk integration.xml.
- Download and save the Task Scheduler XML file to your system. You can rename it to
-
Set Up the Task in Task Scheduler:
- Open Task Scheduler by running
taskschd.msc. - Right-click on "Task Scheduler Library" and select "Import Task...".
- Import the previously saved XML file.
- Edit the task name to
Splunk integration. - On the Actions tab, browse to select
C:\Program Files\Superna\cgi-bin\splunk-dse.py. - Update the service account name, domain, and password to match your environment, then click OK to save.
- Open Task Scheduler by running