API Quick Start
Introduction
The API is designed to enable customers to build business logic to automate failover or provide data access to business units or end customers in a managed service.
The objective of this solution is to provide an interface for securely initiating failover or failback and providing status updates remotely without needing the Eyeglass GUI. This example demonstrates building a proxy solution and shows how cURL can be used. For simplicity, cURL is used to access the API proxy, whereas a more complete implementation would embed the API in a webpage for an improved user experience.
The solution documented here is an example only, meant as a reference to help you get started building solutions with the API. The material is provided "as is" and is not covered under a support contract. It has no warranty, updates, and is free to use, modify, or change under the MIT license.
Prerequisites
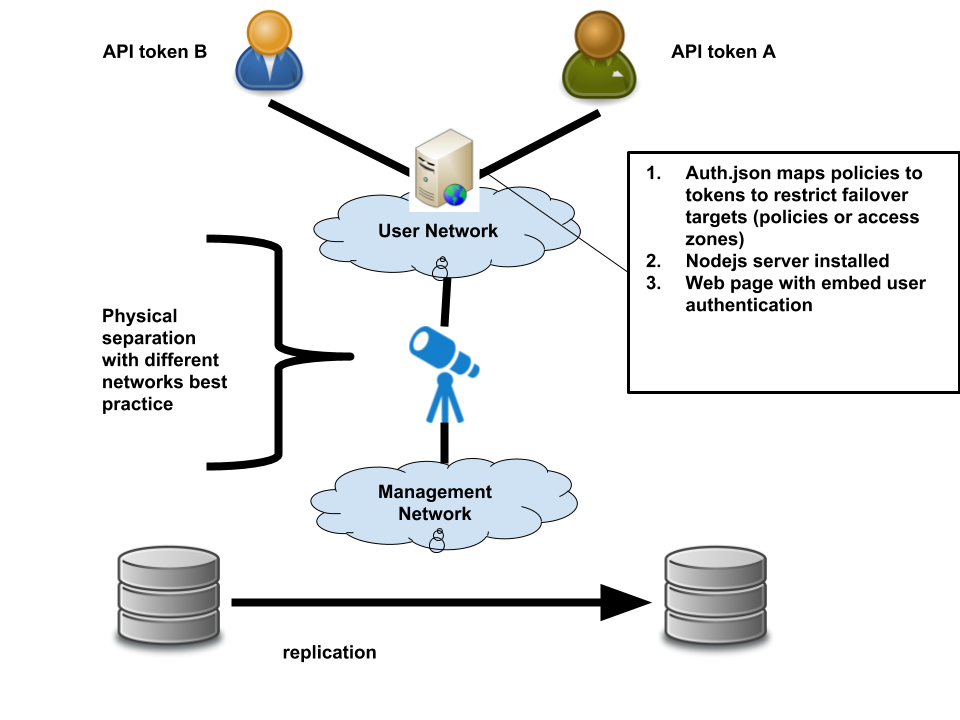
- Security Considerations: Security is a key requirement in all use cases and must be factored into a well-architected design. This guide will provide a high-level architecture for deploying this solution.
- Separation of Customers: Logical and physical separation of customers is required but is out of scope for this guide.
- Separation of Management Infrastructure: Management infrastructure must be separated from end users or companies. This separation involves networking considerations and secure authentication for any services enabling data failover. This aspect is out of scope for this guide.
Core Components
- Eyeglass
- PowerScale pair with syncing
- Webserver - Nginx used in this example
- Node.js installed with a webserver
Common Use Cases
- Multi-tenant within a single company: Business units or development teams that need to test failover and failback independently, without assistance from a storage admin.
- Hosted PowerScale and Eyeglass managed service solutions: Providing services to multiple end customers from different companies.
Failover Gateway
The Failover Gateway is a small Node.js application designed to act as a gateway in front of the Superna Eyeglass REST API (SERA). It provides token authentication to facilitate the failover of specific SyncIQ policies and/or Access Zones.
Quickstart
-
Install Node.js 8 or higher.
-
Clone this repository to a directory on the web server:
git clone https://bitbucket.org:superna/failover_example -
Install dependencies:
npm install -
Configure the
auth.jsonfile (refer to the configuration details below). -
Start the server:
npm startThe server will listen on port 8080.
Configuration
All configuration is performed through the auth.json file located in the root of the project. Follow the steps below to gather the necessary values using the Superna Eyeglass REST API Explorer:
-
Login to the Eyeglass appliance:
-
Access the Eyeglass REST API: From the main menu, select "Eyeglass REST API".
-
Generate an API Token:
- Generate a REST API token and copy it to your clipboard. for more information check Handling REST API Tokens.
-
Launch API Explorer:
- Select the "API Explorer" tab, then click the "Launch API Explorer" button.
- Paste the copied API token into the
api_keyfield at the top right and click "Explore".
-
Gather Cluster IDs and Details:
- Use the
/nodesroute to get the IDs of the PowerScale Clusters provisioned in Eyeglass. - Use the
/nodes/<id>/policiesand/nodes/<id>/zonesroutes to gather the policies and access zones for a given cluster.
- Use the
-
Configure
auth.json:- Use the information from the API to build the
auth.jsonfile in the root of the Failover Gateway project. A sample file is included in the download.
- Use the information from the API to build the
-
Deploy the Server:
- Deploy a web server, install a Node.js server, and run the Node.js code as described in the quickstart section above.
-
Configure HTTPS:
- Configure the web server for HTTPS by following the web server documentation.
- A sample Nginx configuration is included in the Git repository to redirect HTTP traffic to the Node.js server listening on port 8080.
-
License File:
- The license file is included in the Git repository.
-
Secure Deployment:
- Review the provided diagram for a secure deployment example.
-
Create Token Mappings:
- Follow the example below to create mappings from tokens generated in Eyeglass to a policy or access zone using the API Browser tool in Eyeglass. Refer to the Eyeglass API guide for additional details.
The auth.json file is where you define authentication details and specify which users are authorized to failover certain policies or access zones. Below is an example configuration:
{
  "eyeglassIp": "192.168.1.140",
  "apiKeys": {
    "key-1": [
      {
        "targetId": "target-PowerScale-id",
        "sourceId": "source-PowerScale-id",
        "failoverTarget": "policy-name"
      },
      {
        "targetId": "target-PowerScale-id",
        "sourceId": "source-PowerScale-id",
        "failoverTarget": "policy-name_mirror"
      },
      {
        "targetId": "target-PowerScale-id",
        "sourceId": "source-PowerScale-id",
        "failoverTarget": "zone-name-1"
      }
    ],
    "key-2": [
      {
        "targetId": "target-PowerScale-id",
        "sourceId": "source-PowerScale-id",
        "failoverTarget": "policy-name-2"
      }
    ]
  }
}
Explanation
"eyeglassIp": The IP address of the Eyeglass appliance (192.168.1.140in this example)."apiKeys": Defines which API keys have permission to access specific failover targets.key-1:- The user provided with
key-1is authorized to failover:- Policy:
"policy-name" - Policy:
"policy-name_mirror" - Access Zone:
"zone-name-1"
- Policy:
- The user provided with
key-2:- The user provided with
key-2can only failover the policy named"policy-name-2"and nothing else.
- The user provided with
Use this file to control access permissions for different users, ensuring that only the required policies or zones can be failed over by each API key.
Examples
Getting All PowerScales
To get the IDs and details of all available PowerScales, use the following API call:
GET /nodes
Response:
[
  {
    "id": "ISL-TEST-8-1-0-0-144_0050569ff3955440815c200978332081a600",
    "ip": "192.168.1.244",
    "name": "ISL-TEST-8-1-0-0-144"
  },
  {
    "id": "ISL-TEST-8-1-0-0-146_0050569f65335842815c970993ede1cfa604",
    "ip": "192.168.1.246",
    "name": "ISL-TEST-8-1-0-0-146"
  }
]
Getting All Policies for the PowerScales
To get the policies for each of the PowerScales returned in the previous call:
-
GET
/nodes/ISL-TEST-8-1-0-0-144_0050569ff3955440815c200978332081a600/policiesResponse:
[
  {
    "failoverReadiness": "ok",
    "id": "policy-ISL-TEST-8-1-0-0-144_dfs",
    "name": "dfs",
    "target": {
      "id": "ISL-TEST-8-1-0-0-146_0050569f65335842815c970993ede1cfa604",
      "ip": "192.168.1.246",
      "name": "ISL-TEST-8-1-0-0-146"
    },
    "zone": {
      "failoverReadiness": "error",
      "id": "zone-ISL-TEST-8-1-0-0-144_System",
      "name": "System"
    }
  }
] -
GET
/nodes/ISL-TEST-8-1-0-0-146_0050569f65335842815c970993ede1cfa604/policiesResponse:
[
  {
    "failoverReadiness": "warning",
    "id": "policy-ISL-TEST-8-1-0-0-146_dfs_mirror",
    "name": "dfs_mirror",
    "target": {
      "id": "ISL-TEST-8-1-0-0-144_0050569ff3955440815c200978332081a600",
      "ip": "192.168.1.244",
      "name": "ISL-TEST-8-1-0-0-144"
    },
    "zone": {
      "failoverReadiness": "error",
      "id": "zone-ISL-TEST-8-1-0-0-146_System",
      "name": "System"
    }
  }
]
Constructing the auth.json File for Failover
To allow failover and failback for only the retrieved policies, the auth.json file would look like this:
{
"eyeglassIp": "192.168.1.140",
"apiKeys": {
    "igls-1uhrns90b9v4s9cggtt6vs5dlrjj38hkeapdc4ro1sdjnu0bcqtm": [
    {
        "targetId": "ISL-TEST-8-1-0-0-146_0050569f65335842815c970993ede1cfa604",
        "sourceId": "ISL-TEST-8-1-0-0-144_0050569ff3955440815c200978332081a600",
        "failoverTarget": "policy-ISL-TEST-8-1-0-0-144_dfs"
    },
    {
        "sourceId": "ISL-TEST-8-1-0-0-146_0050569f65335842815c970993ede1cfa604",
        "targetId": "ISL-TEST-8-1-0-0-144_0050569ff3955440815c200978332081a600",
        "failoverTarget": "policy-ISL-TEST-8-1-0-0-146_dfs_mirror"
    }
    ]
}
}
Explanation
- The
auth.jsonfile defines which API keys have access to which failover policies. - API Key (
igls-1uhrns90b9v4s9cggtt6vs5dlrjj38hkeapdc4ro1sdjnu0bcqtm): - Has permissions to failover:
- Policy:
"policy-ISL-TEST-8-1-0-0-144_dfs" - Policy:
"policy-ISL-TEST-8-1-0-0-146_dfs_mirror"
- Policy:
Nginx Configuration
This sample configuration file is intended to redirect traffic from port 80 to the Node.js server listening on port 8080.
This is an example; contact your web server admin to configure your environment and set up HTTPS.
#user nobody;
worker_processes 1;

#error_log logs/error.log;
#error_log logs/error.log notice;
#error_log logs/error.log info;

#pid logs/nginx.pid;

events {
    worker_connections 1024;
}

http {
    include mime.types;
    default_type application/octet-stream;

    #log_format main '$remote_addr - $remote_user [$time_local] "$request" '
    #                 '$status $body_bytes_sent "$http_referer" '
    #                 '"$http_user_agent" "$http_x_forwarded_for"';

    #access_log logs/access.log main;

    sendfile on;

    #tcp_nopush on;
    keepalive_timeout 65;

    #gzip on;

    server {
        listen 80;
        server_name localhost;

        #charset koi8-r;
        #access_log logs/host.access.log main;

        location / {
            proxy_read_timeout 600s;
            proxy_pass http://localhost:8080/;
        }

        # Redirect server error pages to the static page /50x.html
        error_page 500 502 503 504 /50x.html;
        location = /50x.html {
            root html;
        }
    }
}
Usage
To issue calls to the server, you must be provided with an API token and the names of the failoverTargets they are authorized to operate on (as defined in the auth.json file). Once these are provided, end users can use curl to initiate failovers:
Launching a Failover
To initiate a failover, use the following command:
curl -X POST http://<failover_gateway_ip>:8080/failover?apiKey=<api_key>&failoverTarget=<failoverTarget>
When launching failovers, the call returns a JSON object containing a jobId:
{"id":"job-1552504373143-255009881"}
Querying the Status of Running Failovers
Using the returned jobId and the API key, users can query the status of running failovers:
curl http://<failover_gateway_ip>:8080/status?apiKey=<api_key>&jobId=<job_id>