ECA VM Installation
Introduction
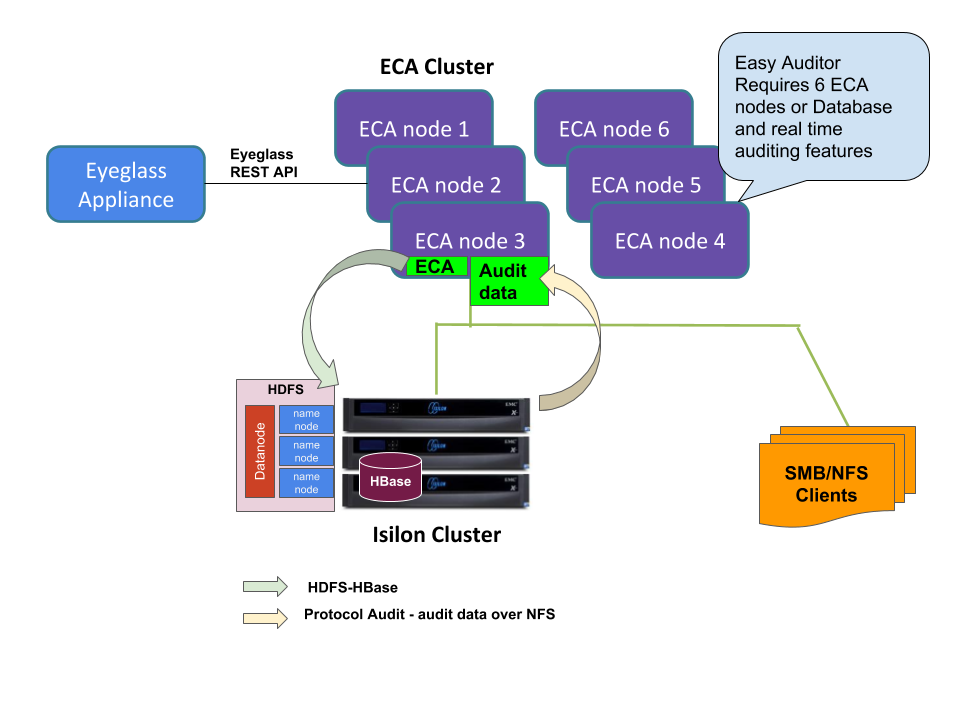
The Eyeglass Clustered Agent (ECA) is a tool that facilitates auditing and ransomware defense through the deployment of virtual machines (VMs) across different platforms, including Hyper-V and VMware. This guide provides step-by-step instructions for deploying the ECA VM on various environments, ensuring that the auditing of critical data is carried out efficiently.
Deployment Scenarios
Centralized with NFS over WAN
In this setup, a central ECA cluster accesses audit data from remote managed clusters over a WAN link using NFS. This configuration is ideal for metro WAN environments where latency is low.
Mini-ECA (a remote-site deployment model for high-latency WAN links) is not supported for VAST or Qumulo deployments.
Requirements
The Eyeglass appliance is required for installation and configuration. The ECA Cluster operates in a separate group of VMs from Eyeglass.
Key Components
- Eyeglass: Responsible for taking actions on the cluster and notifying administrators.
- Licenses:
- Eyeglass Appliance: Requires either Data Security Agent Licenses, Easy Auditor Agent Licenses, or Performance Auditor Licenses.
For Easy Auditor, the analytics database runs on an external PostgreSQL or MSSQL server rather than on the managed cluster itself — see Easy Auditor Database Install.
System Requirements and Network Latency Considerations
ECA Hyper-V
The ECA appliance uses two disks: one for the OS and one for data.
- OS Disk: Requires 20 GB (default disk).
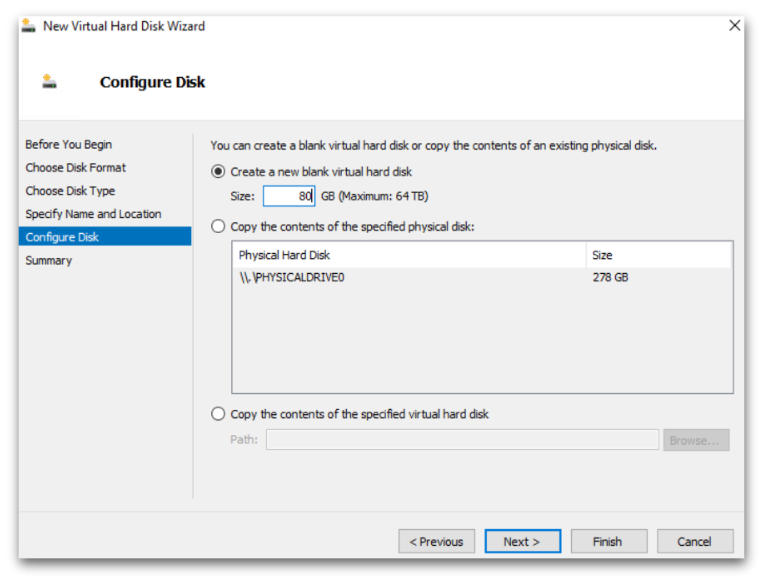
- Data Disk: Requires 80 GB. (Read the instructions below on how to create the data disk).
OVA Install Prerequisites
The OVA file will deploy 3 VMs. To build a 6-node cluster, deploy the OVA twice and move the VMs into the first Cluster object in vCenter. Follow the instructions below to correctly move the VMs into a single vApp in vCenter.
| Configuration Item |
|---|
| see scaling section |
| vSphere 6.x or higher |
| 1x IP address on the same subnet for each node |
| Gateway |
| Network Mask |
| DNS IP |
| NTP server IP |
| IP Address of Eyeglass |
| API token from Eyeglass |
| Unique cluster name (lower case, no special characters) |
Mini-ECA (the remote-site/high-latency deployment model) is not supported for VAST or Qumulo deployments.
ECA Cluster Sizing and Performance Considerations
ECA clusters can consist of 3 to 12 nodes or more, depending on the following factors:
- The applications running on the cluster.
- The number of events generated per second.
- The number of cluster nodes producing audit events.
Minimum ECA Node Configurations
The supported minimum configurations for all ECA deployments are listed below.
New applications or releases with features that require additional resources may necessitate expanding the ECA cluster to handle multiple clusters or new application services.
- PowerScale Only
- VAST Only
- Qumulo Only
- VAST and Qumulo Only
| Environment Size | Number of VM Nodes Required | ESX Hosts to Split VM Workload and Ensure High Availability | ECA Node VM Size | Network Latency NFS Mount For Ransomware Defender & Easy Auditor | EZA DB Network Latency Between ECA and Storing the DB | Host Hardware Configuration Requirements |
|---|---|---|---|---|---|---|
| <18K events per second | - 1 VM for Core Agent (Eyeglass) - 6 ECA VMs | 26 | 4 x vCPU, 16G Ram, 30G OS partition + 80G disk | < 10 ms RTT | < 5 ms RTT | 2 socket CPU 2000 GHZ or greater, Disk IO latency average read and write < 20 ms |
| >18K events per second | - 1 VM for Core Agent (Eyeglass) - 9 ECA VMs | 36 | 4 x vCPU, 16G Ram, 30G OS partition + 80G disk | < 10 ms RTT | < 5 ms RTT | 2 socket CPU 2000 GHZ or greater, Disk IO latency average read and write < 10 ms |
| Large node count clusters >20 nodes | - 1 VM for Core Agent (Eyeglass) - 9 ECA VMs (20-30 nodes) / 12 ECA VMs (>30 nodes) | 36 | 4 x vCPU, 16G Ram, 30G OS partition + 80G disk | < 10 ms RTT | < 5 ms RTT | 2 socket CPU 2000 GHZ or greater, Disk IO latency average read and write < 10 ms |
| Environment Size | Number of VM Nodes Required | ESX Hosts to Split VM Workload and Ensure High Availability | ECA Node VM Size | Network Latency NFS Mount For Ransomware Defender & Easy Auditor | EZA DB Network Latency Between ECA and Storing the DB | Host Hardware Configuration Requirements |
|---|---|---|---|---|---|---|
| <18K events per second | - 1 VM for Core Agent (Eyeglass) - 3 ECA VMs - 1 VM audit database | 26 | 4 x vCPU, 16G Ram, 30G OS partition + 80G disk | 2 socket CPU 2000 GHZ or greater, Disk IO latency average read and write < 10 ms | ||
| >18K events per second | - 1 VM for Core Agent (Eyeglass) - 6 ECA VMs - 1 VM audit database | 36 | 4 x vCPU, 16G Ram, 30G OS partition + 80G disk | 2 socket CPU 2000 GHZ or greater, Disk IO latency average read and write < 10 ms | ||
| Large node count clusters >20 CNodes | - 1 VM for Core Agent (Eyeglass) - 9 ECA VMs - 1 VM audit database | 36 | 4 x vCPU, 16G Ram, 30G OS partition + 80G disk | 2 socket CPU 2000 GHZ or greater, Disk IO latency average read and write < 10 ms |
It is recommended to allocate more resources for the TA responsible for receiving events from Qumulo, as a single TA will be handling the entire event load.
| Environment Size | Number of VM Nodes Required | ESX Hosts to Split VM Workload and Ensure High Availability | ECA Node VM Size | Network Latency NFS Mount For Ransomware Defender & Easy Auditor | EZA DB Network Latency Between ECA and Storing the DB | Host Hardware Configuration Requirements |
|---|---|---|---|---|---|---|
| <18K events per second | - 1 VM for Core Agent (Eyeglass) - 3 VMs for ECA - 1 VM audit database (after 4.0) | 26 | 4 x vCPU, 16G Ram, 30G OS partition + 80G disk | 2 socket CPU 2000 GHZ or greater, Disk IO latency average read and write < 10 ms | ||
| >18K events per second | - 1 VM for Core Agent (Eyeglass) - 6 ECA VMs - 1 VM audit database | 36 | 4 x vCPU, 16G Ram, 30G OS partition + 80G disk | 2 socket CPU 2000 GHZ or greater, Disk IO latency average read and write < 10 ms |
It is recommended to allocate more resources for the TA responsible for receiving events from Qumulo, as a single TA will be handling the entire event load.
| Environment Size | Number of VM Nodes Required | ESX Hosts to Split VM Workload and Ensure High Availability | ECA Node VM Size | Network Latency NFS Mount For Ransomware Defender & Easy Auditor | EZA DB Network Latency Between ECA and Storing the DB | Host Hardware Configuration Requirements |
|---|---|---|---|---|---|---|
| <18K events per second | - 1 VM for Core Agent (Eyeglass) - 6 VMs for ECA nodes - 1 VM audit database (after 4.0) | 26 | 4 x vCPU, 16G Ram, 30G OS partition + 80G disk | 2 socket CPU 2000 GHZ or greater, Disk IO latency average read and write < 10 ms | ||
| >18K events per second | - 1 VM for Core Agent (Eyeglass) - 9 ECA VMs - 1 VM audit database | 36 | 4 x vCPU, 16G Ram, 30G OS partition + 80G disk | 2 socket CPU 2000 GHZ or greater, Disk IO latency average read and write < 10 ms | ||
| Large node count clusters >20 VAST CNodes | - 1 VM for Core Agent (Eyeglass) - 12 ECA VMs - 1 VM audit database | 36 | 4 x vCPU, 16G Ram, 30G OS partition + 80G disk | 2 socket CPU 2000 GHZ or greater, Disk IO latency average read and write < 10 ms |
ECA Appliance Platforms
VMware OVA and Microsoft Hyper-v VHDX are available appliance platforms.
Low Event Rate Environments
Contact support for reduced footprint configuration with 3 VMs only for low event rate environments.
-
OVA Resource Limits: The OVA default sets a resource limit of 18000 MHz, shared by all ECA VM nodes in the cluster. This limit can be increased if the audit event load requires more CPU processing. Consult support before making any changes in VMware.
-
Real-Time Distributed Processing: ECA clusters must operate in the same Layer 2 subnet with low latency between VMs. Splitting VMs across data centers is not supported.
-
Resource Requirements for Additional Applications: Unified Data Security, Easy Auditor, and Performance Auditor require additional resources beyond event rate sizing requirements. Add 4 GB of RAM and 2 additional vCPUs per ECA node. High event rates may require further resource increases. Consult the EyeGlass Scalability table for RAM upgrade requirements.
-
Audit Data Retention: Retaining audit data for more than 1 year increases database size, requiring at least 3 additional ECA VMs to maintain performance. Data retention longer than 365 days requires extra resources and VMs.
-
High Availability (HA) Requirements: For HA, multiple physical hosts are required. ECA clusters with 3 VMs can tolerate N-1 VM failures, clusters with 6 VMs can tolerate N-2 failures, and larger clusters tolerate N-3 failures.
-
VMware Settings: Storage vMotion, SDRS, and DRS should be disabled, as ECA VMs are real-time processing systems.
-
Database Save Rates: Database save rates exceeding 1000 events per second per ECA node require additional database VMs to handle save operations efficiently.
Hyper-V or VMware Requirements
VMware ESX Host Compute Sizing for ECA nodes (Data Security, Easy Auditor, Performance Auditor)
For VMware environments with DRS and SDRS, it is best practice to exempt the ECA and vApp from dynamic relocation. This is because ECA is a real-time application with time synchronization requirements between VMs for processing and database operations.
While DRS movement of running VMs can negatively affect these processes, it is acceptable to migrate VMs for maintenance purposes as needed.
| Number of active concurrent Users per cluster ¹ | ECA VM per Physical Host Recommendation | Estimated Events Guideline |
|---|---|---|
| 1 to 1000 | 1 Host | =5000 * 1.25 = 6,250 events per second |
| 5000 - 10000 | 2 Host | =10,000 * 1.25 = 12,500 events per second |
| > 10000 | 3 Host | = Number of users * 1.25 events/second |
Active TCP connection with file IO to the cluster.
Firewall Configurations
Security - Firewall Port Requirements Data Security , Easy Auditor and Performance Auditor
Firewall Rules and Direction Table
These rules apply to both incoming and outgoing traffic for the virtual machines (VMs). It is important to ensure that all ports remain open between VMs. Private VLANs and firewalls between VMs are not supported in this configuration.
To enhance the security of the Eyeglass Clustered Agent (ECA), we recommend the following measures:
-
Firewall Configuration:
- Configure firewalls to restrict access to the ports between the Eyeglass VM and the ECA VM.
- No external access is required for the ECA, aside from SSH access for management purposes.
- This is the most important step to secure the ECA.
-
Securing Troubleshooting GUIs:
- Limit access to the troubleshooting tools (HBASE, Spark, and Kafka) by configuring them to only be accessible on a management subnet.
Eyeglass GUI VM (Applies to Data Security & Easy Auditor)
| Port | Direction | Function |
|---|---|---|
| Operating System Open Suse 15.x | It is customer responsibility to patch the operating system and allow Internet repository access for automatic patching. The OS is not covered by the support agreement | |
| TCP 443 | Eyeglass → VAST/Qumulo | Authenticated access to the API |
| TCP 443 | Eyeglass → VAST | Authenticated access to the API |
| TCP 8080 | Eyeglass → Powerscale | Authenticated access to the API |
| TCP 9090 | Eyeglass → ECA | Prometheus database for event stats |
| 2181 (TCP) | Eyeglass → ECA | Zookeeper |
| 9092 (TCP) | Eyeglass → ECA | Kafka |
| 5514 (TCP) as of 2.5.6 build 84 | ECA → Eyeglass | Syslog |
| 443 (TCP) | ECA → Eyeglass | TLS messaging |
| 514 | Qumulo → ECA | Syslog information from Qumulo to ECAs |
| NFS v3 UDP/TCP port 111, TCP and UDP port 2049 and TCP/UDP 300 | ECA → Storage Platform | NFS export mounting audit data folder on managed clusters (NOTE: Kerberized NFS is not supported) |
| NFS 4.x TCP port 2049 | ECA → Storage Platform | NFS export mounting audit data folder on managed clusters |
| SMB TCP 445 | Eyeglass → Storage Platform | Security Guard |
| REST API 8080 TCP | ECA → Powerscale (OneFS mandatory) | Needed for REST API audit log monitoring |
| NTP (UDP) 123 | ECA → NTP server | Time sync |
| ICMP | ECA VMs using REST API mode → Powerscale nodes in system zone | Used to provide reachability check and filter out nodes in the SmartConnect pool that are not reachable via ping ICMP |
| SMTP 25 (TCP) | Eyeglass → Email Server | Used by default in Notification center |
| SSH 22 (TCP) | → ECA, → Eyeglass | Port used to connect to ECA, Eyeglass using SSH |
Additional Ports for Easy Auditor
| Port | Direction | Function |
|---|---|---|
| 111 and 2049 (TCP) | Eyeglass → Vast and Qumulo | Required to mount an NFS export from Vast and Qumulo on Eyeglass to store SQL retention data |
| 8020 AND 585 (TCP) | ECA → PowerScale | HDFS (NOTE: Encrypted HDFS is not supported) |
| 18080 | Eyeglass → ECA node 1 only | Hbase history required for Easy Auditor |
| 16000, 16020 | Eyeglass → ECA | Hbase |
| 5432 | ECA → VAST and Qumulo | PostgreSQL |
| 5432 | Eyeglass → VAST and Qumulo | PostgreSQL |
| 6066 (TCP) | Eyeglass → ECA | Spark job engine |
| 7077 | Eyeglass → ECA node 1 and 3 | Spark job submission |
| 9092 (TCP) | Eyeglass → ECA | Kafka broker |
| 443 (TCP) | Admin browser → ECA | Secure access to management tools with authentication required. |
| 443 (TCP) | Eyeglass → Superna | Phonehome |
AirGap
| Port | Direction | Function |
|---|---|---|
| ICMP | Vault cluster → prod cluster(s) | AirGap Solution: Enterprise Edition Description of port: Ping from prod cluster to vault cluster Comments: Used to assess network reachability and vault isolation |
| 15000 (TCP) | ECA → Eyeglass | Transferring vaultagent logs to Eyeglass |
Eyeglass VM Prerequisites
To ensure proper deployment of Eyeglass with the Eyeglass Clustered Agent (ECA), follow these steps to add licenses for Easy Auditor or Data Security to the Eyeglass VM.
Steps to Add Eyeglass Licenses
-
Verify Compatibility:
- Ensure that Eyeglass is deployed or upgraded to the compatible release version for the ECA release being installed.
-
Login to Eyeglass:
- Access the Eyeglass interface.
-
Open the License Manager:
- Click on the License Manager icon.
-
Download License Key:
- Follow the instructions to download the license key using the email token provided with your purchase.
-
Upload License Key:
- Upload the license key zip file obtained in Step 4.
- Once uploaded, the webpage will refresh automatically.
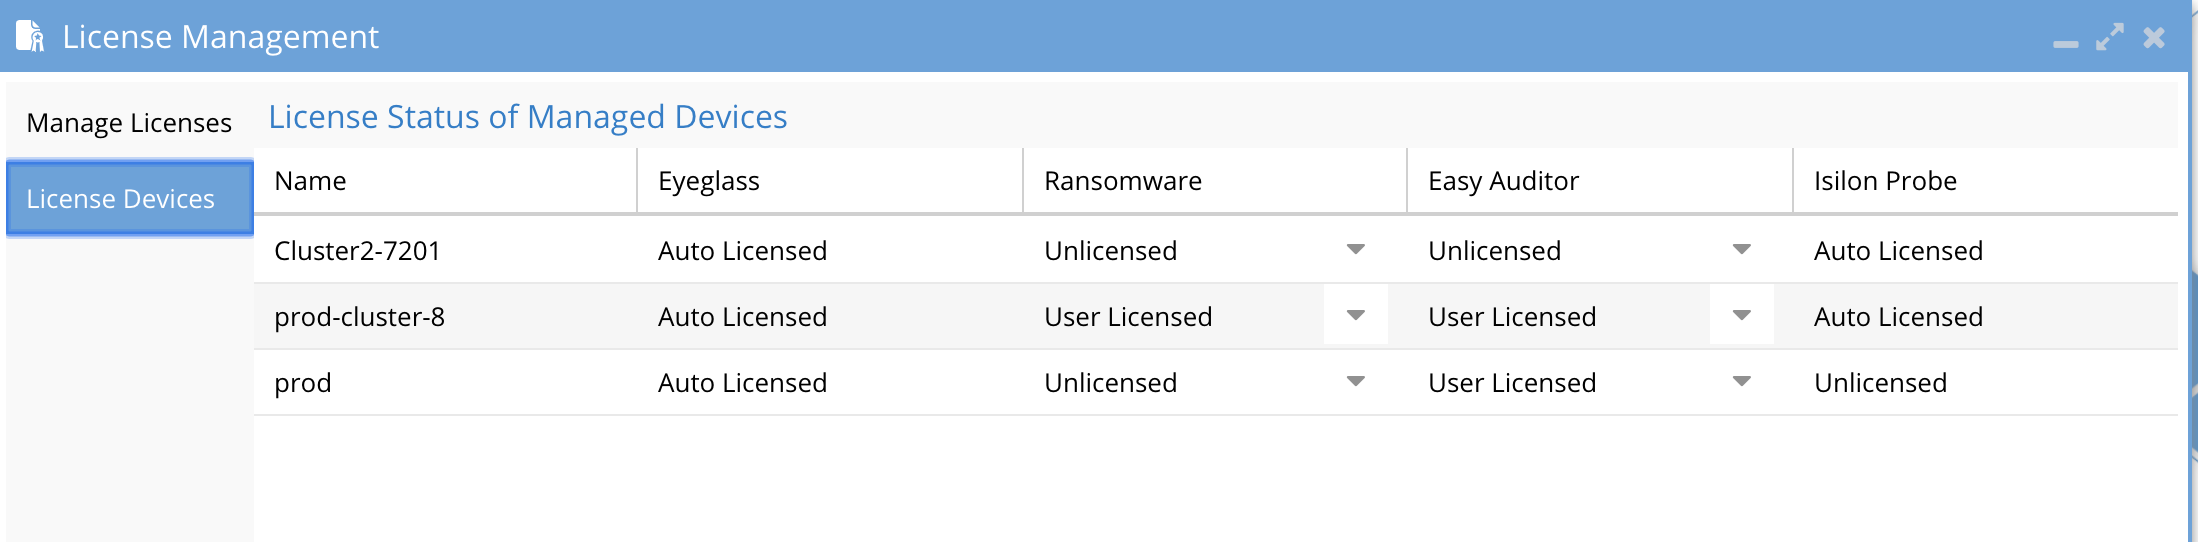
-
Open License Manager Again:
- After the page refreshes, open the License Manager.
-
Set License Status:
- Navigate to the Licensed Devices tab.
- For each cluster you wish to monitor using Data Security or Easy Auditor, set the license status to User Licensed.
- For clusters that should not be licensed, set the license status to Unlicensed. This ensures licenses are applied correctly and prevents them from being used on unintended clusters.
ECA VM Deployment
Step-by-Step Guide for Hyper-V Deployment
Create ECA Hyper-V Virtual Machine
Follow the steps below to create an Eyeglass Clustered Agent (ECA) Virtual Machine on Hyper-V:
-
Download ECA VHDX File:
- Visit the Superna Support Portal and download the ECA Hyper-V vhdx file.
-
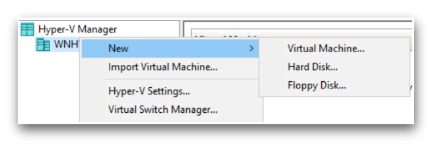
Deploy a New Virtual Machine:
- Open Hyper-V Manager and start the process to create a new Virtual Machine.
-
Configure the Virtual Machine:
- Enter a Name for the virtual machine.
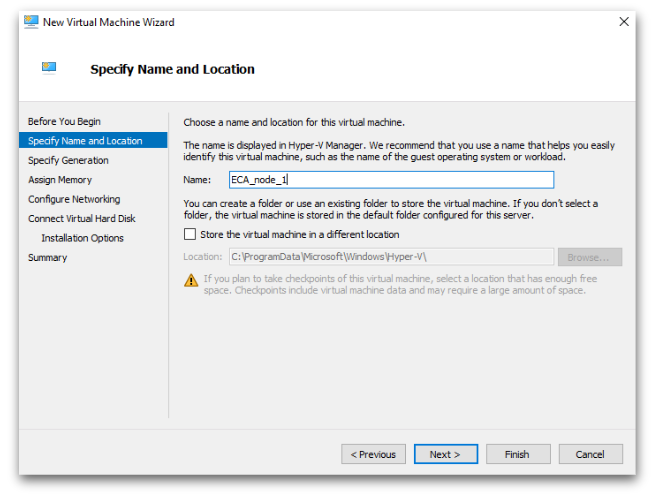
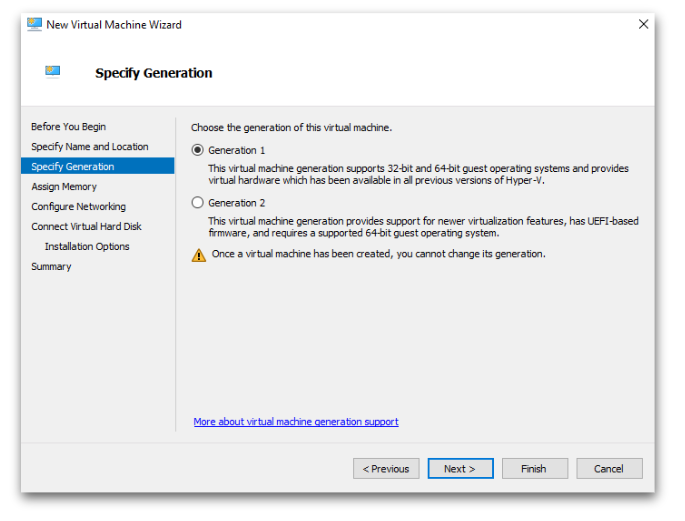
- Select Generation 1 for the virtual machine generation.
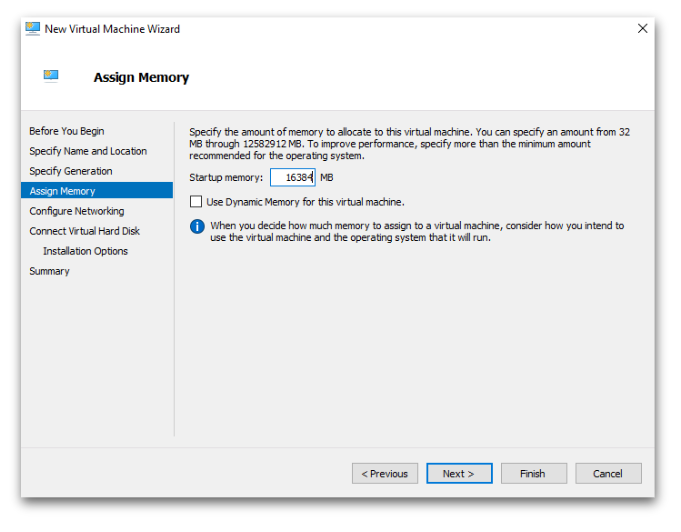
- Set the Startup Memory to 16384 MB (16 GB).
- Enter a Name for the virtual machine.
-
Configure Network:
- Select the appropriate Network Adapter for the virtual machine.
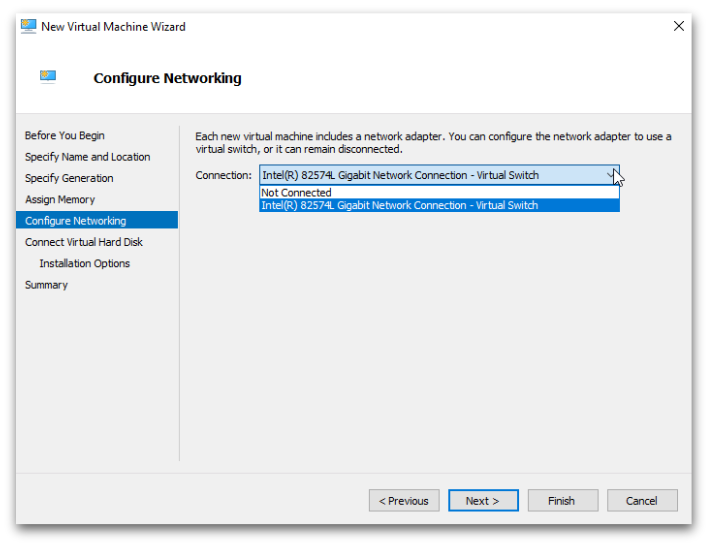
- Select the appropriate Network Adapter for the virtual machine.
-
Attach the ECA VHDX:
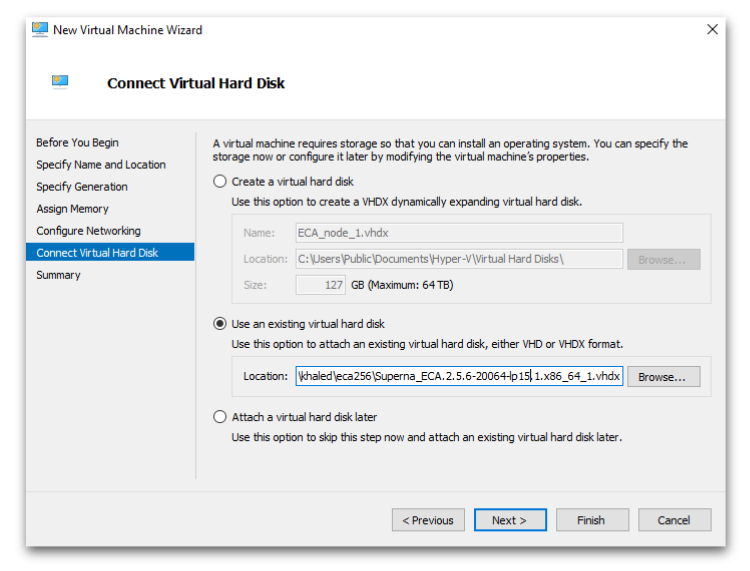
- In the virtual hard disk options, choose Use an existing virtual hard disk.
- Browse to and select the downloaded ECA vhdx file.
-
Complete the Wizard:
- Follow the prompts to complete the virtual machine creation process.
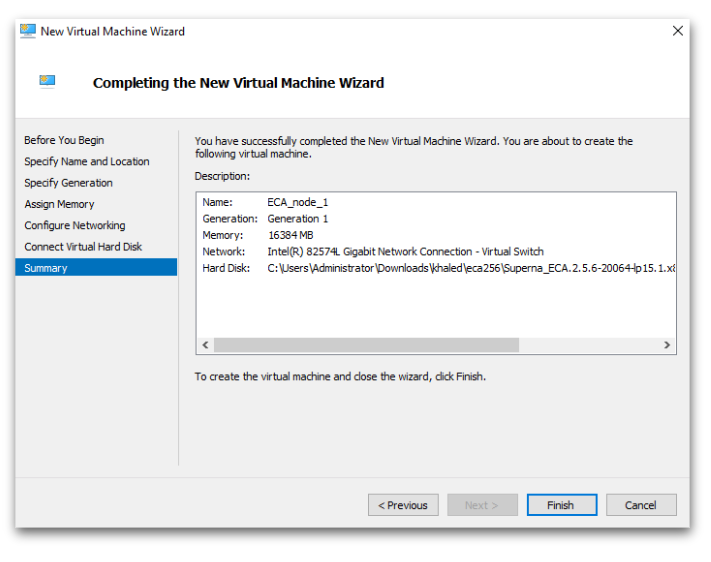
- Follow the prompts to complete the virtual machine creation process.
Configure ECA Data Disk
After deploying the Eyeglass Clustered Agent (ECA) Virtual Machine, follow the steps below to configure the data disk:
-
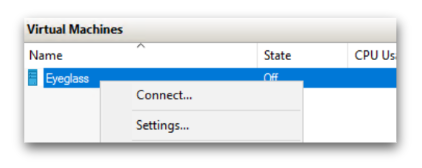
Open VM Settings:
- Go to the new VM in Hyper-V Manager.
- Right-click the VM and select Settings.
-
Add a Hard Drive:
- Under IDE Controller 0, click Add and select Hard Drive.
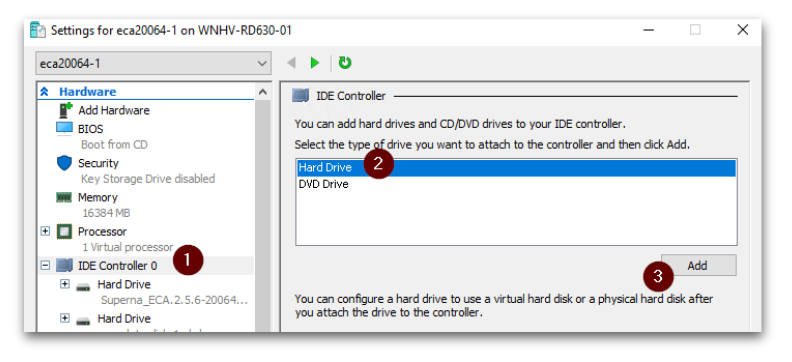
- Under IDE Controller 0, click Add and select Hard Drive.
-
Create a New Virtual Hard Disk:
- Choose Create New to configure a new virtual hard disk.
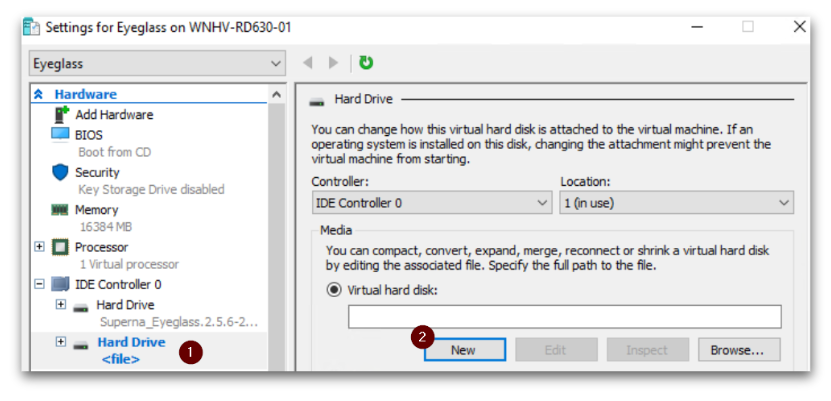
- Choose Create New to configure a new virtual hard disk.
-
Configure Disk Format and Type:
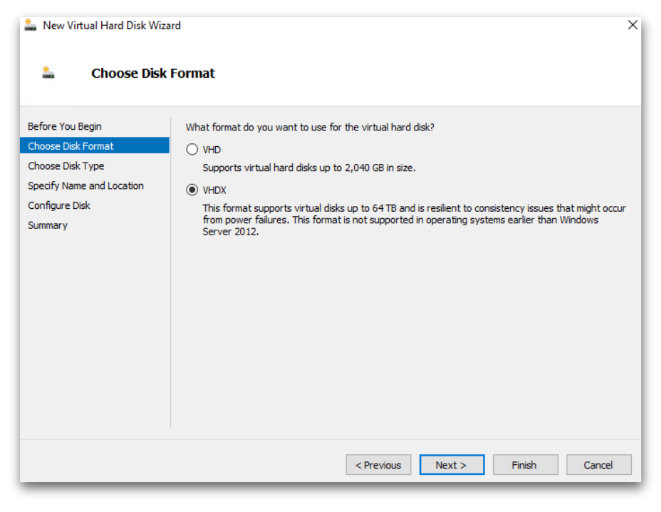
- Disk Format: Select VHDX.
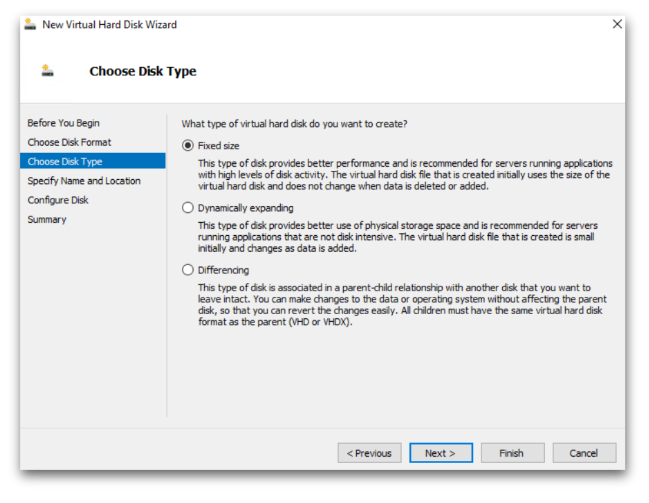
- Disk Type: Select Fixed size.
- Disk Format: Select VHDX.
-
Name and Size the Data Disk:
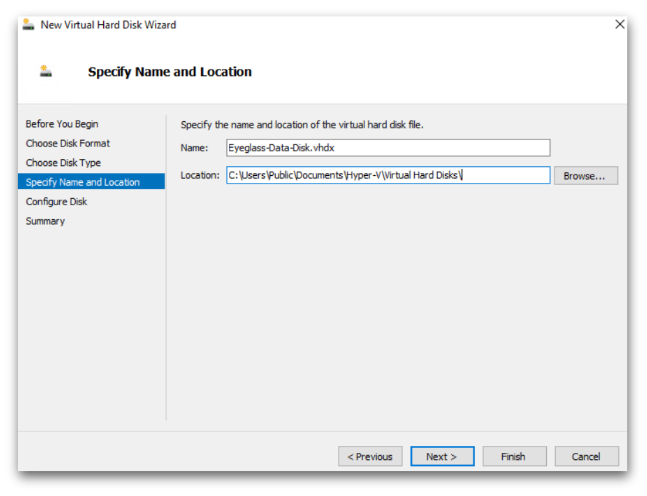
- Enter a Name for the data disk.
- Set the size to 80 GB for the new blank virtual hard disk.
- Enter a Name for the data disk.
-
Complete the Wizard:
- Follow the prompts to complete the data disk creation process.
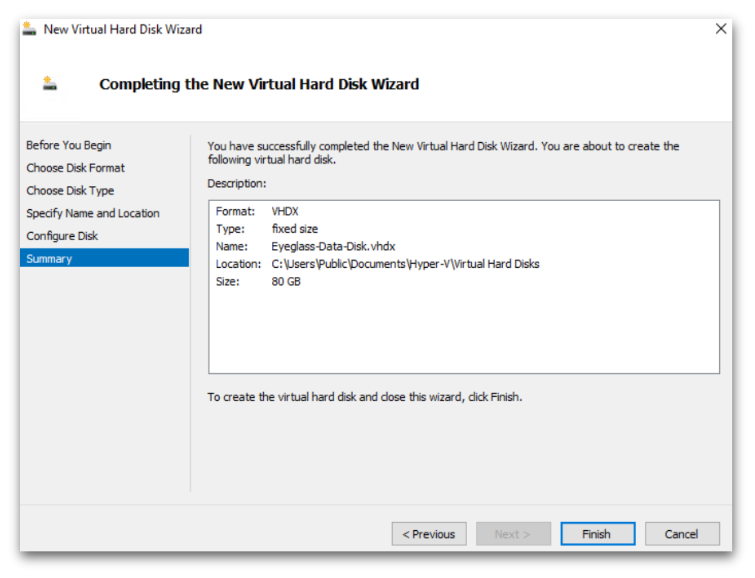
- Follow the prompts to complete the data disk creation process.
Configuration of ECA cluster
SSH Access
- Username:
\\<your-username> - Password:
\\<your-password>
Steps to Configure the ECA Cluster
-
Power Up the VM:
-
Start the ECA VM and wait 5-10 minutes for the Superna on-boot script to run.
-
To monitor the script, use the following command:
tail -2 /var/log/superna-on-boot.log -
Wait for the script to finish and follow the on-screen instructions.

-
-
Setup the First Node (Node 1):
-
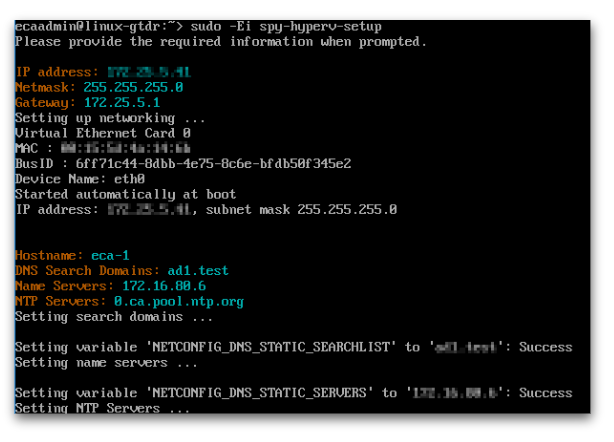
Run the command to set up your ECA Hyper-V node 1:
sudo spy-hypervisor-setup -
When prompted, enter the following network configuration details:
- Admin password
- IP Address
- Netmask
- Gateway
- Hostname
- DNS
- NTP
-
-
Configure the Cluster (Node 1):
- Follow the instructions carefully:
- Do not press
yuntil Node 2-N is configured. - Move on to the next step for Node 2-N setup.
- Do not press
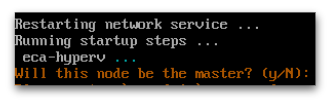
- Follow the instructions carefully:
-
Setup Additional Nodes (Node 2-N):
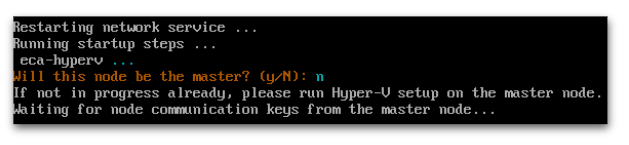
- Repeat STEP 1 and STEP 2 on Node 2-N for each additional node you wish to deploy.
- When prompted for the master node during setup on Node 2-N, enter
n.
-
Complete Setup on the Master Node (Node 1):
- Return to Node 1 (the master node) and press
yto complete the setup. - Enter the following details:
- ECA Cluster Name (use lowercase, no uppercase, underscores, or special characters).
- Child Nodes IPs (space-separated).
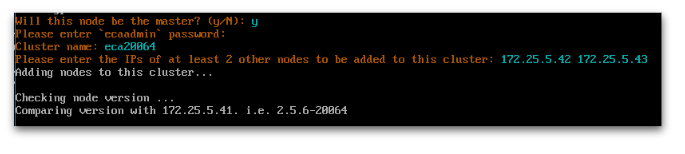
- Return to Node 1 (the master node) and press
-
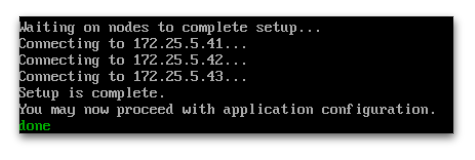
Verify Completion:
- After setup is complete, verify that all nodes are configured properly.
- You will see a "Setup complete" message once everything is successfully configured.
VMware OVA Installation Procedure
Installation ECA Vmware OVA
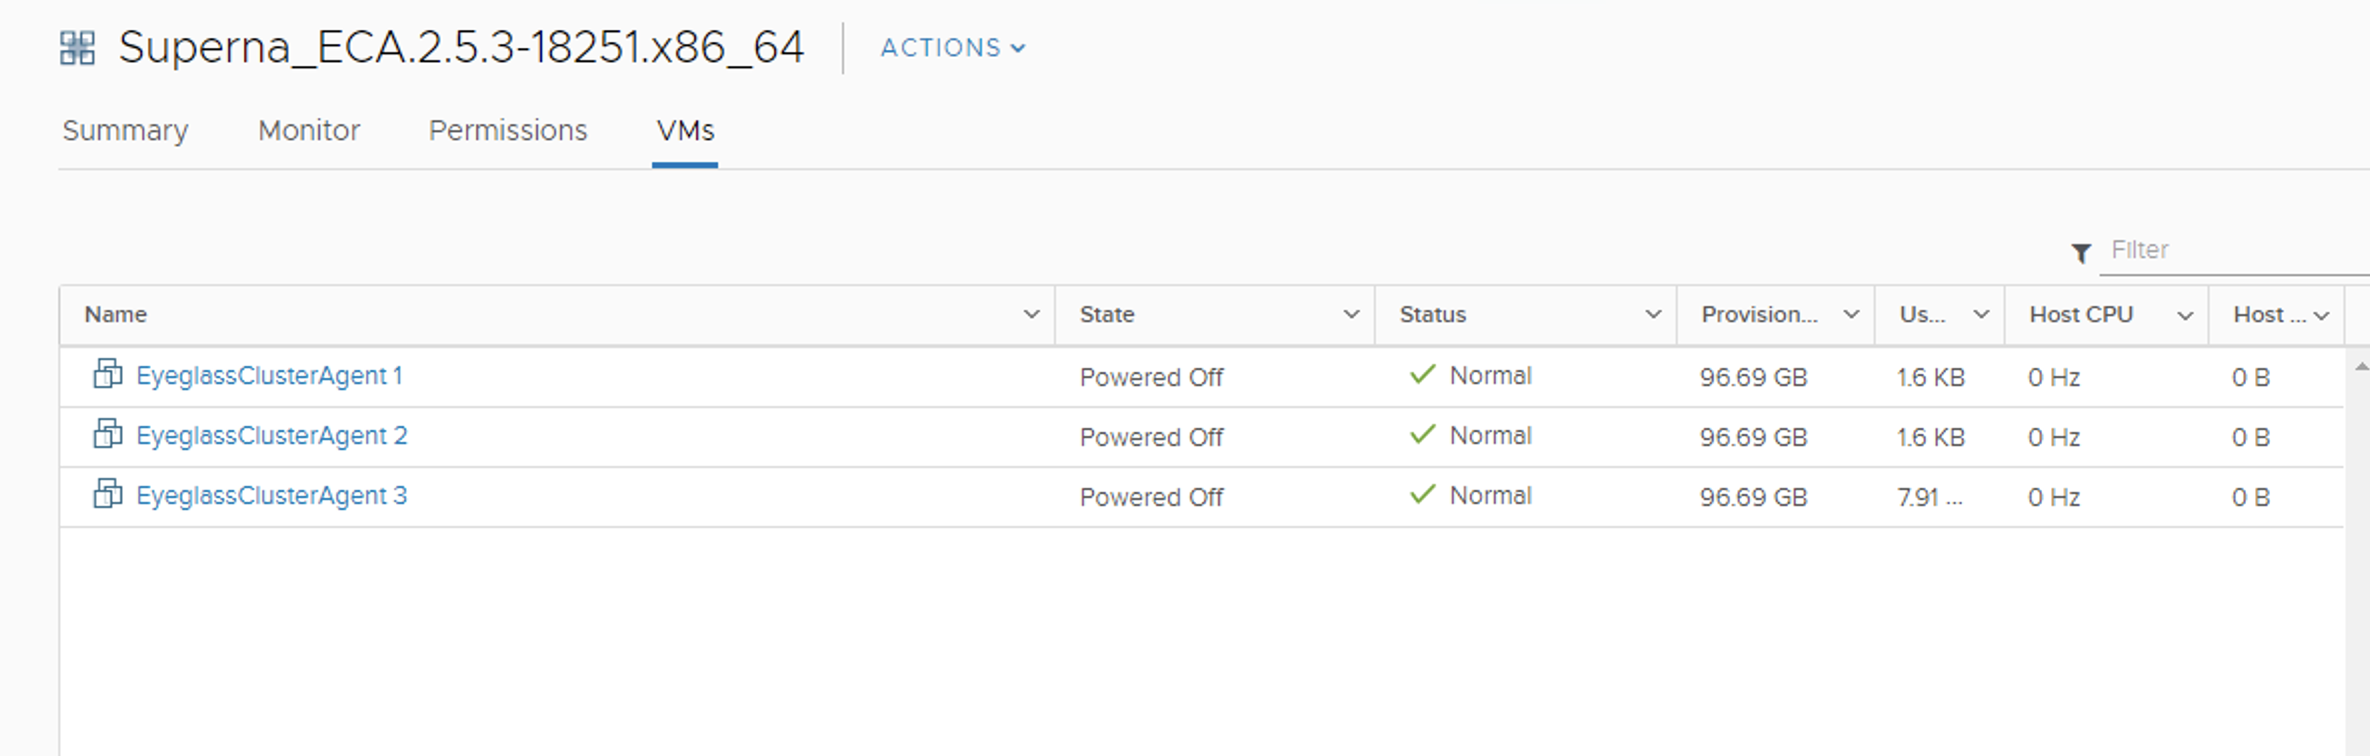
The deployment involves three ECA appliances. Follow the steps below to complete the installation.
-
Download the Superna Eyeglass™ OVF:
- Visit Superna Eyeglass Downloads to download the OVF file.
-
Unzip the OVF File:
- Extract the downloaded file into a directory on a machine with vSphere Client installed.
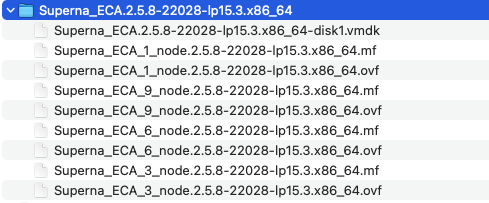
- Extract the downloaded file into a directory on a machine with vSphere Client installed.
-
OVA Contents:
-
The unzipped download contains 1, 3, 6, and 9 VM OVF files.
-
Use the 1 VM OVF if you do not have a VMware license for vAppliance objects and need to deploy N x VMs.
-
Select the 3, 6, 9 OVF + VMDK files to deploy an ECA cluster, matching the VM count from the scaling table in this guide.
-
-
Install the OVF using HTML vCenter Web Interface:
warningAccess vCenter with an FQDN DNS name, not an IP address. A bug in vCenter will generate an error during OVA validation.
-
MANDATORY STEP: Power on the vApp After Deployment to Ensure IP Addresses Get Assigned:
- DO NOT remove the VMs from the vApp before powering them on.
-
First Boot Verification:
-
Make sure the first boot steps complete by reviewing the logs. Run the following commands on each ECA VM:
- Check the status of the boot process:
sudo systemctl status superna-on-boot- Verify the process has completed:
cat /var/log/superna-on-boot.log- Ensure the log shows "done" before proceeding. Do not proceed until this step is complete.
-
-
Procedures After First Boot:
- Once the VMs are pingable, you can move the VMs from the vApp object if needed to rename each VM according to your naming convention.
note
Make sure the first boot script has completed using the procedures above on each VM. This can take up to 10 minutes per VM on the first boot as it sets up docker containers and must complete successfully along with SSH key creation.
- Once the VMs are pingable, you can move the VMs from the vApp object if needed to rename each VM according to your naming convention.
-
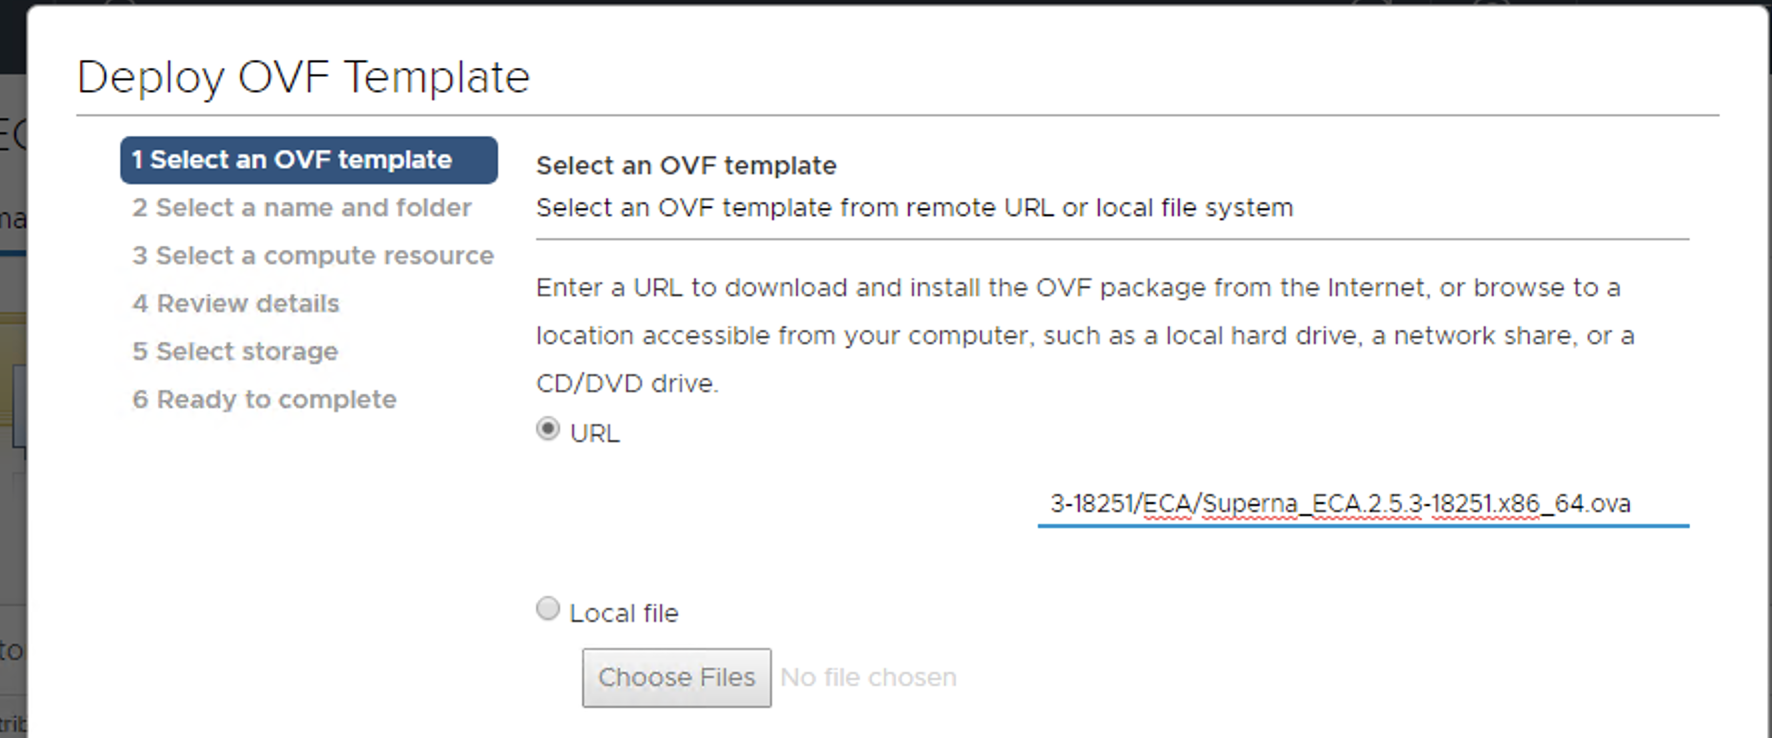
Deploy from a File or URL:
- Deploy the OVA from the file or URL where it was saved.
-
Configure VM Settings:
-
Using vCenter Client, set the required VM settings for datastore and networking.
-
NOTE: Leave the setting as Fixed IP address.
-
-
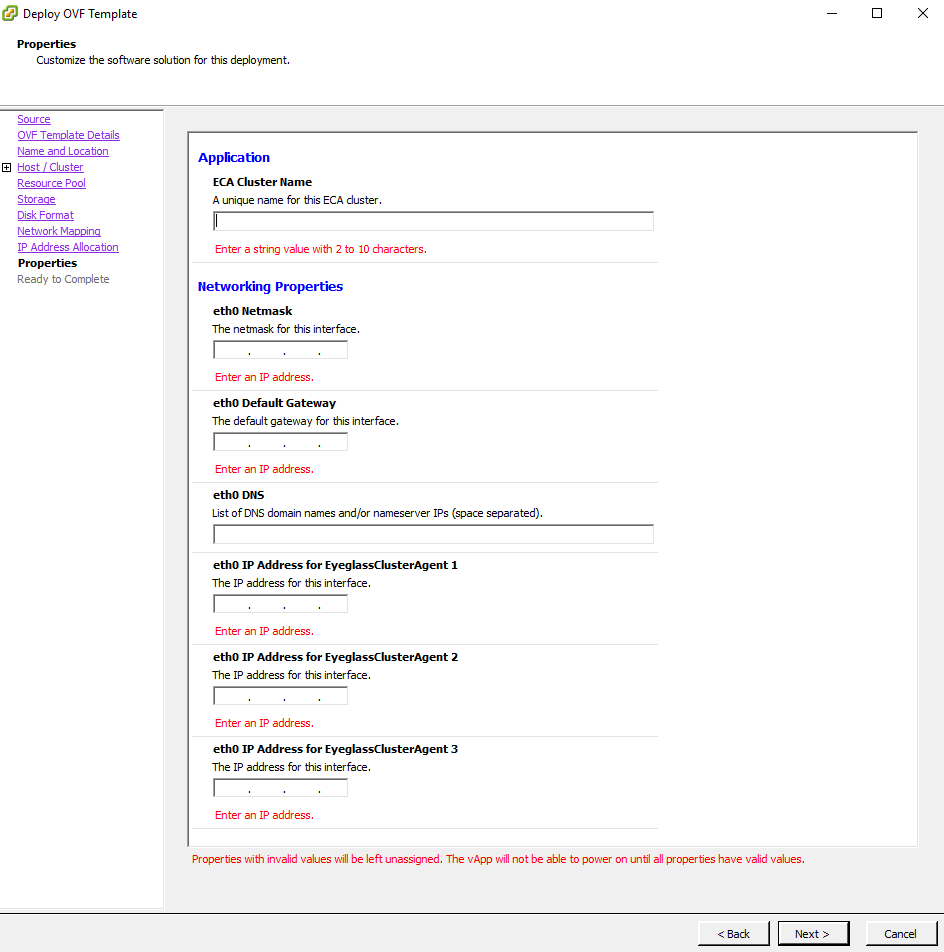
Complete the Networking Sections:
-
ECA Cluster Name:
-
The name must be lowercase, less than 8 characters, and contain no special characters, with only letters.
warningThe ECA cluster name cannot include underscores (
_) as this will cause some services to fail.
-
-
Ensure that all VMs are on the same subnet.
-
Enter the Network Mask (this will be applied to all VMs).
-
Enter the Gateway IP.
-
Enter the DNS Server:
- The DNS server must be able to resolve
igls.\\<your domain name here>. Use the nameserver IP address.
noteAgent node 1 is the master node where all ECA CLI commands are executed for cluster management.
- The DNS server must be able to resolve
-
-
vCenter Windows client example
- vCenter HTML Client Example
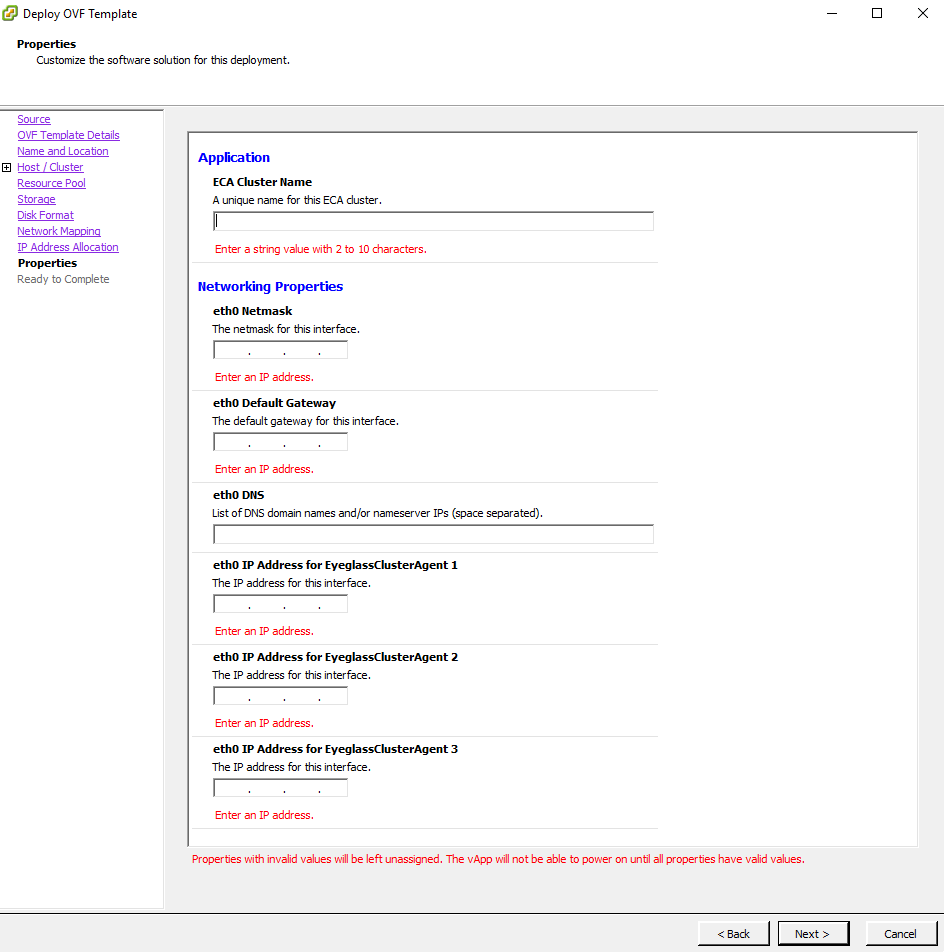
- vCenter HTML Client Example
-
Example OVA vAPP after deployment
-
Enter IP Information:
- Enter all IP information for each ECA VM in the vCenter UI.
-
After Deployment is Complete:
-
Power on the vApp (Recommended to stop here and wait for services to complete the remaining steps).
-
Ping each IP address to make sure each node has finished booting.
-
Login to the Master Node:
- Login via SSH to Node 1 (the Master Node) using the
\\<your-user>account. - Default password: `F.
- Login via SSH to Node 1 (the Master Node) using the
-
Configure Keyless SSH:
-
Run the following command to configure keyless SSH for the
\\<your-user>to manage the cluster:ecactl components configure-nodes
-
-
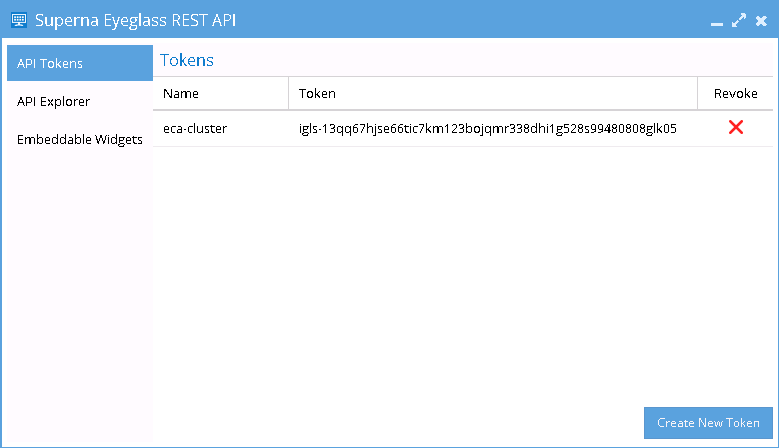
Generate API Token on Eyeglass Appliance:
- On the Eyeglass Appliance, generate a unique API Token from the Superna Eyeglass REST API Window.
- Once the token is generated for the ECA Cluster, it will be used in the ECA startup command for authentication.
-
Login to Eyeglass:
-
Go to the main menu and navigate to the Eyeglass REST API menu item.
-
Create a new API token, which will be used in the startup file for the ECA cluster to authenticate with the Eyeglass VM and register ECA services.
-
-
-
On ECA Cluster Master node ip 1
-
Login to that VM using ass as the ecaadmin user default password
\\<your-password>. From this point on, commands will only be executed on the master node. -
On the master node, edit the file
nano /opt/superna/eca/eca-env-common.conf, and change these five settings to reflect your environment. Replace the variables accordingly. -
Set the IP address or FQDN of the Eyeglass appliance and the API Token (created above), uncomment the parameter lines before saving the file. For example:
export EYEGASS_LOCATION=ip_addr_of_eyeglass_appliance
export EYEGASS_API_TOKEN=Eyeglass_API_token -
Verify the IP addresses for the nodes in your cluster. It is important that NODE_1 be the master (i.e., the IP address of the node you're currently logged into).
infoAdd additional
ECA_LOCATION_NODE_X=x.x.x.xfor an additional node in the ECA cluster depending on ECA cluster size. All nodes in the cluster must be listed in the file. Copy a line and paste to add additional ECA nodes and make sure to change the node number example to add the 4th ECA VM, it would look like this:export ECA_LOCATION_NODE_4=export ECA_LOCATION_NODE_1=ip_addr_of_node_1 # set by first boot from the OVF
export ECA_LOCATION_NODE_2=ip_addr_of_node_2 # set by first boot from the OVF
export ECA_LOCATION_NODE_3=ip_addr_of_node_3 # set by first boot from the OVF
-
-
Done: Continue on to Setting Up Audit Data Ingestion below.
Start up the ECA Cluster
-
Start up the cluster:
- At this point, you can start up the cluster.
-
SSH to ECA node 1:
- SSH to ECA node 1 as
\\<your-username>and run the following command:ecactl cluster up- Note: This process can take 5-8 minutes to complete.
- SSH to ECA node 1 as
-
Verify startup and post-startup status:
- Refer to the troubleshooting section below for commands to verify startup and post-startup status.
Network and Storage Setup
Setting Up Audit Data Ingestion
Audit data ingestion setup is platform-specific. Follow the steps in the installation guide for your platform:
- VAST Installation Guide — mounting the VAST audit path and enabling VAST support on the ECA cluster.
- Qumulo Installation Guide — enabling the Qumulo audit stream and connecting it to the ECA cluster.
Final Configuration
Verifying the Installation and Network Setup
Verify ECA Remote Monitoring Connection from the Eyeglass Appliance
- Login to Eyeglass as the admin user.
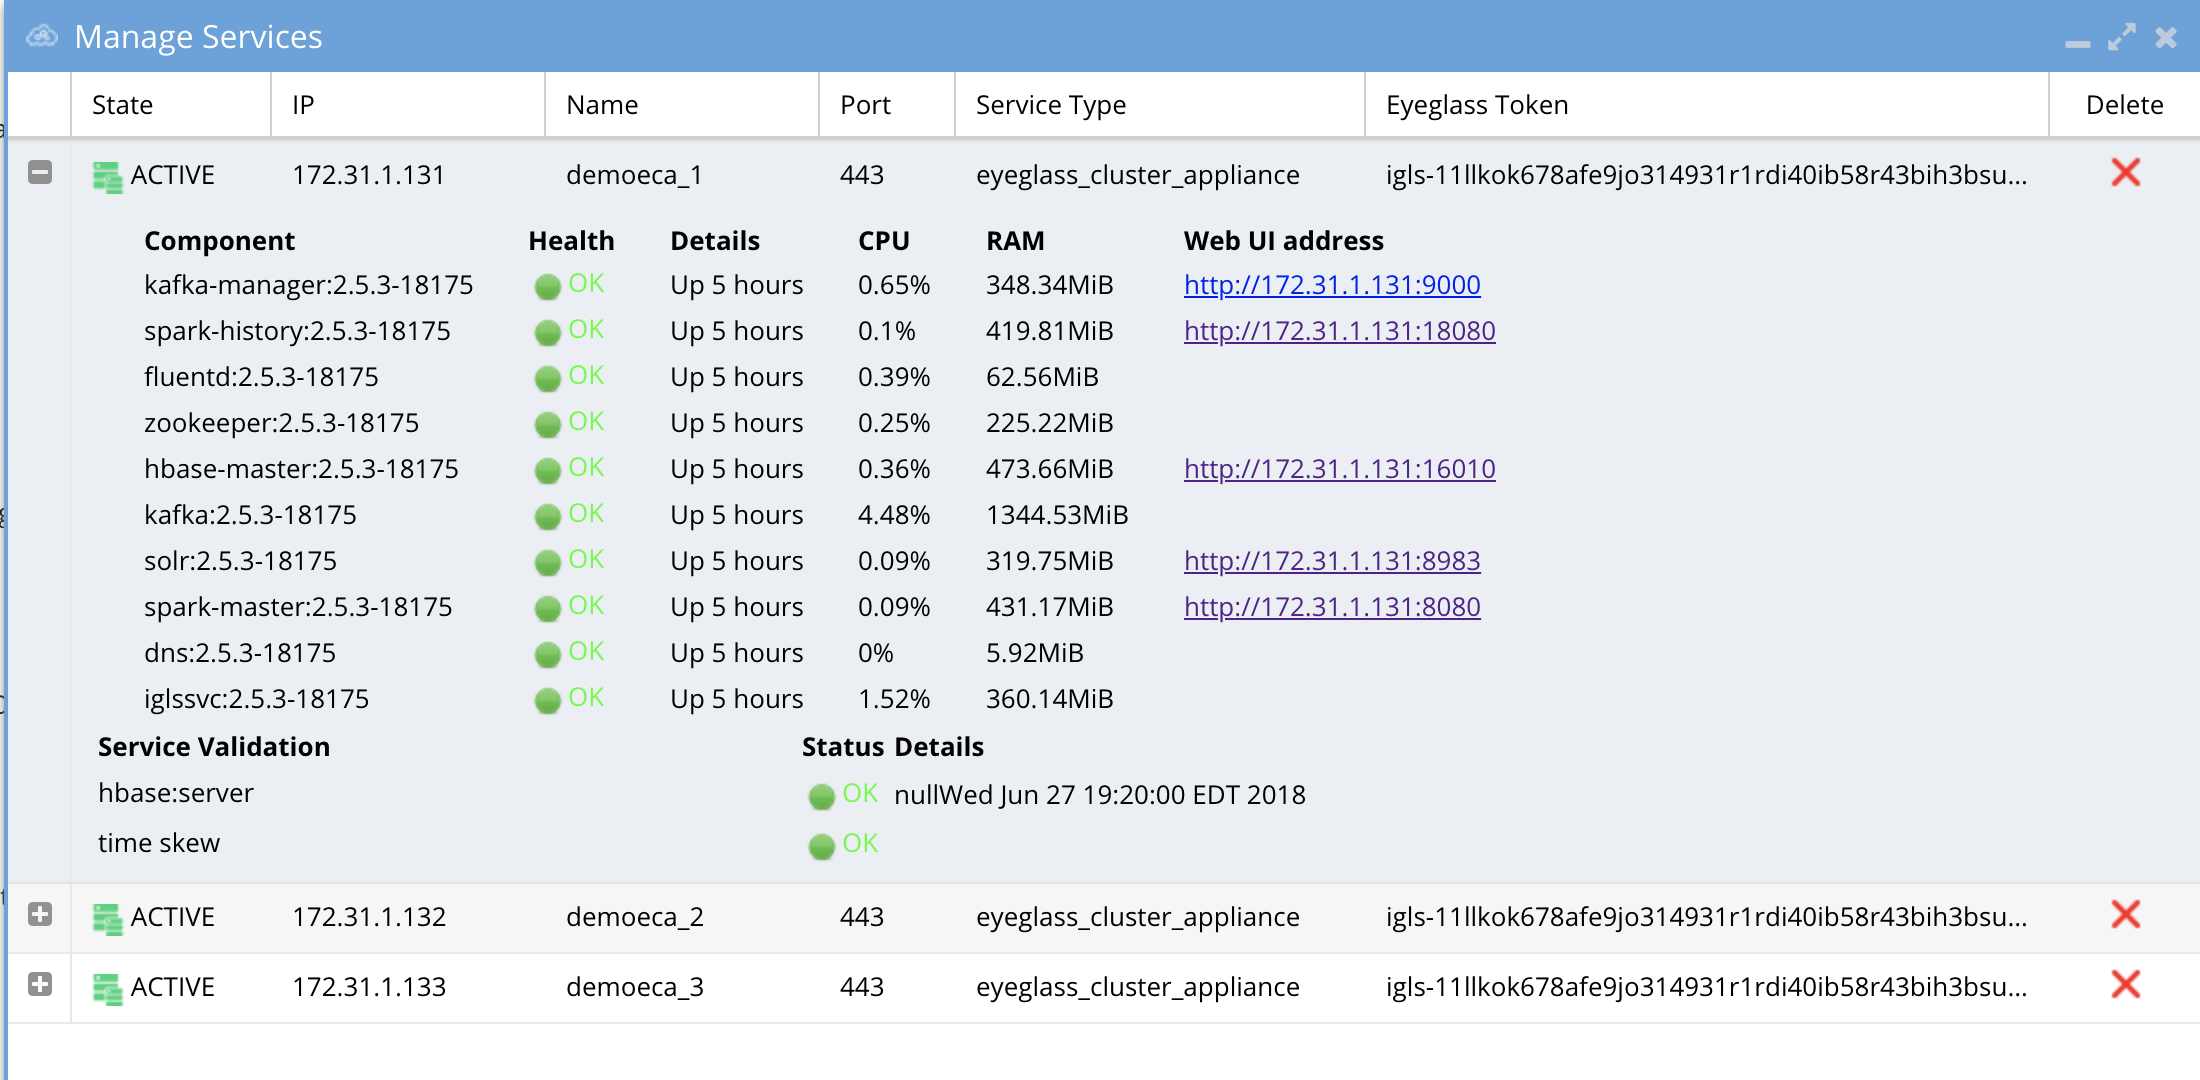
- Check the status of the ECA Cluster. Click the Manage Services icon and then click the + to expand the container or services for each ECA node (review the image below).
- Verify the IP addresses of the ECA nodes are listed.
- Verify that all cluster nodes and all Docker containers show green health.
HBase status can take up to 5 minutes to transition from warning to green.
How to Upgrade the ECA cluster Software For Easy Auditor , Data Security and Performance Auditor
Important Notes for Upgrading
-
Contact support first before upgrading the cluster to ensure compatibility with the Eyeglass version. Both Eyeglass and ECA must be running the same version.
-
Upgrade assistance is scheduled and is a service not covered under 24/7 support. Please review the EULA terms and conditions.
-
Always take a VM-level snapshot before any upgrade steps to allow for rollback to the previous release if needed.
Steps to Carrier Grade Upgrade - No downtime
-
Requirements:
- 2.5.8.2 or later release
-
Login to node 1 as
\\<your-username>and copy the run file to node 1. -
Change file permissions:
chmod 777 xxxx (name of the run file) -
Run the upgrade with the following command:
./eca-xxxxx.run --rolling-upgrade -
Provide the password for
\\<your-username>when prompted. -
Nodes will be upgraded in a manner that allows audit data and all ECA products to continue operating fully.
-
The upgrade will manage all node upgrades and will exit when done. The final state will have all containers running the new code.
Steps to Upgrade
-
Take a Hypervisor-level VM snapshot to enable a rollback if needed. This is a mandatory step.
-
Disable Data Security, Easy Auditor, and Performance Auditor functionality before beginning the upgrade – required first step:
- Log in to ECA Node 1 using
\\<your-username>credentials. - Issue the following command:
ecactl cluster down. - Wait for the procedure to complete on all involved ECA nodes.
- Done!
- Log in to ECA Node 1 using
-
Upgrade Eyeglass VM first and download the latest release.
noteEyeglass and ECA cluster software must be upgraded to the same version.
- Follow the guide.
- Double-check that licenses are assigned to the correct clusters based on the information.
- Double-check that Data Security, Easy Auditor, and Performance Auditor settings match the ones before the upgrade.
-
Download the latest GA Release for the ECA upgrade, following instructions.
-
Log in to ECA Node 1 using
\\<your-username>credentials. -
note
ECA is in a down state –
ecactl cluster downwas already done in step 1. -
Verify by executing the following command:
ecactl cluster status -
Ensure no containers are running.
-
If containers are still running, stop them by executing the command and waiting for it to complete on all nodes:
ecactl cluster down -
Once the above steps are complete:
-
Use WinSCP to transfer the run file to Node 1 (Master Node) in
/home/ecaadmindirectory. -
SSH to ECA Node 1 as
\\<your-username>:ssh ecaadmin@x.x.x.x
cd /home/ecaadmin
chmod +x ecaxxxxxxx.run (xxxx is the name of the file)
./ecaxxxxxxx.run -
Enter the
\\<your-username>password when prompted. -
Wait for the installation to complete.
-
Capture the upgrade log for support if needed.
-
-
Complete the software upgrade.
-
Bring up the ECA cluster:
-
Execute:
ecactl cluster exec "sudo systemctl enable --now zkcleanup.timer"(Enter the
\\<your-username>password for each node.) -
Start the cluster:
ecactl cluster up -
Wait until all services start on all nodes. If there are any errors, copy the upgrade log and use WinSCP to transfer it to your PC or attach it to a support case.
-
-
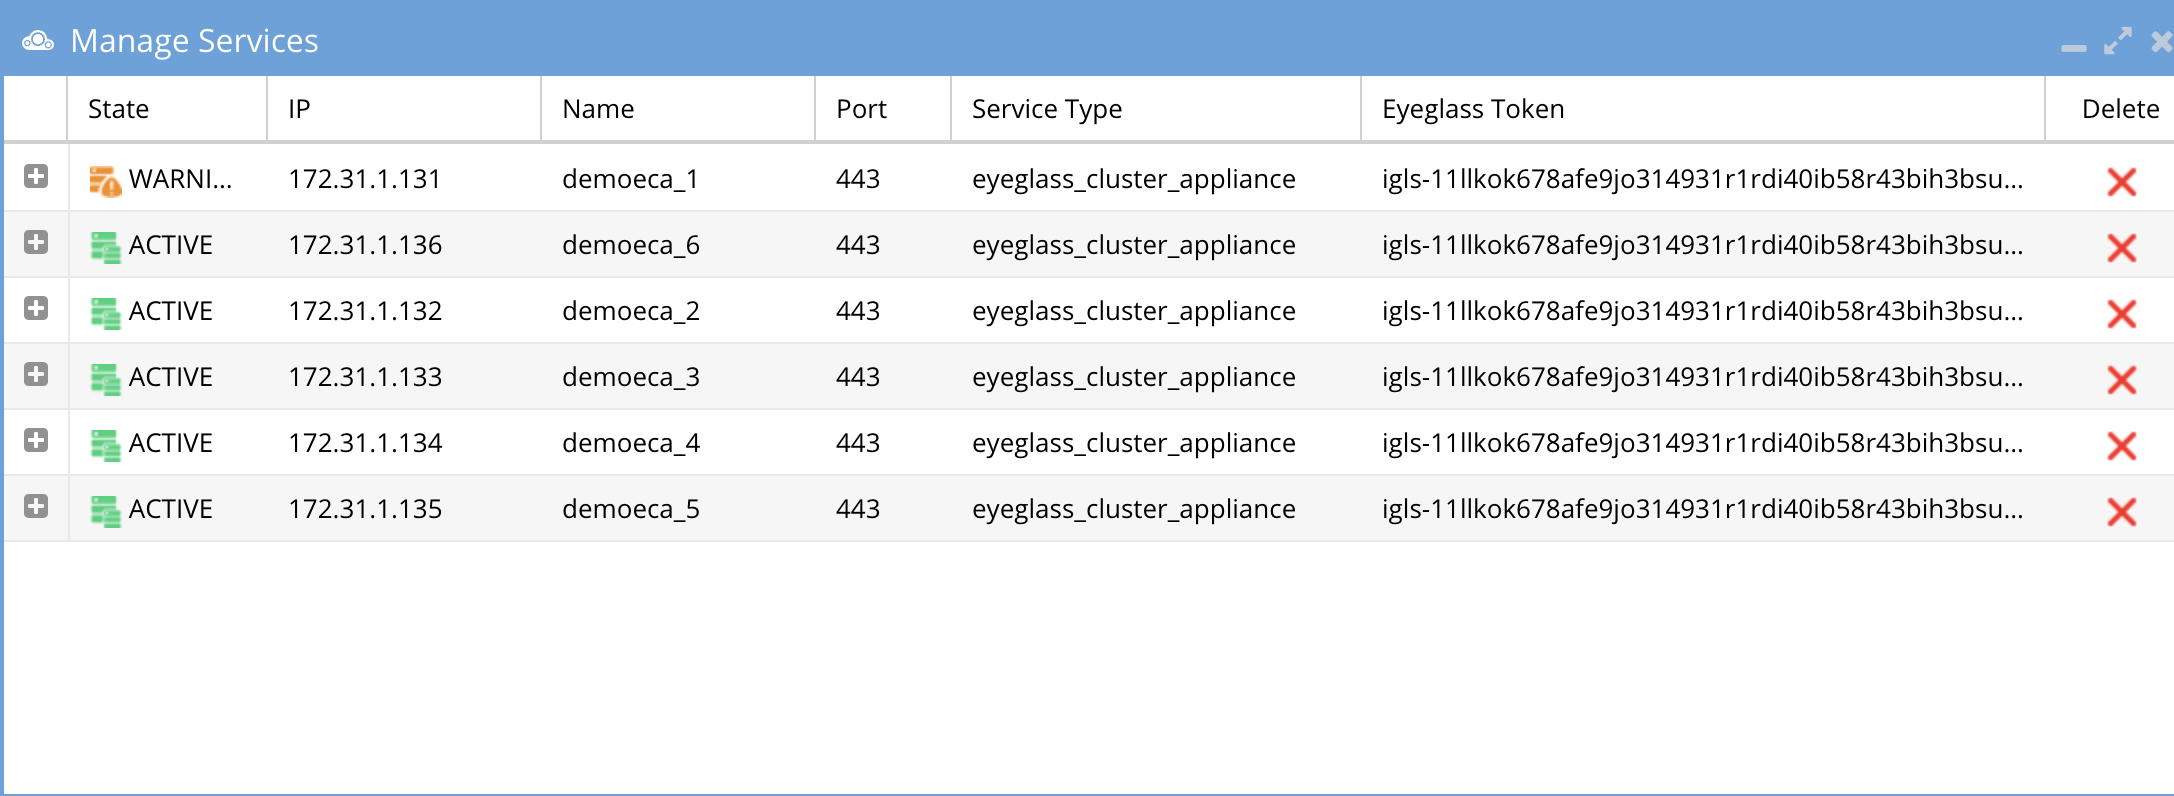
Once completed, log in to Eyeglass, open the Manage Services icon, and verify that all ECA nodes show green and are online. If any services show a warning or are inactive, wait at least 5 minutes. If the condition persists, open a support case.
-
If all steps pass and all ECA nodes show green:
- Use the Security Guard test in Data Security or run the RoboAudit feature in Easy Auditor to validate that audit data ingestion is functioning.
-
Consult the admin guide for each product to start a manual test of these features.
How to Migrate ECA cluster settings to a new ECA cluster deployment - To upgrade Open Suse OS
To upgrade an ECA cluster OS, it is easier to migrate the settings to a new ECA cluster deployed with the new OS. Follow these steps to deploy a new ECA cluster and migrate configuration to the new ECA cluster.
-
Retrieve the ECA Cluster Name:
- The ECA cluster has a logical name shared between nodes. When deploying a new OVA, the deployment will prompt for the ECA cluster name. This should be the same as the previous ECA cluster name.
- To get the ECA cluster name:
-
Log in to ECA Node 1 via SSH as
\\<your-username>(e.g.,ssh ecaadmin@x.x.x.x). -
Run the following command:
cat /opt/superna/eca/eca-env-common.conf | grep ECA_CLUSTER_ID -
Use the value returned after the
=sign when deploying the new ECA cluster. -
Use WinSCP to copy the following files from ECA Node 1 of the existing ECA cluster (logged in as
\\<your-username>):/opt/superna/eca/eca-env-common.conf/opt/superna/eca/docker-compose.overrides.yml/opt/superna/eca/conf/common/overrides/ThreatLevels.json/opt/superna/eca/data/audit-nfs/auto.nfs
-
noteThis procedure assumes the IP addresses will stay the same, so the cluster NFS export doesn't need to be changed, and there will be no impact on any firewall rules.
-
Deploy a New OVA:
- Deploy a new OVA ECA cluster using the latest OS OVA, following the instructions
- Follow the deployment instructions and use the same ECA cluster name captured earlier when prompted during the installation of the OVA.
noteUse the same IP addresses as the current ECA cluster.
-
Shutdown the Old ECA Cluster:
-
Log in to Node 1 as
\\<your-username>. -
Run the following command:
ecactl cluster down -
Wait for the shutdown to finish.
-
Using the vCenter UI, power off the VApp.
-
-
Startup the New ECA Cluster:
-
Power on the VApp using the vCenter UI.
-
Ping each IP address in the cluster until all VMs respond.
warningDo not continue if you cannot ping each VM in the cluster.
-
Using WinSCP, log in as
\\<your-username>and copy the files from the steps above into the new ECA OVA cluster. -
On Node 1, replace the files with the backup copies:
/opt/superna/eca/eca-env-common.conf/opt/superna/eca/docker-compose.overrides.yml/opt/superna/eca/conf/common/overrides/ThreatLevels.json/opt/superna/eca/data/audit-nfs/auto.nfs
-
On Nodes 1 to X (where X is the last node in the cluster):
- On each node, complete the following steps:
-
SSH to the node as
\\<your-username>:ssh ecaadmin@x.x.x.x -
Run the following commands:
sudo -s
mkdir -p /opt/superna/mnt/audit/\\<cluster GUID/cluster name>
Example:
/opt/superna/mnt/audit/0050569960fcd70161594d21dd22a3c10cbe/prod-cluster-8 -
Repeat for each cluster managed by this ECA cluster. View the contents of the
auto.nfsfile to get the cluster GUID and name.
-
- On each node, complete the following steps:
-
Restart the Autofs process to read the
auto.nfsfile and mount all clusters:-
Run the following commands on each node:
ecactl cluster exec "sudo systemctl restart autofs"
ecactl cluster exec "mount" -
Verify that the mount is present on all nodes in the output from the
mountcommand.
-
-
Start up the new ECA cluster:
-
Log in to ECA Node 1 as
\\<your-username>:ecactl cluster up -
Review startup messages for errors.
-
-
Done.
-
Monitor Health and Performance of an ECA Cluster - Optional
The sections below provide instructions on how to monitor the health and performance of an ECA cluster. Always contact support before taking any actions. Note that ECA clusters are designed to consume high CPU resources for most operations, and it is expected to see high CPU usage on all nodes most of the time.
Verifying ECA Cluster Status
To check the status of an ECA cluster, follow these steps:
-
Access the master node and run the following command:
ecactl db shell -
Once in the shell, execute the command:
status -
The output should show:
- 1 active master
- 2 backup master servers

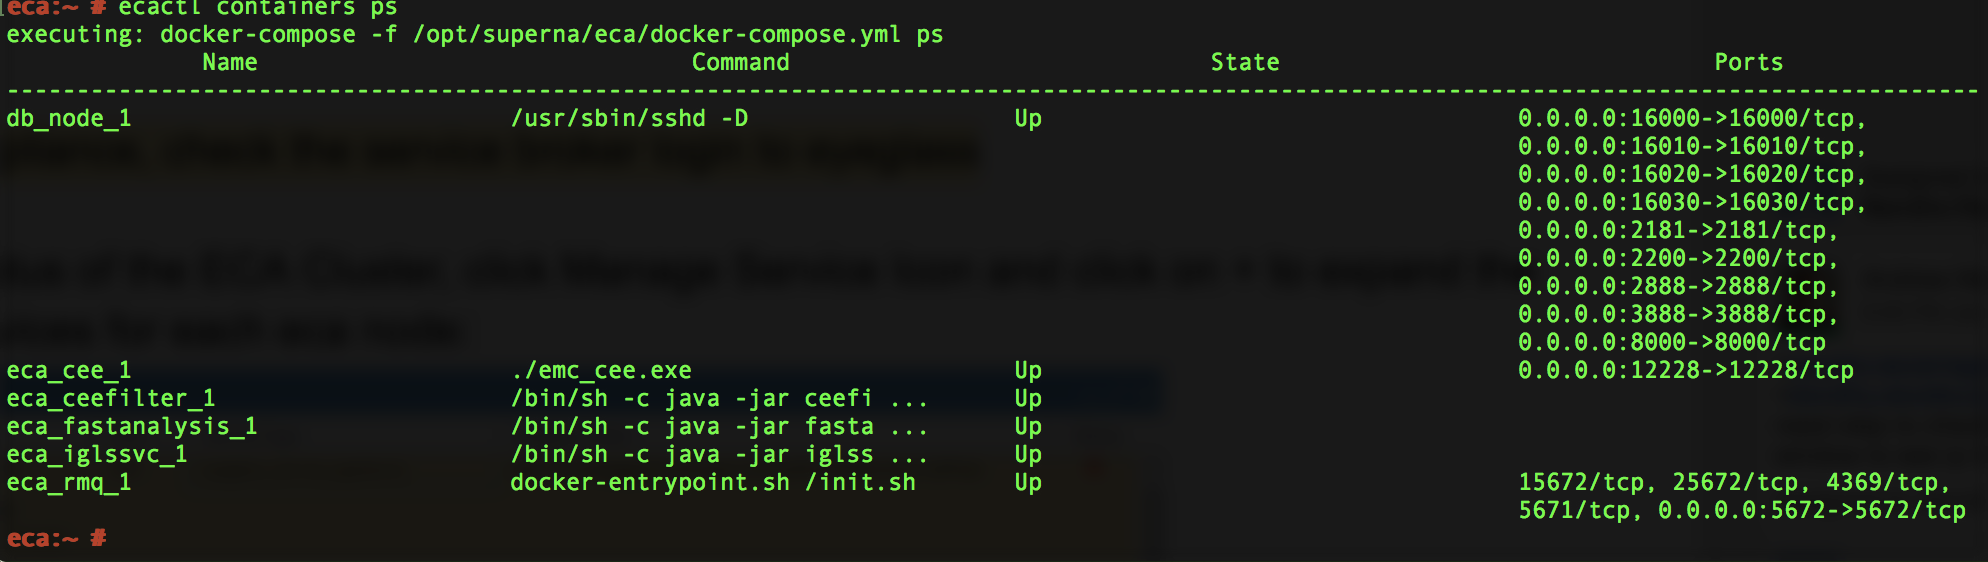
Verifying ECA Containers are Running
To verify that ECA containers are running, execute the following command:
ecactl containers ps
Check Cluster Status and Verify Analytics Tables - Optional
This section explains how to check the status of the cluster and ensure all analytics tables are available for Data Security, Easy Auditor, and Performance Auditor.
-
Run the following command to check the cluster status:
ecactl cluster statusThis command verifies:
- All containers are running on every node.
- Each node can mount the necessary tables in the Analytics database.
-
If any errors are encountered, follow these steps:
- Open a support case to resolve the issue.
- Alternatively, retry the cluster commands below:
ecactl cluster down
ecactl cluster up -
Once the cluster is back up, send the ECA cluster startup log to support for further assistance.
Check ECA Node Container CPU and Memory Usage - Optional
To monitor the real-time CPU and memory usage of containers on an ECA node, follow these steps:
-
Log in to the ECA node as the
\\<your-username>user. -
Run the following command to view the real-time resource utilization of the containers:
ecactl stats
Enable Real-time Monitoring of ECA Cluster Performance (If Directed by Support)
Follow this procedure to enable container monitoring and ensure that CPU GHz are set correctly for query and writing performance to the managed cluster.
Steps to Enable Monitoring
-
To enable cadvisor across all cluster nodes, add the following line to the
eca-env-common.conffile:export LAUNCH_MONITORING=trueThis will launch cadvisor on all ECA cluster nodes.
-
If you need to launch cadvisor on a single node, log in to that specific node and run the following command:
ecactl containers up -d cadvisor -
Once the cadvisor service is running, you can access the web UI by navigating to:
http://\\<IP OF ECA NODE>:9080Replace
\\<IP OF ECA NODE>with the actual IP address of the node.
Done! You can now monitor the real-time performance of the ECA cluster.
ECA Cluster Modification Procedures - Optional
How to Expand Easy Auditor Cluster Size
Always contact support before proceeding. Support will determine if your installation requires expansion.
To enhance analytics performance for handling higher event rates or long-running queries in a large database, follow these steps to add 3 or 6 more VMs:
- Deploy the ECA OVA.
- Copy the new VMs into the vAPP.
- Remove the vAPP created during the deployment.
The ECA name during the OVA deployment is not important, as it will be synchronized from the existing ECA cluster during the cluster startup procedures.
-
Log in to the master ECA node.
-
Run the following command to take the cluster down:
ecactl cluster down -
Deploy one or two more ECA clusters. No special configuration is needed on the newly deployed ECA OVA.
-
Edit the configuration file to add more nodes:
nano /opt/superna/eca/eca-env-common.conf -
Add the IP addresses of the new nodes, for example:
ECA_LOCATION_NODE_4: \\<IP>
ECA_LOCATION_NODE_5: \\<IP> -
You can add nodes from 4 to 9, depending on the number of VMs added to the cluster.
-
Run the following command to configure the new nodes:
ecactl components configure-nodes -
Bring the cluster back up:
ecactl cluster up -
This will expand the HBASE and Spark containers for faster read and analytics performance.
-
Log in to Eyeglass and open the managed services.
-
Now balance the load across the cluster for improved read performance:
- Log in to the Region Master VM (typically node 1).
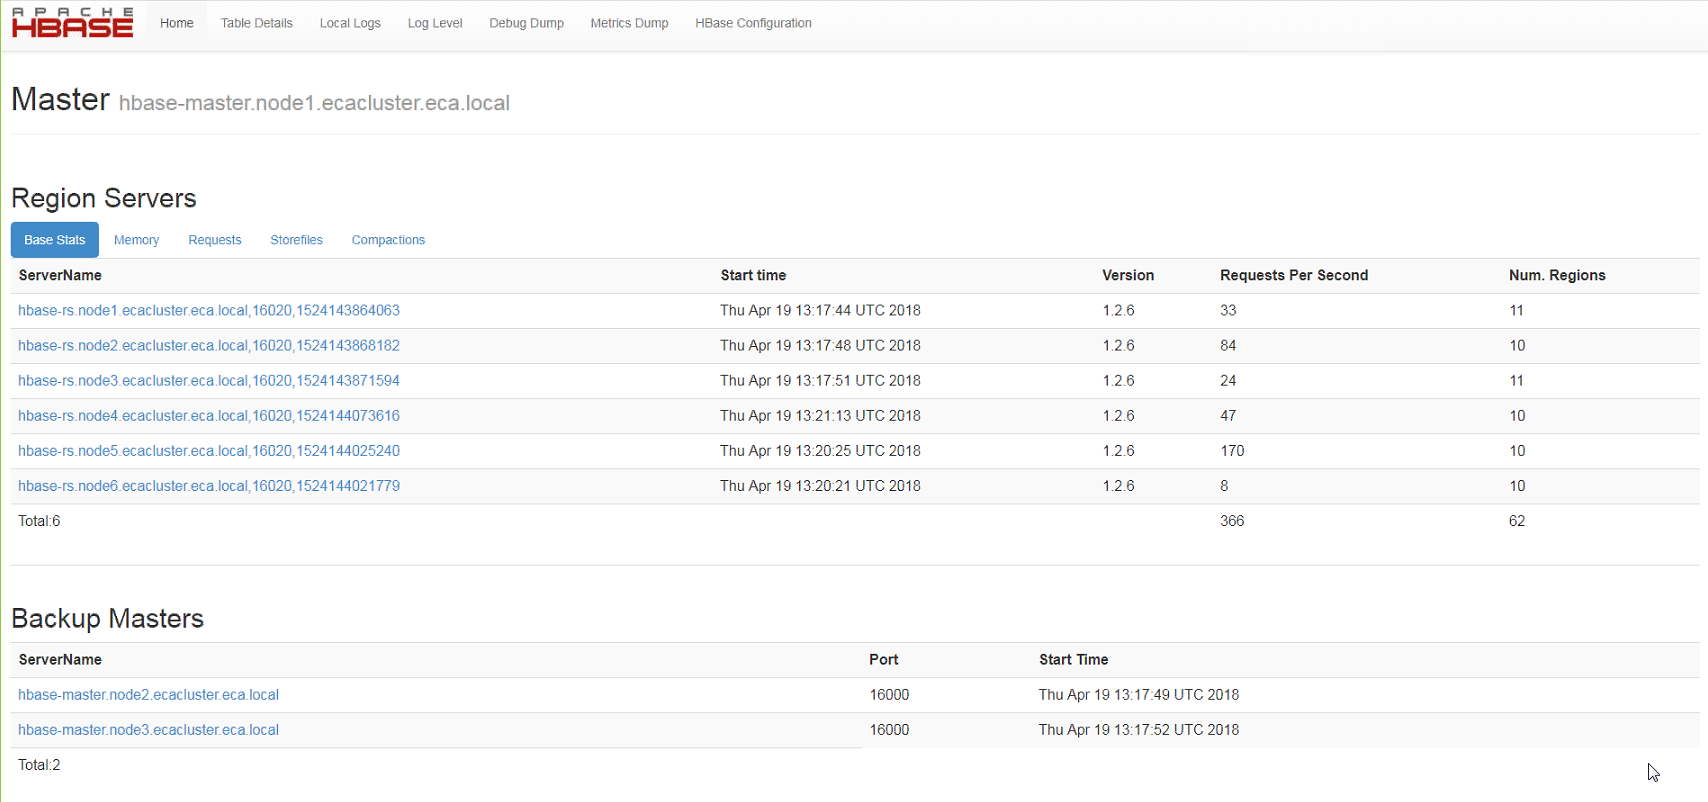
- Open the UI at
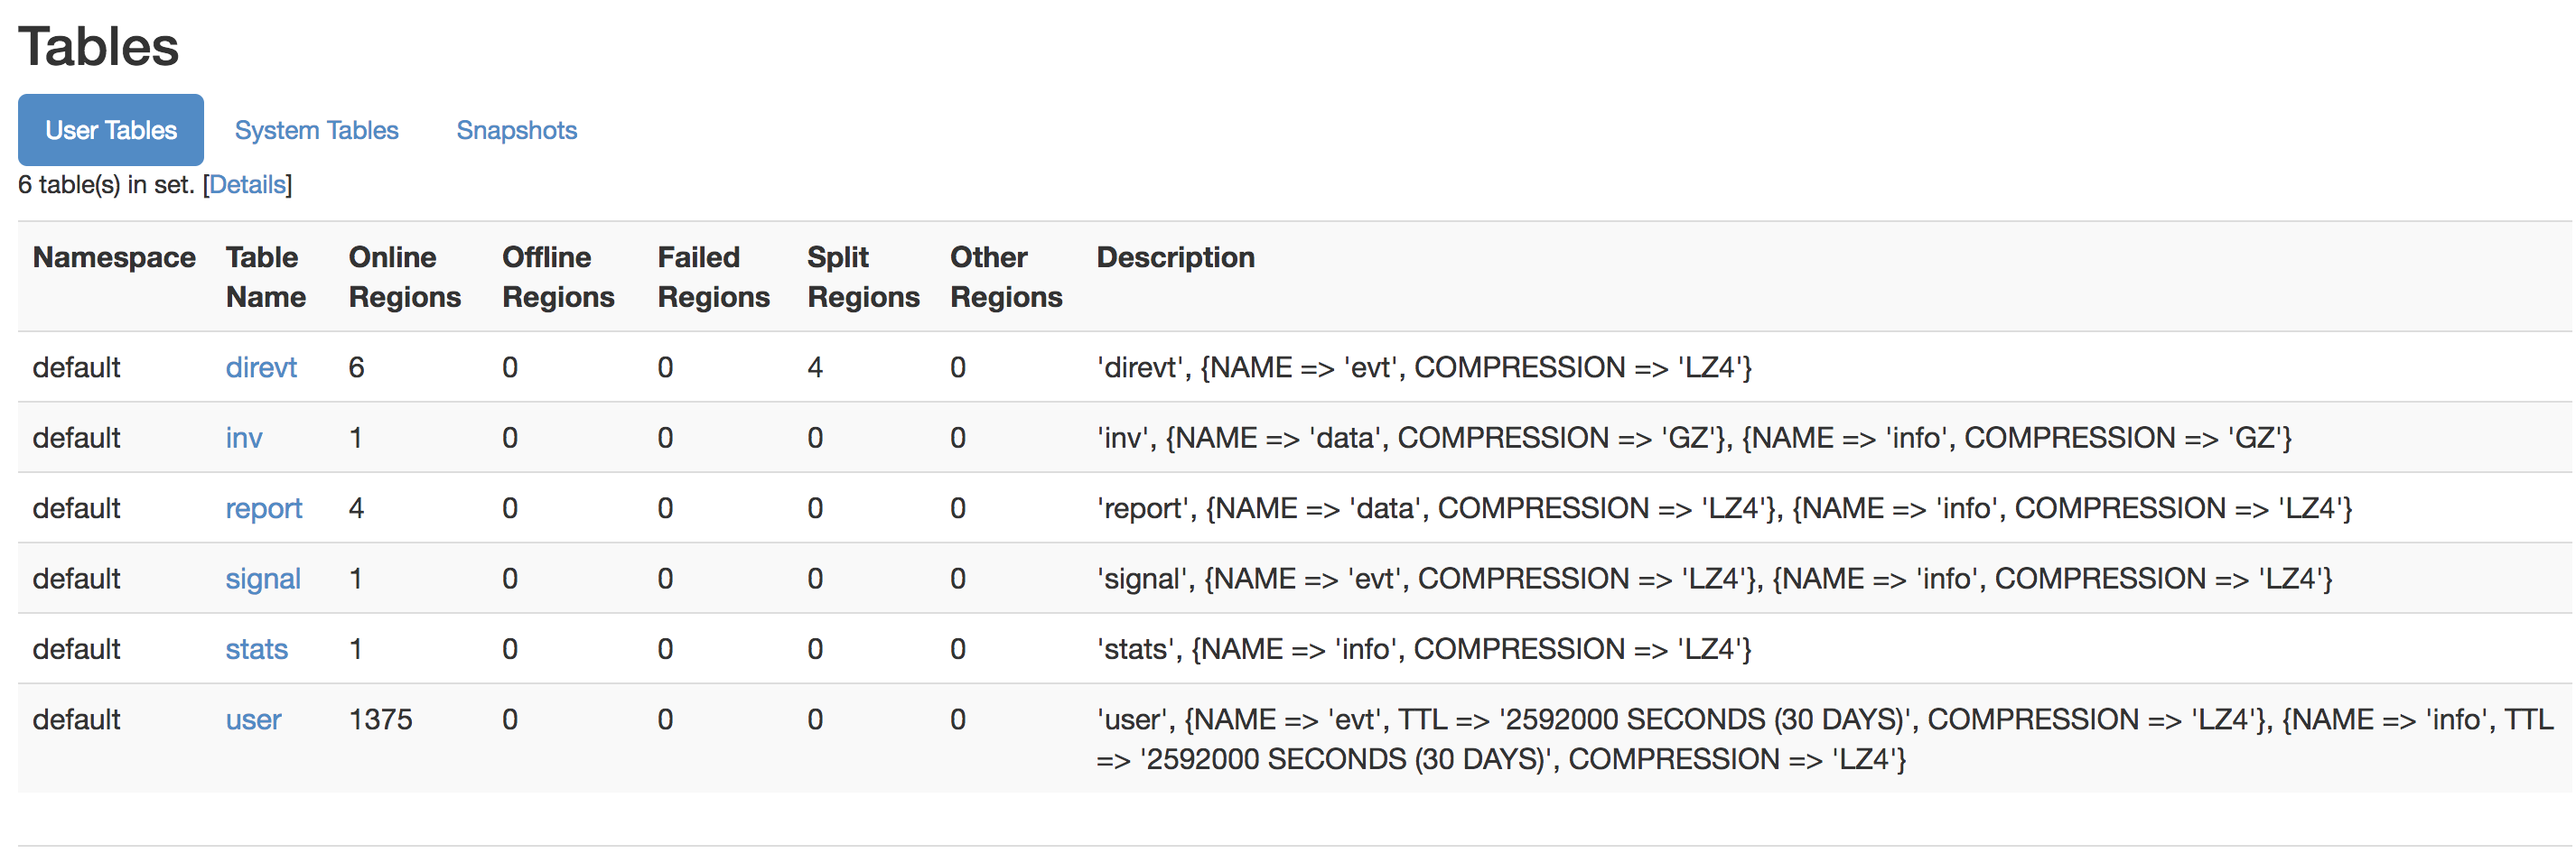
http://x.x.x.x:16010/and verify that each region server (6 total) is visible. - Ensure each server has assigned regions and verify that requests are visible for each region server.
- Check that the tables section shows no regions offline, and no regions are in the "other" column.
- Example screenshots of six region servers with regions and normal table views can be used for reference.
Advanced Configurations
How to Configure a Data Security Only Configuration (Skip if Running Multiple Products)
Follow this procedure before starting up the cluster to ensure unnecessary Docker containers are disabled during startup.
-
Log in to node 1 over SSH as the
\\<your-username>user. -
Open the configuration file:
nano /opt/superna/eca/eca-env-common.conf -
Add the following variable:
export RSW_ONLY_CFG=true -
Save and exit the file:
:wq -
Continue with the startup steps below.
Moving an NFS audit export between Access Zones is a PowerScale OneFS-specific procedure and is not applicable to VAST or Qumulo deployments.