Execute Failover with DR Assistant
Introduction
The DR Assistant simplifies the process of executing a failover in the event of a planned maintenance activity or an unexpected outage.
This guide walks you through the steps to initiate, monitor, and complete a failover using the DR Assistant.
Requirements
Before executing a failover, gather the following information:
-
The designated storage cluster eligible for failover
-
At least one failover object available for selection based on your environment and configuration.
Ensure your environment is properly configured and that both the source and target clusters are prepared for failover. The failover options available may vary depending on the storage platform (e.g., VAST, Qumulo).
Be sure to complete any pre-failover steps required for your specific configuration.
Execute a Failover
This section of the guide will cover the steps to start, monitor, and complete a failover.
-
From the Superna Dashboard, select the DR Assistant icon.
-
From the Failover Wizard menu, select a source cluster, failover type, and failover settings.
-
Select the Source Cluster to fail over.
-
From the Failover Type dropdown menu, select the type of failover object to fail over.
-
Choose the appropriate Failover Options for your environment.
Not all options are available for all storage platforms.
The available options are as follows:
-
Controlled Failover: Only uncheck this option if the source cluster is unreachable.
warningUsing this option means you are failing away from the data and losing all changes at the moment the failover is started. If this is unchecked, all failover will occur from an older snapshot and will result in data loss.
-
Data Sync: Adds a step to the failover process to sync data between the source and target cluster before the failover begins.
-
Block Failover on Warnings: Prevents the failover from proceeding if a WARNING status exists.
-
Enable Seamless Failover: Enables seamless failover behavior for SMB and NFS clients. This option requires a VAST Seamless Failover feature license. The specific behavior depends on the failover scope:
-
Tenant Seamless Failover (VAST only): Check this option to allow SMB client shares to automatically remount after failover. The source VIP pool is temporarily set to a non-routable IP and is reverted after the failover completes.
-
VIP Pool Seamless Failover (VAST only): Check this option to allow both SMB shares and NFS exports to automatically remount after failover. For SMB-only pools, the source VIP pool is temporarily set to a non-routable IP and reverted post-failover. For NFS pools, the IP ranges are interchanged between the source and target VIP pools.
-
-
After selecting your Source Cluster, Failover Type, and Failover Options, click Next to continue.
-
-
Review and acknowledge Superna Support policies.
This screen summarizes Superna's failover support policies.
Read the policies carefully. When you’re ready, select the acknowledgment checkbox and click Next to continue.
-
Select the objects to fail over.
This screen will show the failover objects available to you based on the options you selected earlier (cluster and failover type).
- VAST
- Qumulo
- Protected Path
- Tenant
- VIP Pool
Select objects to include in the failover.
Select the tenants to include in this failover.
Select the VIP Pool you want to fail over, then click Analyze Scope.
This analyzes the selected VIP Pool and identifies any additional VIP Pools that will be included in the failover. Only VIP Pools linked through the selected VIP Pool’s protected paths will be shown.
Select the objects you want to include in the failover.
infoIf you believe the DR Failover Status has changed, click Run Readiness to run the job and update this status. The job usually takes up to 5 minutes to finish, but it may take longer depending on your configuration.
Click Next to continue.
-
Review the Success summary and confirm.
If no errors are found, you’ll see a Success screen.
Review the listed failover objects and make sure everything looks correct.
Carefully review the failover release notes, select the confirmation checkbox, and click Next to proceed.
-
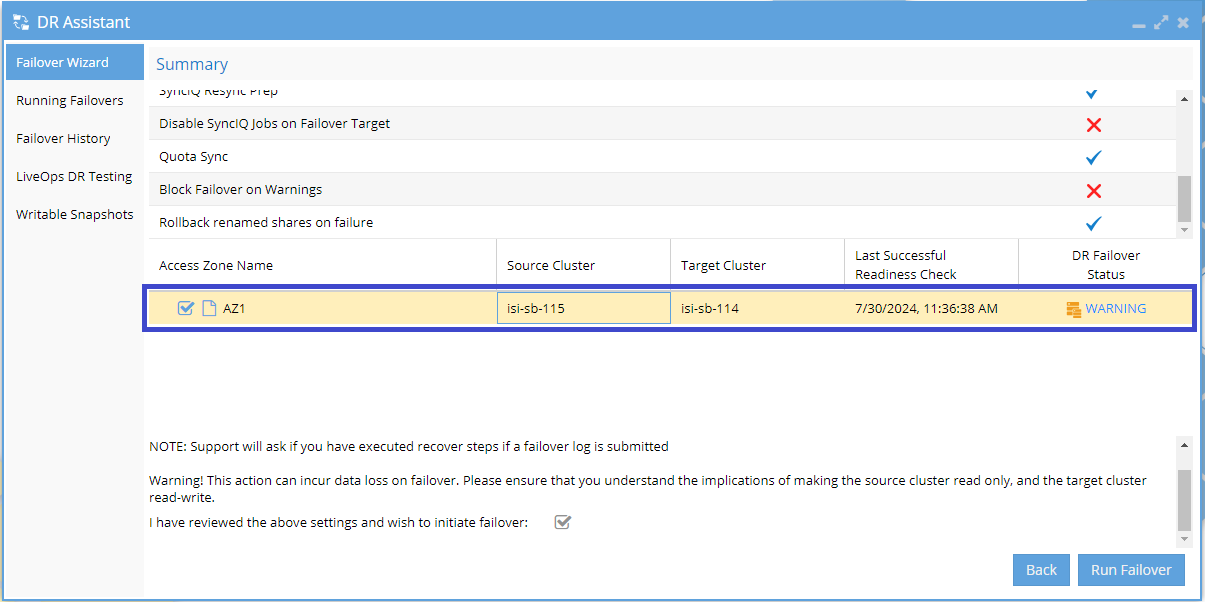
Review the summary and start the failover.
This screen shows a summary of the selected failover object, including its DR Failover Status and the options you enabled.
Review the details carefully. When you’re ready to proceed, select the confirmation checkbox and click Run Failover.
-
Monitor the failover process.
After the failover starts, navigate to the Running Failovers tab. (This may happen automatically.)
Use the Job Details section to track individual operations in progress.
For a more detailed view, click the Logs to open the Failover Log Viewer and review actions in greater depth. To continuously monitor the failover using the viewer, click Watch.
-
Review and address any issues.
If any problems occur during the failover, they appear in the Job Details section.
Click the INFO link next to the relevant job to view more information and take appropriate action.
-
Confirm completion.
Once all operations are complete, the failover process is finished.
Review the final status and logs to confirm success before making any additional changes to the environment.
Additional Information
View Failover History
You can view historical failovers by navigating to the Failover History tab of DR Assistant.
Failback a Cluster
Before starting a failback, make sure the cluster configurations are correct and up to date.
Complete any required pre-failover steps for your environment.
Check the DR Failover Status to confirm the system is ready.
Then, follow the same DR Assistant steps you used for failover. This time, select the DR cluster as the source. The production cluster will act as the target.