Upgrade openSUSE 15.6 to SLES 15 SP6
Introduction
This guide walks through upgrading an appliance from openSUSE Leap 15.6 to SUSE Linux Enterprise Server (SLES) 15 SP6.
- Applies to appliances running version 2.10.0 or later for Dell Cyberstorage, or 4.0.0 or later for Multiplatform Cyberstorage.
- Supports installations using SLES-compatible installers (>= 2.10.0 and >= 4.0.0).
Requirements
Take VM-level snapshots before starting the upgrade process. Do not run the upgrade process without backups.
- Appliance running a compatible version that supports SLES upgrades (>= 2.10.0 or >= 4.0.0).
- Access to the appliance as the
rootuser. - A valid SLES subscription (purchased from SUSE or a reseller), including the email address used to purchase it and the Activation Code.
For ECA (Extended Cluster Appliance) upgrades:
- Login as
ecaadmin - Shut down the appliance with
ecactl cluster down - Elevate permissions with
sudo -s
OS upgrades need to be completed on all ECA nodes in your environment.
Upgrade Steps
-
Refresh and update zypper packages, and reboot the system.
zypper ref
zypper up -y
reboot -
Install migration and rollback tools.
zypper in -y yast2-migration rollback-helpernoteIf you encounter an installation error, feel free to disregard it. If you're uncertain, simply rerun the same command to verify the installed packages.
Enable the rollback-helper service with the following command:
systemctl enable rollbackRunning this command is mandatory and must be completed before migration.
-
Register the system with the SUSE Customer Center.
Launch YaST registration:
yast2 registration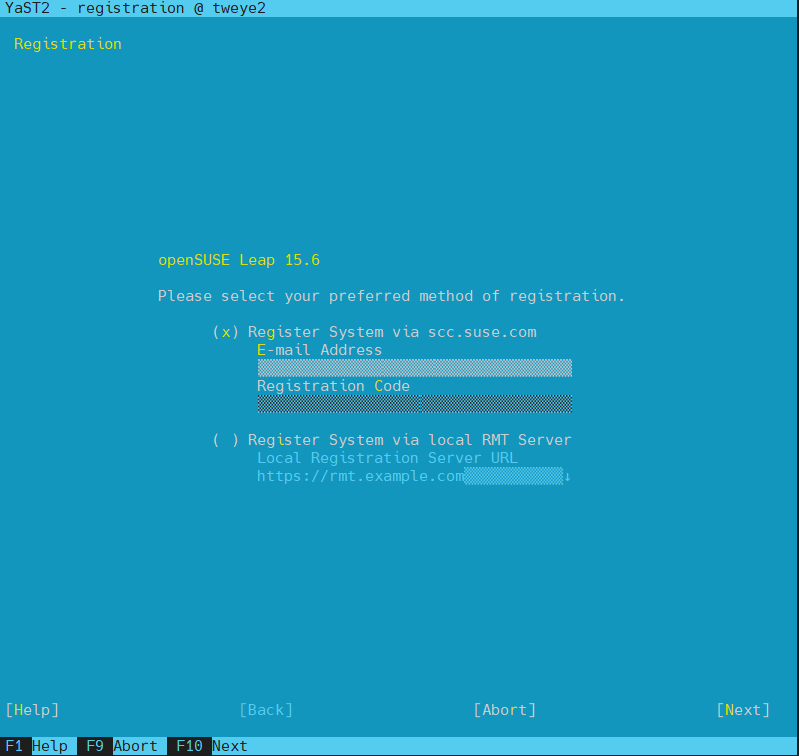
Select the “Register System via scc.suse.com” method.
When prompted, enter your email address and SUSE registration code.
If you purchased SUSE Linux Enterprise from Superna, you will receive an email notification containing your registration code. Copy this code directly from the email and paste it into the registration prompt in YaST.
After successfully registering, you will receive an email from the SUSE Customer Center.
-
Backup the MOTD file.
Even though this file is typically preserved, back it up to be safe:
cp /etc/motd /etc/motd.bak -
Start the migration wizard.
yast2 migration-
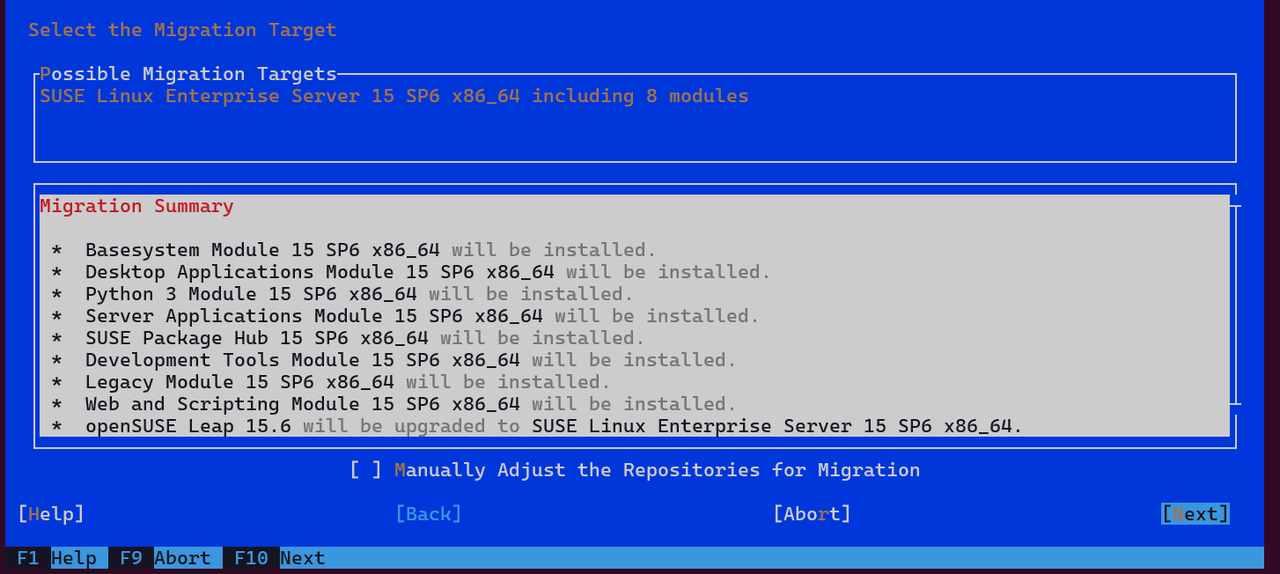
Select a migration target.
Use the default option presented. Do not check the box labeled "Manually Adjust the Repositories for Migration." Click Next to proceed.
-
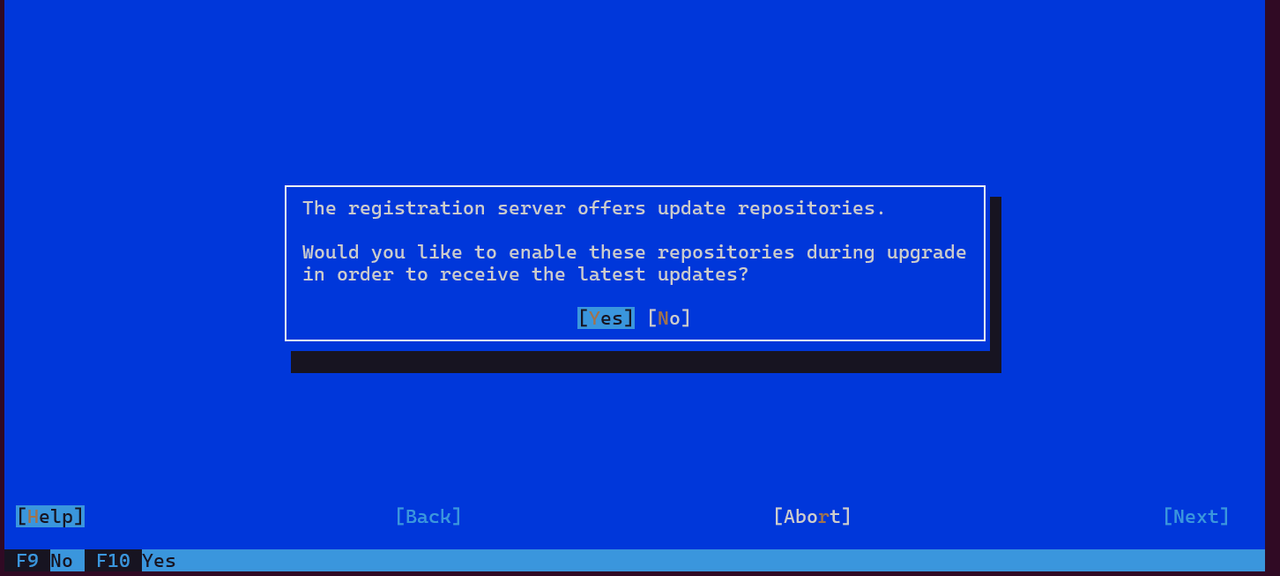
Enable repositories.
When prompted, choose Yes to allow the system to enable update repositories provided by SUSE.
-
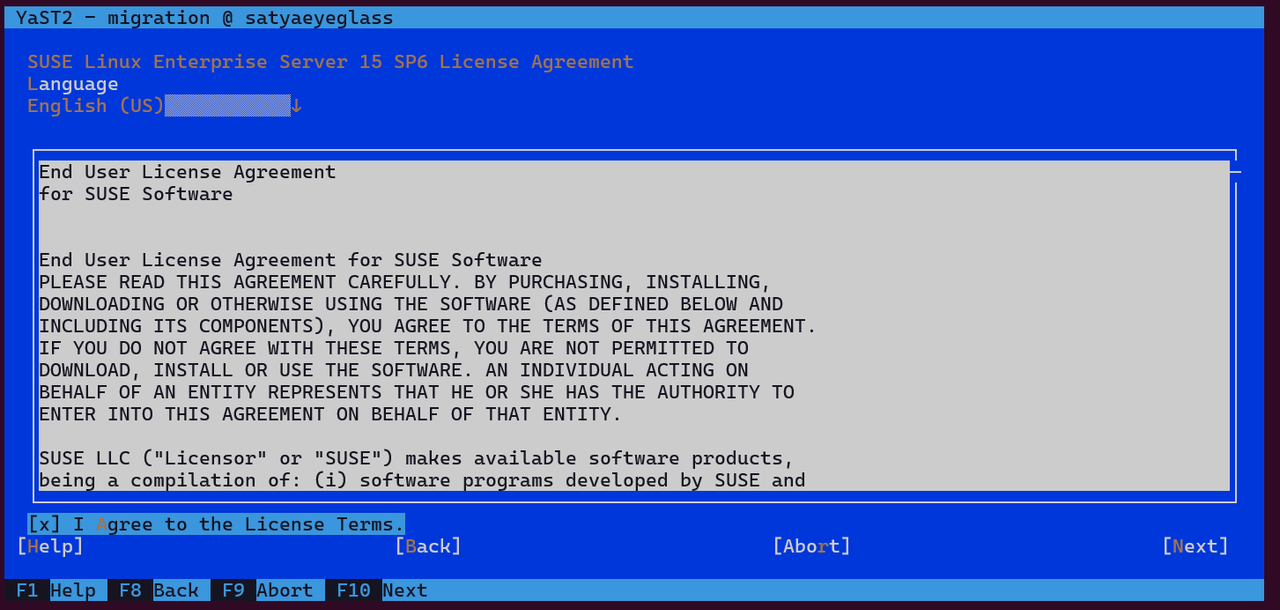
Accept the SUSE License Agreement.
Check the box for "I agree to License Terms". Click Next to continue.
-
-
Review the migration proposal.
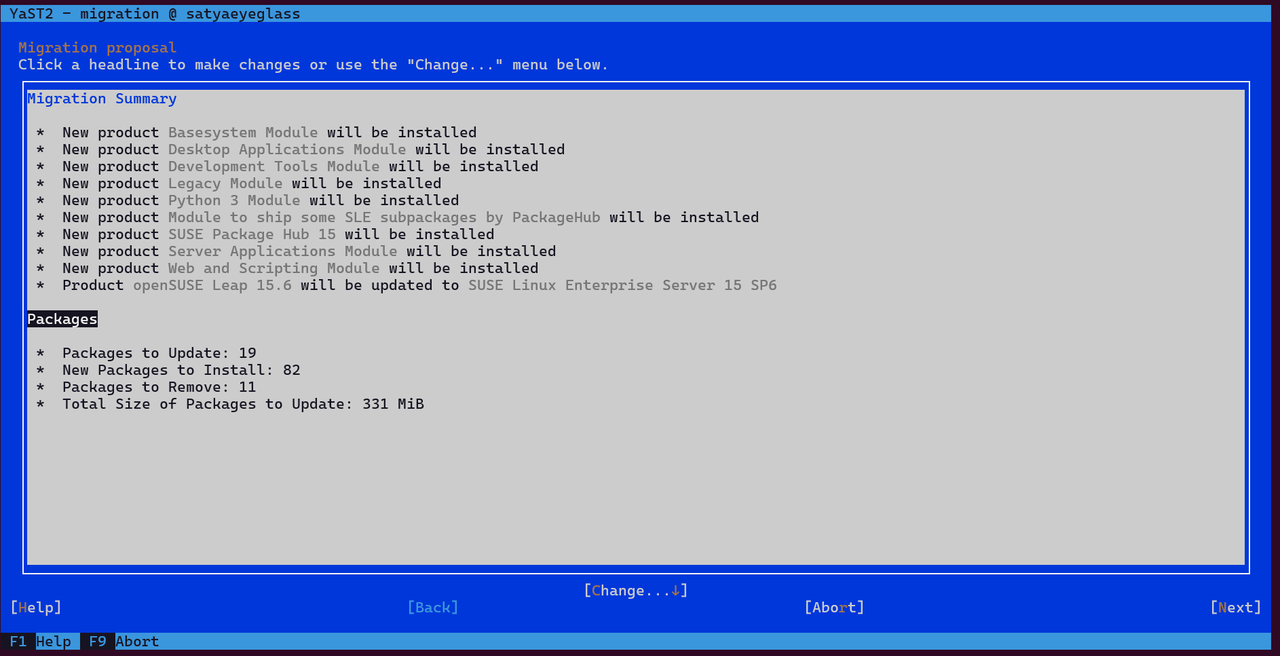
Select Change > Packages to view detailed changes.
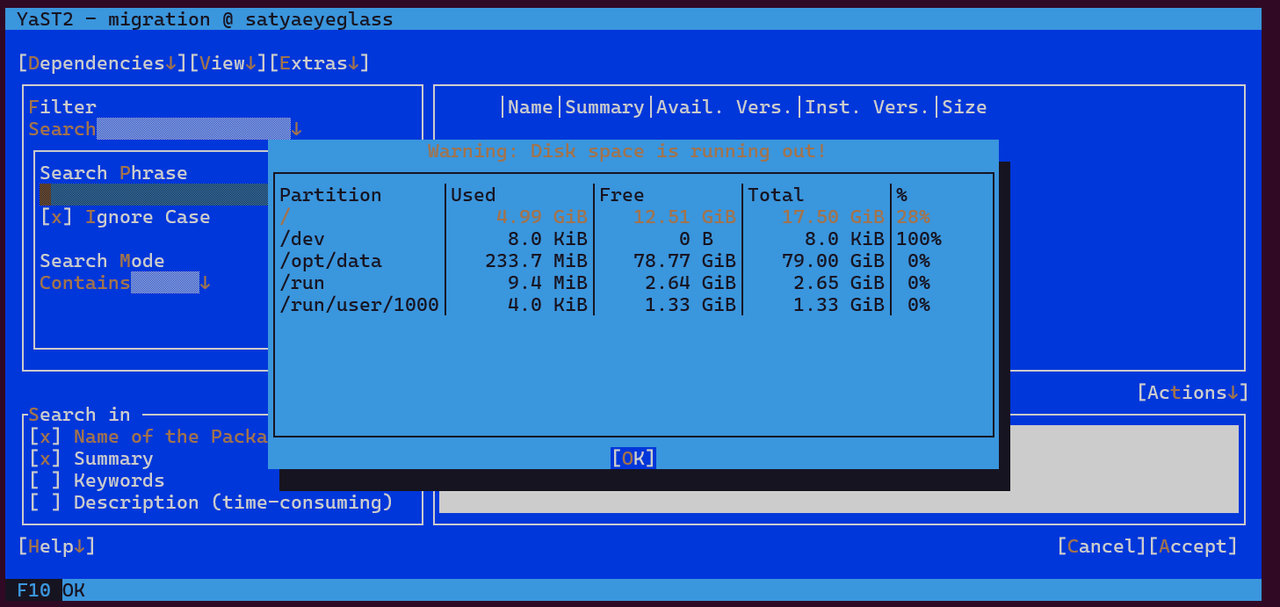
noteIf you receive a disk space warning, ignore by selecting ok.
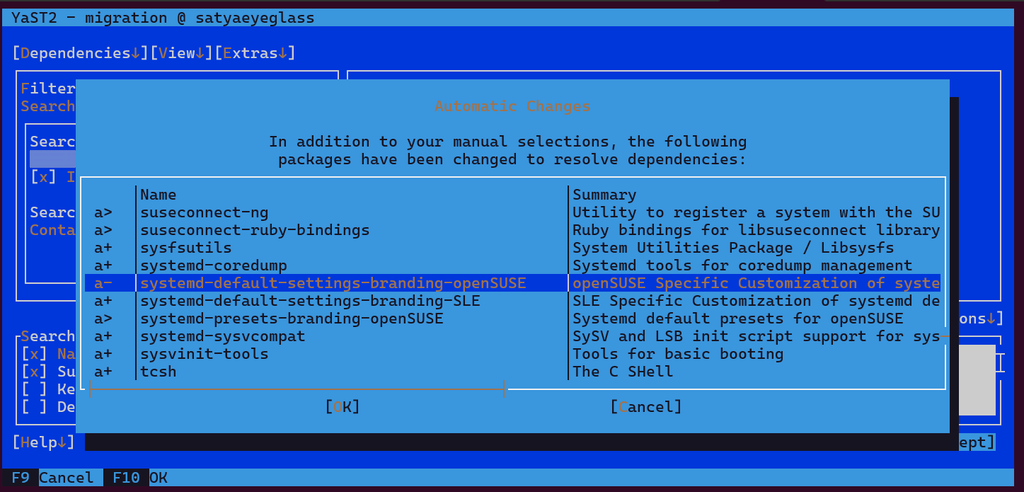
If you see a message that says "Manual intervention is required", use the tab and arrow keys to navigate the cursor to that line and press Enter.
This opens the Package Dependencies screen where you can review and resolve package conflicts.
- Select the recommended option to install the updated version of the conflicting package (from the SUSE repository).
- After making your selections, choose OK – Try Again to reprocess the changes.
With the default filter settings, navigate to and select Accept.
This view shows all the packages that will be:
a>- updateda+- installeda-- removed
The following packages were identified during Superna’s internal testing when upgrading to SLES 15 SP6. If you see additional packages listed for removal that are not shown here, review them carefully before continuing.
- Core Agent Appliance
- Extended Cluster Appliance
Core Agent Appliance (Eyeglass or CAA)
a-  │branding-openSUSE                             │openSUSE Leap 15.6 Brand File                                                │                    │15.6.20240408
a-  │btrfsprogs-bash-completion                    │Bash completion for btrfsprogs                                               │                    │6.12           │    │
a-  │chrony-pool-openSUSE                          │Chrony preconfiguration for openSUSE                                         │                    │4.1            │    │
a-  │gio-branding-openSUSE                         │openSUSE definitions of default settings and applications                    │                    │42.1
a-  │grub2-branding-openSUSE                       │openSUSE Leap 15.6 branding for GRUB2                                        │                    │15.6.20240408
a-  │libcbor0                                      │Library for parsing Concise Binary Object Representation (CBOR)              │                    │0.5.0          │    │
a-  │libcpupower0                                  │Processor power related C-library                                            │                    │5.14           │    │
a-  │libpoppler126                                 │PDF Rendering Library                                                        │                    │23.01.0        │ ───┘
a-  │libprotobuf-lite20                            │Protocol Buffers - Google's data interchange format                          │                    │3.9.2          │ ns↓]
a-  │openSUSE-release                              │openSUSE Leap 15.6                                                           │                    │15.6           │    │
a-  │openSUSE-release-ftp                          │openSUSE Leap 15.6                                                           │                    │15.6           │ ───┘
a-  │plymouth-branding-openSUSE                    │openSUSE Leap 15.6 branding for Plymouth bootsplash                          │                    │15.6.20240408  │
a-  │poppler-data                                  │Encoding Files for use with libpoppler                                       │                    │0.4.12         │    │
a-  │python3-bind                                  │A module allowing rndc commands to be sent from Python programs              │                    │9.16.50        │    │
a-  │python3-brotlipy                              │Python binding to the Brotli library                                         │                    │0.7.0          │    │
a-  │python3-slip                                  │Miscellaneous convenience, extension and workaround code for Python          │                    │0.6.5          │    │
a-  │python3-slip-dbus                             │Convenience functions for dbus services                                      │                    │0.6.5          │    │
a-  │systemd-default-settings-branding-openSUSE    │openSUSE Specific Customization of systemd defaults                          │                    │0.10           │
a-  │yast2-qt-branding-openSUSE                    │openSUSE Leap 15.6 branding for YaST2 Qt                                     │                    │15.6.20240408  │
Extended Cluster Appliance (ECA)
a-  │branding-openSUSE                             │openSUSE Leap 15.6 Brand File                                                │                    │15.6.20240408  │    │
a-  │btrfsprogs-bash-completion                    │Bash completion for btrfsprogs                                               │                    │6.12           │    │
a-  │chrony-pool-openSUSE                          │Chrony preconfiguration for openSUSE                                         │                    │4.1            │    │
a-  │docker-rootless-extras                        │Rootless support for Docker                                                  │                    │26.1.5_ce      │    │
a-  │fuse-overlayfs                                │FUSE implementation for overlayfs                                            │                    │1.13           │    │
a-  │gio-branding-openSUSE                         │openSUSE definitions of default settings and applications                    │                    │42.1           │ ───┘
a-  │grub2-branding-openSUSE                       │openSUSE Leap 15.6 branding for GRUB2                                        │                    │15.6.20240408
a-  │libcbor0                                      │Library for parsing Concise Binary Object Representation (CBOR)              │                    │0.5.0          │    │
a-  │libcpupower0                                  │Processor power related C-library                                            │                    │5.14           │    │
a-  │libpoppler126                                 │PDF Rendering Library                                                        │                    │23.01.0        │    │
a-  │libprotobuf-lite20                            │Protocol Buffers - Google's data interchange format                          │                    │3.9.2          │ ───┘
a-  │openSUSE-release                              │openSUSE Leap 15.6                                                           │                    │15.6           ┬    │
a-  │openSUSE-release-ftp                          │openSUSE Leap 15.6                                                           │                    │15.6           │    │
a-  │plymouth-branding-openSUSE                    │openSUSE Leap 15.6 branding for Plymouth bootsplash                          │                    │15.6.20240408  │    │
a-  │poppler-data                                  │Encoding Files for use with libpoppler                                       │                    │0.4.12         │    │
a-  │python3-bind                                  │A module allowing rndc commands to be sent from Python programs              │                    │9.16.50        │    │
a-  │python3-brotlipy                              │Python binding to the Brotli library                                         │                    │0.7.0          │    │
a-  │python3-slip                                  │Miscellaneous convenience, extension and workaround code for Python          │                    │0.6.5          │    │
a-  │python3-slip-dbus                             │Convenience functions for dbus services                                      │                    │0.6.5          │    │
a-  │systemd-default-settings-branding-openSUSE    │openSUSE Specific Customization of systemd defaults                          │                    │0.10           │ ns↓
a-  │yast2-qt-branding-openSUSE                    │openSUSE Leap 15.6 branding for YaST2 Qt                                     │                    │15.6.20240408  │    │
Safe to Remove – Will Be Reinstalled Post-Upgrade
For ECA, the following packages are required and must be present on the system, but they are removed during the cleanup step as part of the upgrade process. This is expected. They will be reinstalled later, so no action is needed at this point to keep them.
a-  │docker-rootless-extras                        │Rootless support for Docker                                                  │                    │26.1.5_ce      │    │
a-  │fuse-overlayfs                                │FUSE implementation for overlayfs                                            │                    │1.13           │    │
If no changes are required, select Cancel to return to the package search screen, then select Cancel again to return to the migration proposal.
-
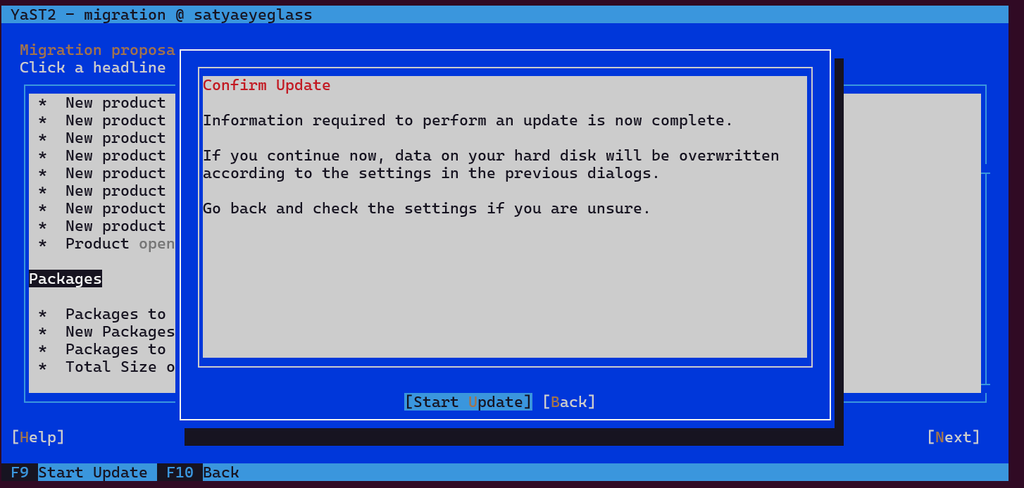
Start the update.
To continue, select Next and then select Start Update.
-
Handle package conflicts.
During the migration process, you may encounter one or more conflicts. Here's how to handle them:
eyeglass_depsConflict- This conflict may appear due to changes in the
sles-releasepackage. - While the
/etc/motdfile (which contains appliance branding) is not replaced directly, a new file called/etc/motd.rpmnewmay be created. - This is expected behavior. A backup of the original
/etc/motdwas made earlier in the process.
- This conflict may appear due to changes in the
openSUSE-build-keyConflict- This conflict can be safely ignored. It is related to openSUSE package signing and not required for SLES.
If you encounter additional conflicts not listed above, stop and investigate before proceeding. In some cases, it may be necessary to abort the migration and initiate a rollback using the rollback tools enabled earlier. You can follow the steps available in the SUSE upgrade documentation. Refer to Rolling back a service pack.
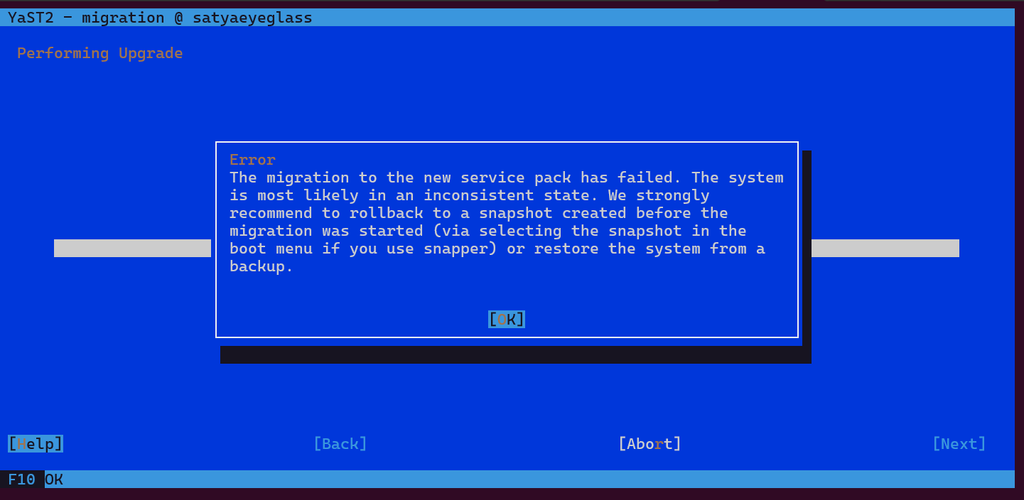
If only the above two known conflicts are shown, select Continue to proceed with the migration.
-
Complete the migration.
AFter a successful migration, select Finish.
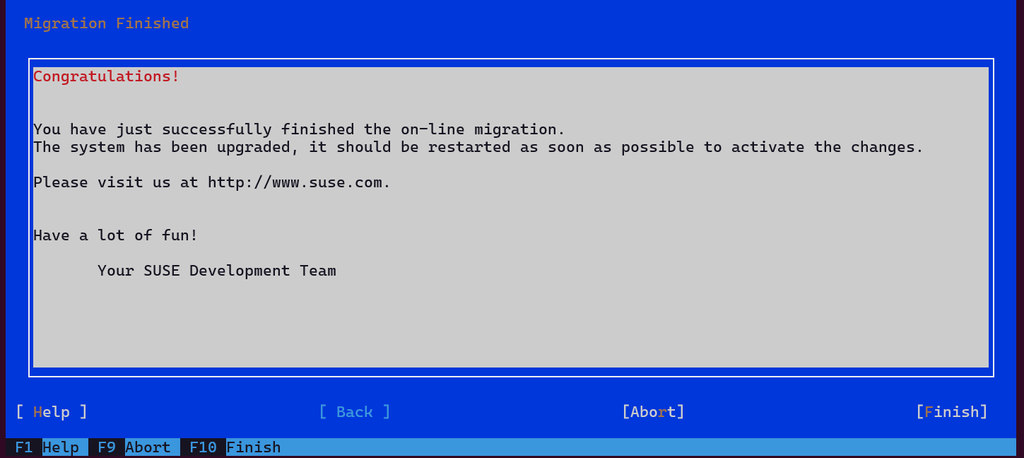
After migration, a system restart is required. Select Restart Now.
-
Verify registration.
At this point, your system should be fully migrated to SUSE Linux Enterprise Server 15 SP6. To confirm the migration and ensure all required modules are properly registered, run:
SUSEConnect -sThis command returns a JSON list of all SUSE modules, their registration status, and subscription information.
-
Remove orphaned and unneeded packages
Orphaned packages are no longer available from the system’s configured repositories and may no longer receive updates. Similarly, unneeded packages are leftover dependencies that are no longer required by the installed software.
However, during the upgrade process, some packages—especially those related to Superna Eyeglass—may appear as orphaned or unneeded even though they are critical for system functionality. These must not be removed.
To identify and remove the correct packages:
-
Identify orphaned and unneeded packages.
Run the following commands:
zypper packages --orphaned
zypper packages --unneeded
The following tab items provide example output for the Core and ECA appliances. These are lists of orphaned and unneeded packages identified during testing.
- Core Agent Appliance
- Extended Cluster Appliance
Core Agent Appliance (Eyeglass or CAA)
    S  | Repository | Name                        | Version                           | Arch
---+------------+-----------------------------+-----------------------------------+-------
i+ | @System    | augeas-bash-completion      | 1.14.1-150600.1.3                 | x86_64
i+ | @System    | eyeglass_authservice        | 2.10.0-24270                      | x86_64
i+ | @System    | eyeglass_db                 | 2.10.0-24270                      | x86_64
i+ | @System    | eyeglass_deps               | 2.10.0-24270.lp15.6               | x86_64
i+ | @System    | eyeglass_document_generator | 2.10.0-24270                      | x86_64
i+ | @System    | eyeglass_licencing          | 2.10.0-24270                      | x86_64
i+ | @System    | eyeglass_logparser          | 2.10.0-24270                      | x86_64
i+ | @System    | eyeglass_pygls              | 2.10.0-24270.lp15.6               | x86_64
i+ | @System    | eyeglass_sca                | 2.10.0-24270                      | x86_64
i+ | @System    | eyeglass_scagateway         | 2.10.0-24270                      | x86_64
i+ | @System    | eyeglass_sera               | 2.10.0-24270                      | x86_64
i+ | @System    | eyeglass_servicebroker      | 2.10.0-24270                      | x86_64
i+ | @System    | eyeglass_ui                 | 2.10.0-24270                      | x86_64
i+ | @System    | fontconfig-lang             | 2.14.2-150600.1.3                 | noarch
i+ | @System    | irqbalance-ui               | 1.9.2-150500.1.3                  | x86_64
i+ | @System    | klogd                       | 1.4.1-11.2                        | x86_64
i+ | @System    | libidn2-lang                | 2.2.0-3.6.1                       | noarch
i+ | @System    | openSUSE-build-key          | 1.0-lp156.8.2                     | noarch
i+ | @System    | openSUSE-signkey-cert       | 20220613-lp156.4.2                | x86_64
i+ | @System    | os-prober                   | 1.76-150100.4.2.1                 | x86_64
i+ | @System    | pam_pwquality               | 1.4.5-150600.2.3                  | x86_64
i+ | @System    | perl-Term-ReadLine-Gnu      | 1.42-150500.1.2                   | x86_64
i+ | @System    | plymouth-plugin-two-step    | 22.02.122+94.4bd41a3-150600.3.3.1 | x86_64
i+ | @System    | plymouth-theme-bgrt         | 22.02.122+94.4bd41a3-150600.3.3.1 | noarch
i+ | @System    | plymouth-theme-spinner      | 22.02.122+94.4bd41a3-150600.3.3.1 | noarch
i+ | @System    | procps-lang                 | 3.3.17-150000.7.39.1              | noarch
i+ | @System    | rsw-ui                      | 2.10.0-24270                      | x86_64
i+ | @System    | unzip-doc                   | 6.00-150000.4.14.1                | noarch
i+ | @System    | wget-lang                   | 1.20.3-150600.19.9.1              | noarch
i+ | @System    | whois-bash-completion       | 5.5.20-150600.1.4                 | noarch
i+ | @System    | wol-lang                    | 0.7.1-2.5                         | noarch
i+ | @System    | yast2-metapackage-handler   | 4.6.0-150600.1.2                  | noarch
i+ | @System    | yast2-migration-sle         | 4.4.0-lp156.3.2                   | noarch
Extended Cluster Appliance (ECA)
    S  | Repository | Name                        | Version                           | Arch
---+------------+-----------------------------+-----------------------------------+-------
i+ | @System    | augeas-bash-completion      | 1.14.1-150600.1.3                 | x86_64
i+ | @System    | docker-zsh-completion       | 26.1.5_ce-150000.212.1            | noarch
i+ | @System    | dracut-mkinitrd-deprecated      | 059+suse.543.g94f7d037-150600.3.14.2 | x86_64
i+ | @System    | eca-control                 | 2.10.0-25019.lp15.6               | x86_64
i+ | @System    | eyeglass_cluster_appliance | 2.10.0-24019.lp15.6               | x86_64
i+ | @System    | fontconfig-lang             | 2.14.2-150500.1.3                 | noarch
i+ | @System    | irqbalance-ui               | 1.9.2-150500.1.3                  | x86_64
i+ | @System    | klogd                       | 1.4.1-11.2                       | noarch
i+ | @System    | libidn2-lang                   | 2.2.0-3.6.1                | x86_64
i+ | @System    | libprocps7                  | 3.3.15-150000.7.34.1              | x86_64
i+ | @System    | openSUSE-build-key          | 1.0-lp156.8.2                     | noarch
i+ | @System    | openSUSE-signkey-cert       | 20220613-lp156.4.2                | x86_64
i+ | @System    | os-prober                   | 1.76-150100.4.2.1                 | x86_64
i+ | @System    | pam_pwquality               | 1.4.5-150600.2.3                  | x86_64
i+ | @System    | perl-Term-ReadLine-Gnu      | 1.42-150500.1.2                   | x86_64
i+ | @System    | plymouth-plugin-two-step    | 22.02.122+94.4bd41a3-150600.3.3.1 | x86_64
i+ | @System    | plymouth-theme-bgrt         | 22.02.122+94.4bd41a3-150600.3.3.1 | noarch
i+ | @System    | plymouth-theme-spinner      | 22.02.122+94.4bd41a3-150600.3.3.1 | noarch
i+ | @System    | unzip-doc                   | 6.00-150000.4.14.1                | noarch
i+ | @System    | wget-lang                   | 1.20.3-150600.19.9.1              | noarch
i+ | @System    | wol-lang                    | 0.7.1-2.5                         | noarch
i+ | @System    | yast2-metapackage-handler   | 4.6.0-150600.1.2                  | noarch
i+ | @System | yast2-migration-sle | 4.4.0-lp156.3.2 | noarchwarningSuperna Eyeglass and related packages (e.g.,
eyeglass_*,rsw-ui, etc.) may show up as orphaned or unneeded, but they are required. Do not remove them. The next step gives instructions for removing unwanted packages while excluding necessary packages. -
Remove unwanted packages while keeping required ones.
During cleanup, it’s critical to exclude required packages based on your appliance type. Some packages—such as those related to Eyeglass or ECA—may appear as orphaned or unneeded, but are still required and must not be removed.
You’ll need to review the list of packages carefully and identify which ones to exclude for your specific deployment.
There are two safe ways to perform this cleanup:
-
Option 1: Use an exclude file
-
Create a plain text file (e.g.,
/keep-packages.txt) listing package names to exclude from removal, one per line:- Core Agent Appliance
- Extended Cluster Appliance
Core Agent Appliance (Eyeglass or CAA)
i+ | @System    | eyeglass_authservice        | 2.11.0-25019                         | x86_64
i+ | @System    | eyeglass_db                 | 2.11.0-25019                         | x86_64
i+ | @System    | eyeglass_deps               | 2.11.0-25019.lp15.6                  | x86_64
i+ | @System    | eyeglass_document_generator | 2.11.0-25019                         | x86_64
i+ | @System    | eyeglass_licencing          | 2.11.0-25019                         | x86_64
i+ | @System    | eyeglass_logparser          | 2.11.0-25019                         | x86_64
i+ | @System    | eyeglass_pygls              | 2.11.0-25019.lp15.6                  | x86_64
i+ | @System    | eyeglass_sca                | 2.11.0-25019                         | x86_64
i+ | @System    | eyeglass_scagateway         | 2.11.0-25019                         | x86_64
i+ | @System    | eyeglass_sera               | 2.11.0-25019                         | x86_64
i+ | @System    | eyeglass_servicebroker      | 2.11.0-25019                         | x86_64
i+ | @System    | eyeglass_ui                 | 2.11.0-25019                         | x86_64
i+ | @System    | nodejs18                    | 18.20.5-150400.9.30.1                | x86_64
i+ | @System    | npm18                       | 18.20.5-150400.9.30.1                | x86_64
i+ | @System    | rsw-ui                      | 2.11.0-25019                         | x86_64
i+ | @System    | whois-bash-completion       | 5.5.20-150600.1.4                    | noarch
Extended Cluster Appliance (ECA)
eca-control
docker-zsh-completion
eyeglass_cluster_appliance -
Run the following command to remove all orphaned and unneeded packages except those listed:
zypper rm $(zypper --no-refresh packages --orphaned --unneeded | gawk '{print $5}' | tail -n +5 | grep -v -f ./keep-packages.txt)
-
-
Option 2: Inline filtering with grep
- Core Agent Appliance
- Extended Cluster Appliance
Core Agent Appliance (Eyeglass or CAA)
zypper rm $(zypper --no-refresh packages --orphaned --unneeded | gawk '{print $5}' | tail -n +5 | grep -v -E '^(eyeglass*|rsw-ui|whois-bash-completion|nodejs18|npm18$)')Extended Cluster Appliance (ECA)
zypper rm $(zypper --no-refresh packages --orphaned --unneeded | gawk '{print $5}' | tail -n +5 | grep -v -E '^(docker-zsh-completion|eca-control|eyeglass_cluster_appliance)$')
-
-
-
ECA-Specific Post-Migration Steps
infoMake sure you complete these steps on all ECA nodes in your environment.
- Login as
ecaadmin - Shut down the appliance with
ecactl cluster down - Elevate permissions with
sudo -s
Complete the following steps after the migration to ensure required components are restored and the system is fully functional.
-
Run the following command to list currently active modules:
SUSEConnect -l -
Activate the Containers module:
SUSEConnect -p sle-module-containers/15.6/x86_64Run
SUSEConnect -lagain to confirm the module is now activated. -
Reinstall the container-related packages that were removed during the migration:
zypper install docker-rootless-extras fuse-overlayfs
- Login as
-
Check for config file replacements.
During the upgrade process, SUSE will not overwrite configuration files that have been modified. Instead, it preserves both the old and new versions using the following conventions:
-
.rpmnew— Contains the new default configuration. Your original file remains unchanged. -
.rpmsave— A backup of your existing configuration, created before it is replaced by the new default.
These files require manual review to ensure your system continues functioning as expected with the latest settings and custom configurations merged appropriately.
To locate these files, limit the search to the
/etcdirectory:find /etc/ -name "*.rpmnew" -o -name "*.rpmsave"The following files were identified during testing:
- Core Agent Appliance
- Extended Cluster Appliance
/etc/sudoers.rpmnew
/etc/motd.rpmnew
/etc/postfix/master.cf.rpmnew
/etc/postfix/main.cf.rpmnew
/etc/motd.rpmsave
/etc/lighttpd/modules.conf.rpmsave
/etc/lighttpd/conf.d/proxy.conf.rpmsave
/etc/logrotate.d/syslog.rpmsave
/etc/chrony.d/pool.conf.rpmsave
/etc/zypp/repos.d/repo-backports-debug-update.repo.rpmsave
/etc/zypp/repos.d/repo-sle-update.repo.rpmsave
/etc/zypp/repos.d/repo-backports-update.repo.rpmsave
/etc/zypp/repos.d/repo-sle-debug-update.repo.rpmsave
Review each file carefully. Compare them to the active config to decide whether to merge changes, replace the file, or leave it as-is.
You can use diff to see what's changed:
diff -u /etc/<file>.rpmsave /etc/<file>or
diff -u /etc/<file>.rpmnew /etc/<file>Based on the comparison, take one of the following actions:
-
Keep the current file as-is, if your original configuration is still valid.
-
Merge desirable changes manually, if the
.rpmnewincludes improvements or changes that should be adopted. -
Replace the current file with the
.rpmsaveversion, if the original values were overwritten but are still required.
An important file to check is
/etc/motd. This file should contain the Eyeglass banner, which identifies the appliance. If it's missing or has been replaced, compare it with/etc/motd.rpmnewor restore it from your backup to ensure the correct banner is displayed.Some
.rpmsavefiles are expected and do not need to be reviewed or changed. In most cases, SUSE repo files under/etc/zypp/repos.d/can be left as-is after the upgrade.For example, the following files should be kept:
/etc/zypp/repos.d/repo-backports-debug-update.repo.rpmsave
/etc/zypp/repos.d/repo-sle-update.repo.rpmsave
/etc/zypp/repos.d/repo-backports-update.repo.rpmsave
/etc/zypp/repos.d/repo-sle-debug-update.repo.rpmsave
The following files should also be kept:
/etc/lighttpd/modules.conf
/etc/lighttpd/conf.d/proxy.conf
/etc/chrony.d/pool.conf.rpmsave
Compare each file before replacing to confirm the required values are present.
-
/etc/lighttpd/modules.confCompare the existing
/etc/lighttpd/modules.confto any.rpmnewor.rpmsaveversion:diff -u /etc/lighttpd/modules.conf.rpmsave /etc/lighttpd/modules.confLook specifically for
mod_rewrite. It must be uncommented (e.g., "mod_rewrite", not "# mod_rewrite") in the/etc/lighttpd/modules.conffile. -
/etc/lighttpd/conf.d/proxy.confCompare the existing
/etc/lighttpd/conf.d/proxy.confto any.rpmnewor.rpmsaveversion:diff -u /etc/lighttpd/proxy.conf.rpmsave /etc/lighttpd/proxy.confHere is an example of the expected output:
admin@tweye2:/etc/lighttpd> diff -u /etc/lighttpd/conf.d/proxy.conf.rpmsave /etc/lighttpd/conf.d/proxy.conf
--- /etc/lighttpd/conf.d/proxy.conf.rpmsave     2025-02-06 10:54:34.381074007 -0500
+++ /etc/lighttpd/conf.d/proxy.conf     2025-03-28 10:57:31.000000000 -0400
@@ -18,42 +18,11 @@
## might be one of 'hash', 'round-robin' or 'fair' (default).
##
#proxy.balance = "fair"
-proxy.server = ( "/RestClient" =>
-                 ( "scagateway" =>
-                   (
-                     "host" => "127.0.0.1",
-                     "port" => 8081
-                   )
-                 ),
-                "/websockets" =>
-                 ( "websockets" =>
-                   (
-                     "host" => "127.0.0.1",
-                     "port" => 8082
-                   )
-                 ),
-                "/sera/v1" =>
-                 ( "sera" =>
-                   (
-                     "host" => "127.0.0.1",
-                     "port" => 8089
-                   )
-                 ),
-                "/sera/v2" =>
-                 ( "sera" =>
-                   (
-                     "host" => "127.0.0.1",
-                     "port" => 8089
-                   )
-                 ),
-                "/swagger.json" =>
-                 ( "sera" =>
-                   (
-                     "host" => "127.0.0.1",
-                     "port" => 8089
-                   )
-                 )
-               )
+# Make sure to check `session-check-authenticated.lua` if adding a new proxy server.
+# See the top of `make-proxy.py` for details on adding new proxy paths.
+include_shell "/etc/lighttpd/make-proxy.py"
+
proxy.header = ( "upgrade" => "enable
If your diff output looks the same, do not copy the
.rpmsavefile over the current one. The active file already has the correct settings -
/etc/chrony.d/pool.conf.rpmsaveThis file defines the NTP servers used by the system for time synchronization.
diff -u /etc/chrony.d/pool.conf.rpmsave /etc/chrony.d/pool.confIf the
.rpmsaveversion contains your original or custom NTP server settings, restore it:cp /etc/chrony.d/pool.conf.rpmsave /etc/chrony.d/pool.confThen verify:
cat /etc/chrony.d/pool.confConfirm that the file includes the correct NTP servers for your environment. These may include internal time servers or organization-specific pools. For example:
server ntp.mycompany.local iburst
server 0.pool.ntp.org iburst
If you see any
.rpmnewor.rpmsavefiles other than the ones listed above, you should review them. These may include changes that could impact system behavior, especially if they replace or update files that were previously customized in your environment. In those cases, compare the files and merge any important changes manually./etc/snapper/zypp-plugin.conf.rpmsave
/etc/postfix/master.cf.rpmnew
/etc/postfix/main.cf.rpmnew
/etc/logrotate.d/snapper.rpmsave
/etc/chrony.d/pool.conf.rpmsave
/etc/zypp/repos.d/repo-backports-debug-update.repo.rpmsave
/etc/zypp/repos.d/repo-sle-update.repo.rpmsave
/etc/zypp/repos.d/repo-backports-update.repo.rpmsave
/etc/zypp/repos.d/repo-sle-debug-update.repo.rpmsave
/etc/dbus-1/system.d/org.opensuse.Snapper.conf.rpmsaveDuring testing, the above files were discovered. If you encounter the same files in your environment, no additional changes are required, and you can proceed to the steps for
/etc/chrony.d/pool.conf.rpmsave.If there are additional files, other than the ones listed above, use the below procedure to compare them and decide what to do next.
You can use diff to see what's changed:
diff -u /etc/<file>.rpmsave /etc/<file>or
diff -u /etc/<file>.rpmnew /etc/<file>Based on the comparison, take one of the following actions:
-
Keep the current file as-is, if your original configuration is still valid.
-
Merge desirable changes manually, if the
.rpmnewincludes improvements or changes that should be adopted. -
Replace the current file with the
.rpmsaveversion, if the original values were overwritten but are still required.
Some
.rpmsavefiles are expected and do not need to be reviewed or changed. In most cases, SUSE repo files under/etc/zypp/repos.d/can be left as-is after the upgrade.For example, the following files should be kept:
/etc/zypp/repos.d/repo-backports-debug-update.repo.rpmsave
/etc/zypp/repos.d/repo-sle-update.repo.rpmsave
/etc/zypp/repos.d/repo-backports-update.repo.rpmsave
/etc/zypp/repos.d/repo-sle-debug-update.repo.rpmsave/etc/chrony.d/pool.conf.rpmsaveYou should also check the
/etc/chrony.d/pool.conf.rpmsavefile with following procedure to ensure your NTP settings for each node are correct.This file defines the NTP servers used by the system for time synchronization.
diff -u /etc/chrony.d/pool.conf.rpmsave /etc/chrony.d/pool.confIf the
.rpmsaveversion contains your original or custom NTP server settings, restore it:cp /etc/chrony.d/pool.conf.rpmsave /etc/chrony.d/pool.confThen verify:
cat /etc/chrony.d/pool.confConfirm that the file includes the correct NTP servers for your environment. These may include internal time servers or organization-specific pools. For example:
server ntp.mycompany.local iburst
server 0.pool.ntp.org iburst
If you see any
.rpmnewor.rpmsavefiles other than the ones listed above, you should review them. These may include changes that could impact system behavior, especially if they replace or update files that were previously customized in your environment. In those cases, compare the files and merge any important changes manually. -
-
Verify Python 3 module activation
By default, SUSE Linux Enterprise Server 15 includes Python 3.6. In earlier service packs (such as SP3), Python 3.9 was introduced as an alternative, but it is no longer supported as of SLES 15 SP4 and later.
To receive ongoing security and feature updates, ensure the Python 3 module is activated.
-
Check the current module status:
SUSEConnect -lLook for a line similar to:
Python 3 Module 15 SP6 x86_64 (Activated) -
If the Python 3 module is not listed or is not marked as “Activated,” enable it with the following command:
sudo SUSEConnect -p sle-module-python3/15.6/x86_64.
Once activated, your system will have access to the latest supported Python 3 packages from the SUSE repositories.
-
-
Reformat XFS v4 devices (if applicable)
Check to see whether your appliance is using the XFS file system using the following command:
df -TLook for 'XFS' in the Filesystem Type
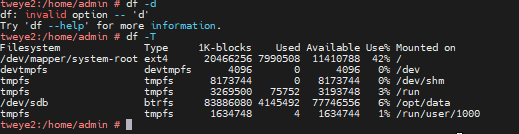
If your appliance is using the XFS file system, verify whether any volumes are using the v4 format. This format is deprecated and should be reformatted to v5 to ensure compatibility and support with SUSE Linux Enterprise Server.
If your appliance is not using XFS, or is already on XFS v5, this step can be safely skipped.
For more information and reformatting instructions, refer to the official SUSE documentation: Reformatting XFS v4 devices
-
Confirm the system is fully upgraded
At this point, you should be fully upgraded to SUSE Linux Enterprise Server 15 SP6.
To verify:
cat /etc/os-releaseExpected output:
NAME="SLES"
VERSION="15-SP6"
PRETTY_NAME="SUSE Linux Enterprise Server 15 SP6"
You can also confirm the appliance version and build from the UI by navigating to the About / Contact section in the appliance web interface.
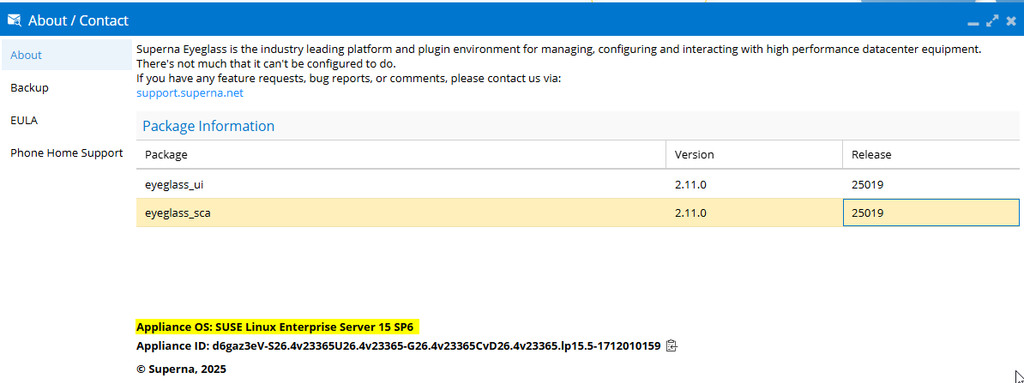
Verify the Appliance OS is SUSE Linux Enterprise Server 15 SP6.
This confirms that the migration was successful and the appliance is running on the upgraded OS.
-
Cluster up (ECA nodes)
For all nodes, after confirming you have successfully upgrade, run the following command:
ecactl cluster up
Troubleshooting
If you encounter issues after the upgrade, use the following guidance based on the symptoms observed.
-
UI or Application Stability Issues
If you notice problems such as UI errors or unexpected behavior in the application after the upgrade:
-
Cluster down using the following command:
ecactl cluster down -
Re-run the Eyeglass and/or ECA installer, or upgrade to the latest available build.
-
Cluster up using the following command:
ecactl cluster up -
Restart the sca service
systemctl restart sca
-
-
Docker Service Issues
If you encounter problems where certain containers fail to start manually or during cluster up:
-
Cluster down using the following command:
ecactl cluster down -
Clear all Docker data:
docker system prune -a -
Re-run the installer or upgrade to the latest build
-
Cluster up using the following command:
ecactl cluster up
-
See Also
The following SUSE guides are available if you need more information about the upgrade process:
SLES 15 SP6 | Upgrade Guide via yast2 migration