Multi Site Access Zone and SyncIQ Configuration
Introduction
Access Zone Failover with SyncIQ enables seamless data replication and recovery across three sites, ensuring high availability and robust disaster recovery. This configuration supports flexible failover options, allowing operations to continue without disruption during site outages.
This document provides a step-by-step guide for configuring Access Zone Failover with SyncIQ in a three-site setup. It includes prerequisites, procedural guidelines, and behavior descriptions to help you implement and maintain a reliable failover configuration.
Prerequisites
SyncIQ Policy Configuration
- Ensure the source cluster SyncIQ policy path is contained within the Access Zone for the target cluster.
- Use consistent naming conventions for SyncIQ policies (e.g., source-target pairs like
AB-synciq-01).
Recommended vs. Unsupported Configurations
-
Recommended Configuration:
Use SyncIQ policies that replicate all data and DNS namespaces together, enabling fully automated Access Zone failover. This ensures no data or namespaces are stranded.Matrix for Recommended Configuration:
SyncIQ Policy Source Cluster Path Target Cluster 1 Target Cluster 2 SyncIQ policy 1/ifs/data/AZ1/data✅ ✅ SyncIQ policy 2/ifs/data/AZ1/marketing✅ ✅ SmartConnect Zone 1data.example.com✅ ✅ SmartConnect Zone 2marketing.example.com✅ ✅ -
Unsupported Configuration:
Avoid configurations where failover results in only partial data replication or DNS namespace misalignment, as this can leave data stranded and failover incomplete.Matrix for Unsupported Configuration:
SyncIQ Policy Source Cluster Path Target Cluster 1 Target Cluster 2 SyncIQ policy 1/ifs/data/AZ1/data❌ ✅ SyncIQ policy 2/ifs/data/AZ1/marketing✅ ❌ SmartConnect Zone 1data.example.com❌ ✅ SmartConnect Zone 2marketing.example.com✅ ❌
Mirror Policy Prerequisites
-
Before Failover A ⇒ B:
Delete any SyncIQ Mirror Policies from Site C to Site A to prevent overlaps that may cause failover failures. -
Before Failover A ⇒ C:
Similarly, delete any SyncIQ Mirror Policies from Site B to Site A.
SmartConnect Zone Alignment
- Ensure that SmartConnect zones are correctly configured to failover together, leaving no stranded namespaces or data.
- Both data and DNS configurations must align across all clusters.
Zone Readiness
Initial Configuration / Before Failover / After Failback
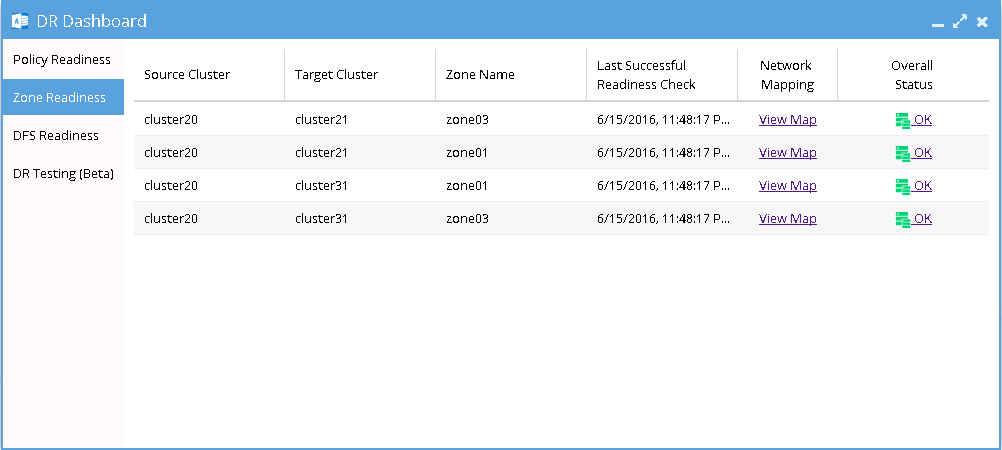
This is the Zone Readiness for an Initial Configuration (before failover or after failback).
Both Source-Target pairs are listed in this DR Dashboard 'Zone Readiness' window.
This shows that a failover choice can be made to any target cluster in the Green OK state. Failover during a warning status is also allowed.
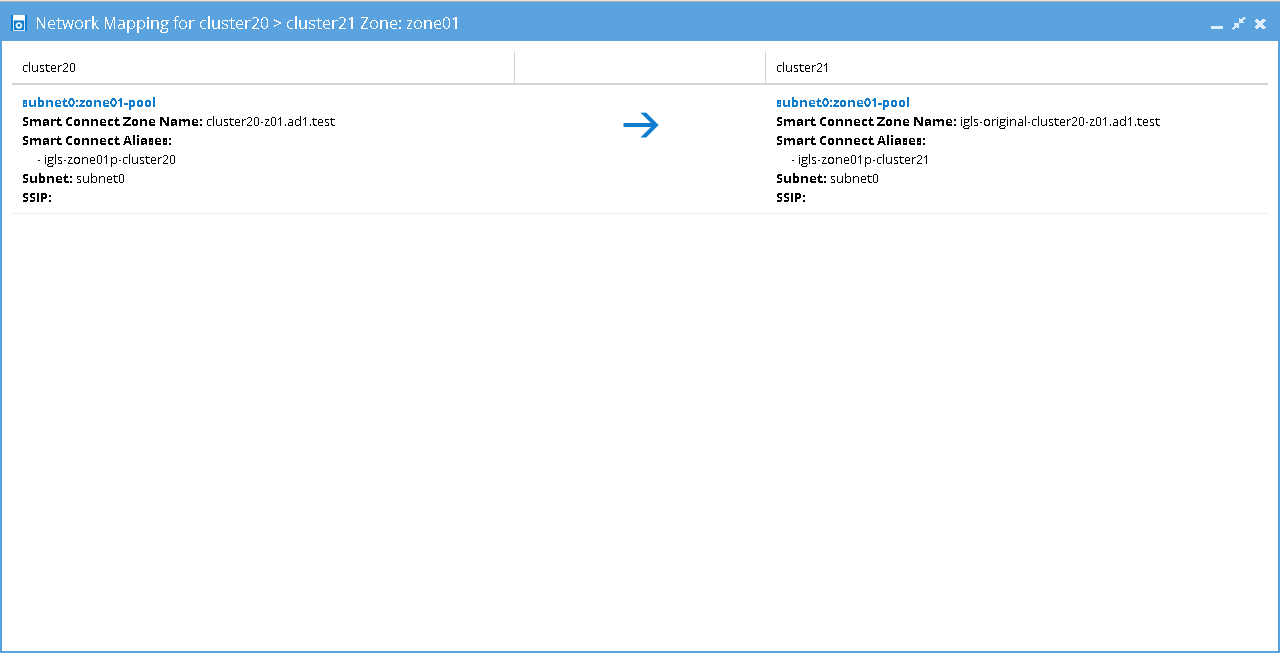
Network Mapping - Initial Configuration: A to B Zone01
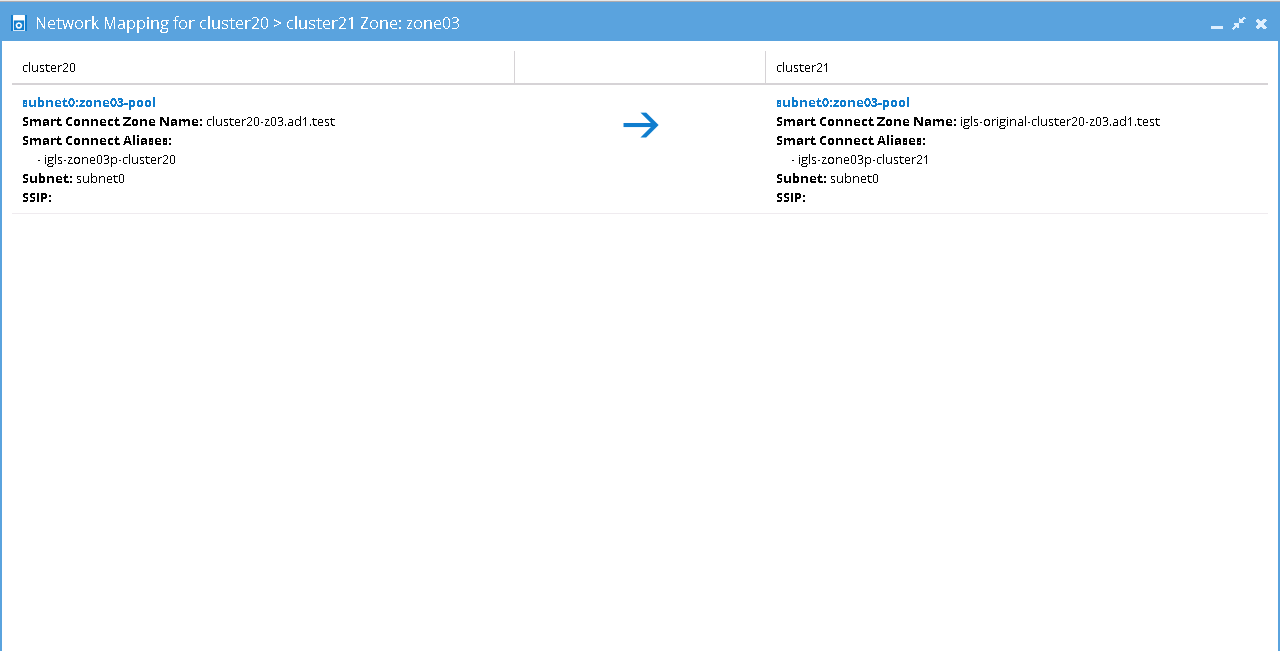
Network Mapping - Initial Configuration: A to B Zone03
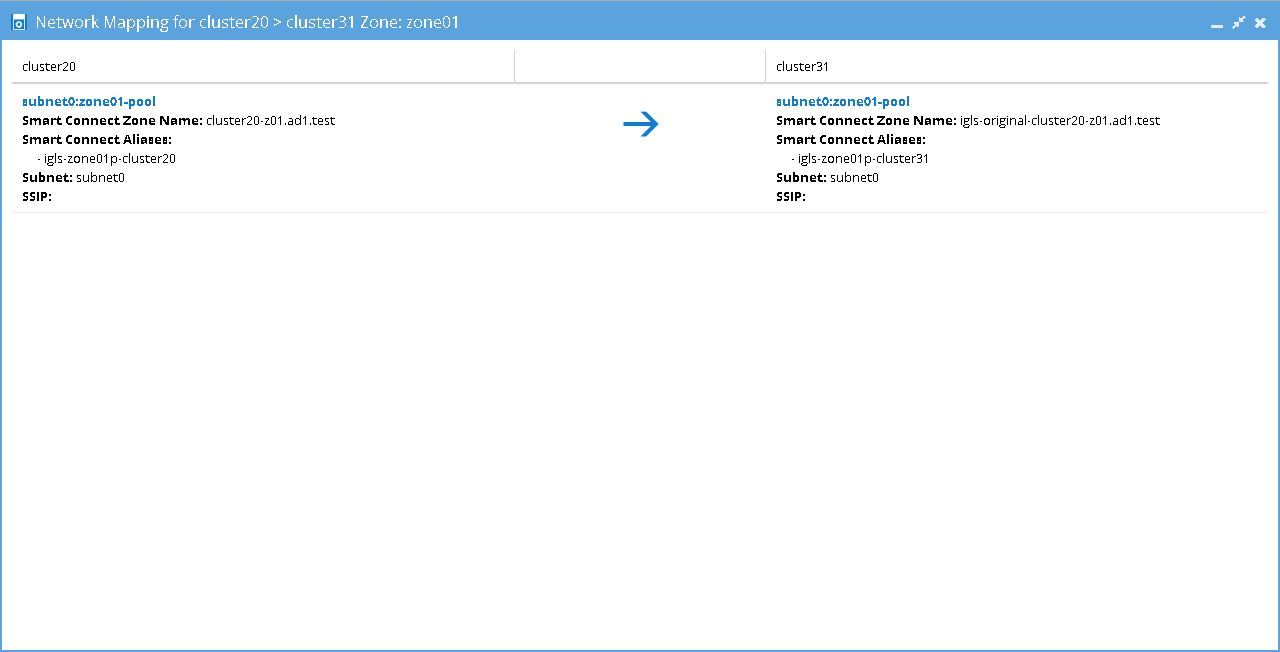
Network Mapping - Initial Configuration: A to C Zone01
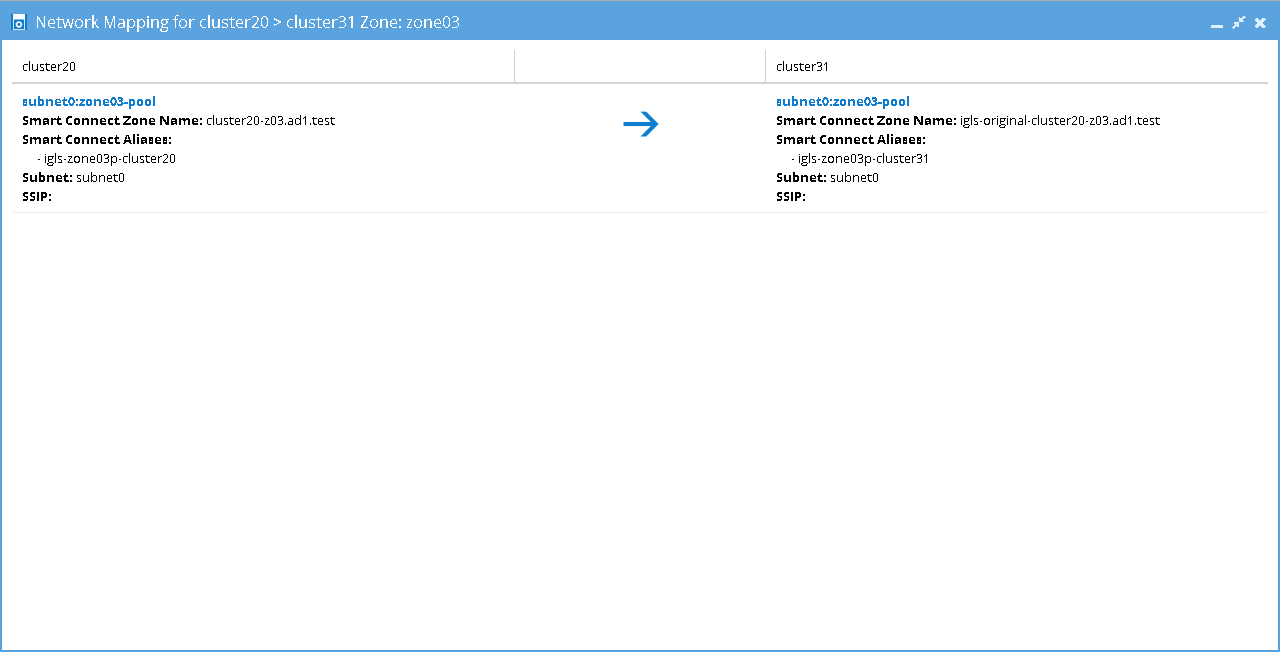
Network Mapping - Initial Configuration: A to C Zone03
Mappings Table - Initial Configuration
The following table shows Alias Name mappings for this Initial Configuration:
Before Failback B ⇒ A
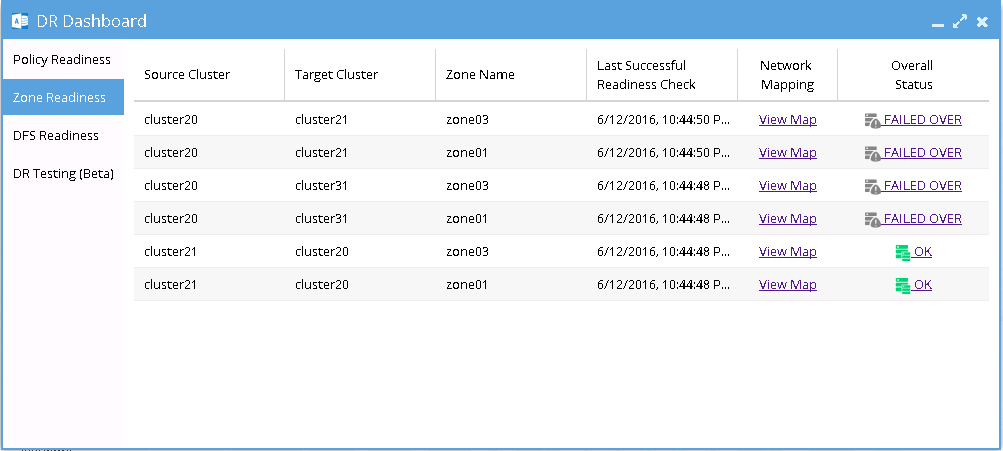
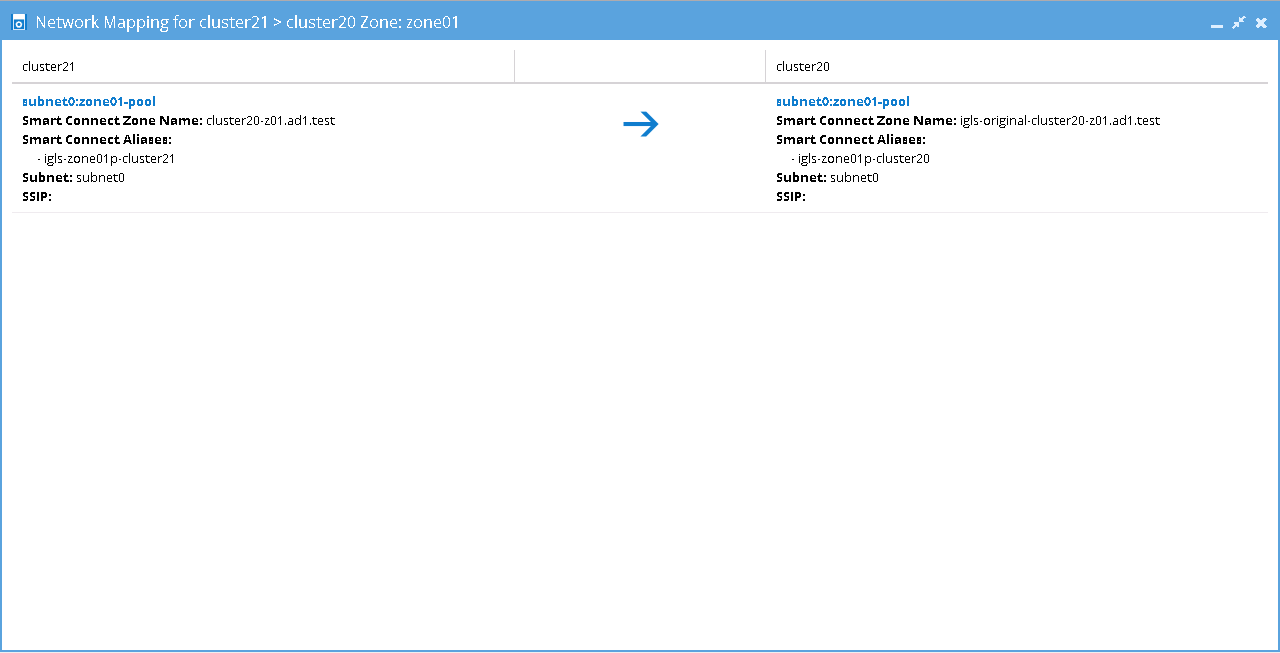
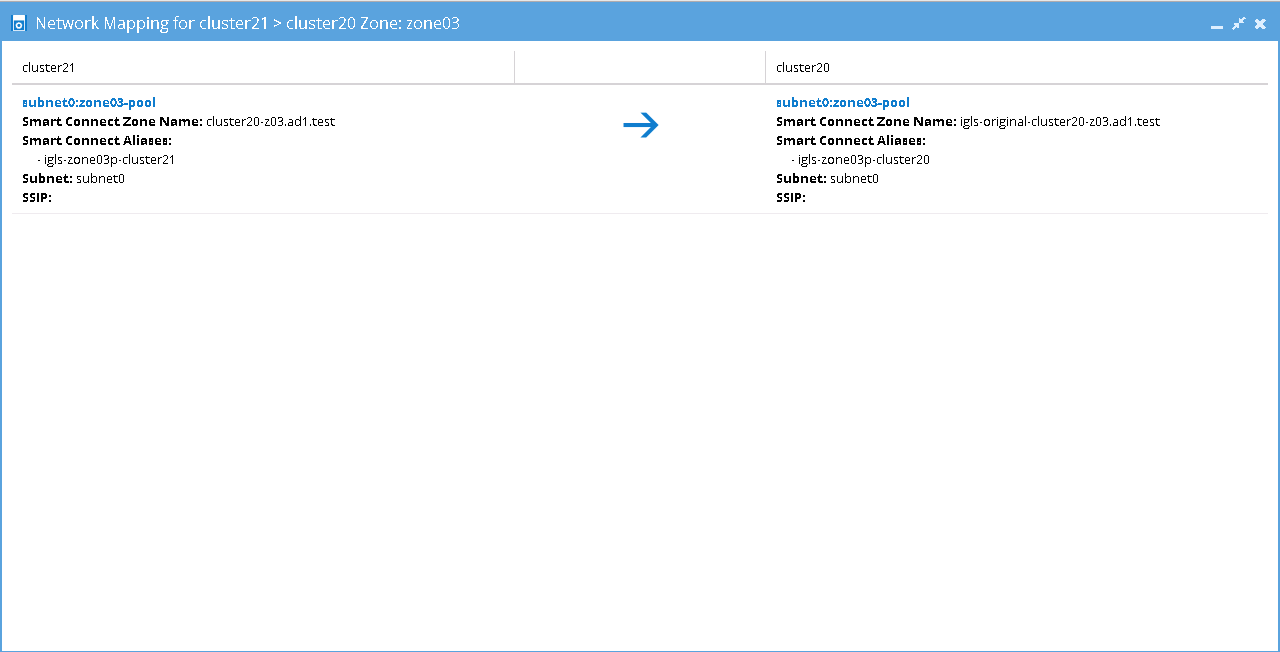
This Zone Readiness is for the state before Failback from B to A. In the figure below, only Target B (cluster 21) to Source A (cluster20) pairs are listed as available in this DR Dashboard 'Zone Readiness' window. The other pairs are stated as ´FAILED OVER´.
Network Mapping - Before Failback B to A Zone01
Network Mapping - Before Failback B to A Zone03
Mappings Table - Before Failback B to A
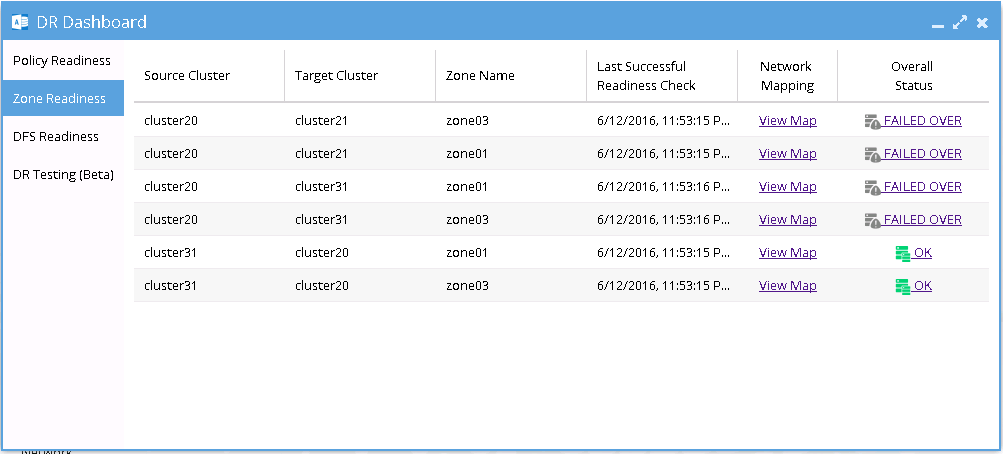
Before Failback C ⇒ A
This Zone Readiness is for the state before Failback from C to A. In the figure below, only Target C (cluster 31) to Source A (cluster20) pairs are listed as available in this DR Dashboard 'Zone Readiness' window. The other pairs are stated as ´FAILED OVER´.
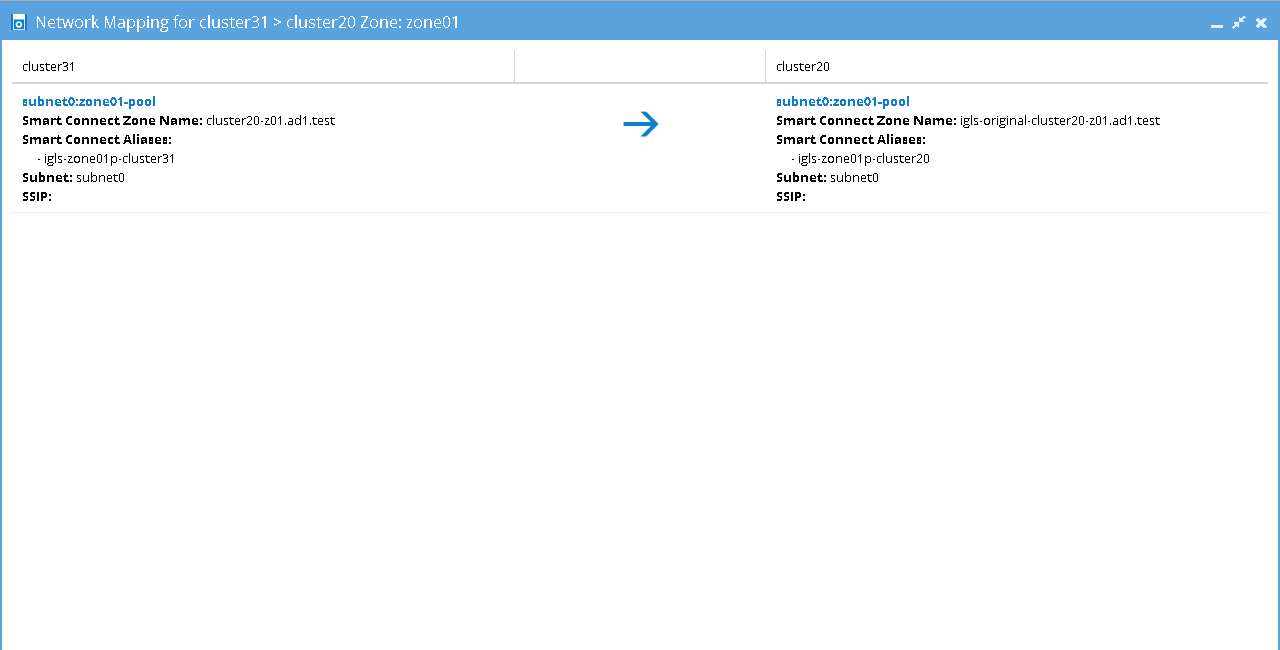
Network Mapping - Before Failback C to A Zone01
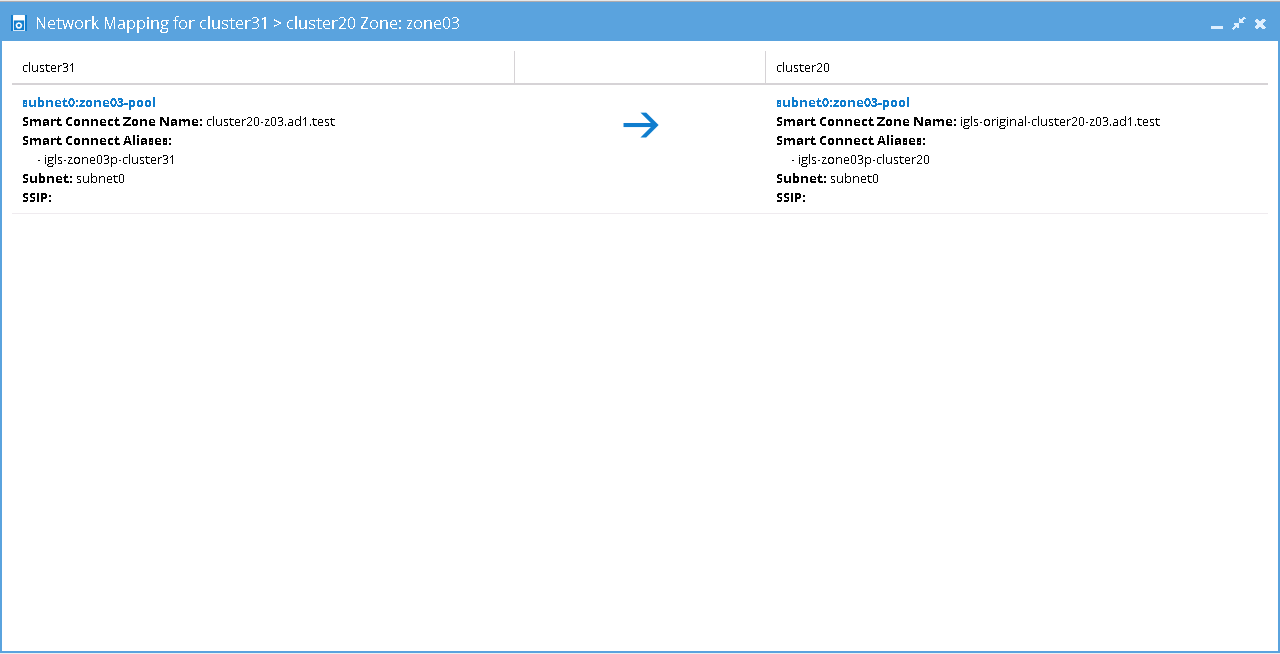
Network Mapping - Before Failback C to A Zone03
Mappings Table - Before Failback C to A
Network Mappings Summary
Based on the above examples, the following tables summarize the networking mappings with zone names and zone alias names.
Initial Configuration, Before Failover, and After Failback
After Failover
Access Zone Failover and Failback Procedures
Failover from A to B Procedure
-
Check for Mirror Policies:
Before initiating the Eyeglass Access Zone Failover from A to B, ensure there are no existing SyncIQ Mirror Policies from Site C to Site A.- Overlapping Mirror Target Paths can create conflicts, making Mirror Policies from B to A un-runnable and causing the Eyeglass Failover Job to fail.
- Delete any conflicting Mirror Policies before proceeding.
-
Run Domain Mark Job:
Execute a domain mark job on each SyncIQ policy on Cluster A.- This is a required step to create domain marks that will be used during the failover process.
- Best practice: Run the domain mark job before failover to ensure the resync prep step is completed quickly.
importantWhile the domain mark job is running, do not initiate a failover from A to C.
-
Select the Correct Target Cluster:
In the DR Assistant Wizard, carefully select the correct target cluster for the failover (in this case, A to B).- Choose the appropriate zone for failover based on the source-target pairs, such as
cluster20(source) tocluster21(target).
- Choose the appropriate zone for failover based on the source-target pairs, such as
-
Review the Warning Screen:
The next screen in the DR Assistant Wizard will display a warning to highlight that only the selected Access Zone will failover (A to B).- Other policies on the same Access Zone (e.g., A to C) will not be impacted during this failover.
-
Initiate the Failover:
Proceed with the failover operation as per normal instructions in the Eyeglass Access Zone Failover Guide. -
Repeat as Needed:
If other Access Zones need to failover from A to B, repeat the above steps for each zone.
Failback from B to A Procedure
-
Initiate Failback in DR Assistant Wizard:
Begin the Eyeglass Access Zone Failback process as per normal procedure.- Select the source cluster (Cluster B in this example, e.g.,
cluster21). - The wizard will display failover options specifically for the selected Source-Target pair (Cluster B to Cluster A, e.g.,
cluster21tocluster20).
- Select the source cluster (Cluster B in this example, e.g.,
-
Select the Access Zone to Be Failed Back:
Choose the specific Access Zone that you want to failback from the options displayed in the wizard. -
Review Success Screen:
The next wizard screen will confirm successful selection and will not display any warnings related to SyncIQ policies that are not part of the failback operation.noteEnsure that the selected Access Zone and target configuration are correct before proceeding.
-
Complete the Failback:
Follow the steps to complete the failback process. Refer to the Eyeglass Access Zone Failover Guide for any additional details or procedural clarifications. -
Repeat for Other Access Zones:
If there are additional Access Zones to be failed back from Cluster B to Cluster A, repeat the above steps for each one.
Failover from A to C Procedure
-
Check for Mirror Policies:
Before initiating the Eyeglass Access Zone Failover from A to C, ensure there are no existing SyncIQ Mirror Policies from B to A.- Overlapping Mirror Target Paths can create conflicts, making Mirror Policies from C to A un-runnable and causing the Eyeglass Failover Job to fail.
- Delete any conflicting Mirror Policies before proceeding.
importantThe prerequisite step must be completed before failover. The order is critical, as the domain mark will be deleted on Cluster A once this step is finished.
-
Run Domain Mark Job:
Execute a domain mark job on each SyncIQ policy on Cluster A.- This is a required step to create domain marks used during the failover process.
- Best practice: Run the domain mark job before failover to ensure the resync prep step is completed quickly.
importantWhile the domain mark job is running, do not initiate a failover from A to B. Wait for the domain mark job to complete.
-
Select the Correct Target Cluster:
In the DR Assistant Wizard, carefully select the correct target cluster for the failover (in this case, A to C).- Choose the appropriate zone for failover based on the source-target pairs, such as
cluster20(source) tocluster31(target).
- Choose the appropriate zone for failover based on the source-target pairs, such as
-
Review the Warning Screen:
The next screen in the DR Assistant Wizard will display a warning to highlight that only the selected Access Zone will failover (A to C).- Other policies on the same Access Zone (e.g., A to B) will not be impacted during this failover.
-
Initiate the Failover:
Proceed with the failover operation as per normal instructions in the Eyeglass Access Zone Failover Guide. -
Repeat for Other Access Zones:
If there are additional Access Zones to failover from A to C, repeat the above steps for each one.
Failback from C to A Procedure
-
Initiate Failback in DR Assistant Wizard:
Start the Eyeglass Access Zone Failback process.- Select the source cluster (Cluster C in this example, e.g.,
cluster31). - The wizard will display failover options for the selected Source-Target pair (Cluster C to Cluster A, e.g.,
cluster31tocluster20).
- Select the source cluster (Cluster C in this example, e.g.,
-
Select the Access Zone to Be Failed Back:
Choose the specific Access Zone to failback from the list displayed in the wizard. -
Review Success Screen:
Confirm the Access Zone selection in the next wizard screen.- No warnings will appear regarding SyncIQ policies not being failed back.
-
Complete the Failback:
Proceed with the failback as per normal steps. Refer to the Eyeglass Access Zone Failover Guide for additional details if needed. -
Repeat for Other Access Zones:
If additional Access Zones need to be failed back from Cluster C to Cluster A, repeat the steps for each zone.


