NetApp Configuration
Adding a Filer to the Superna Data Security Essentials Policy Hierarchy
After installing the NetApp version of Data Security Essentials, the NetApp Filer must be added to the hierarchy for management.
-
Open Superna Data Security Essentials Admin by navigating to:
Start > All Programs > Superna Data Security Essentials > Data Security Essentials Admin -
Right-click My Site and select:
New > Filer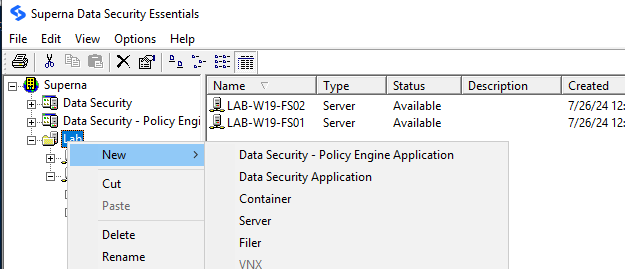
-
A prompt will appear to enter a name. The name entered must match the name of the NetApp Filer (7-mode) or CIFS Server (c-mode).

-
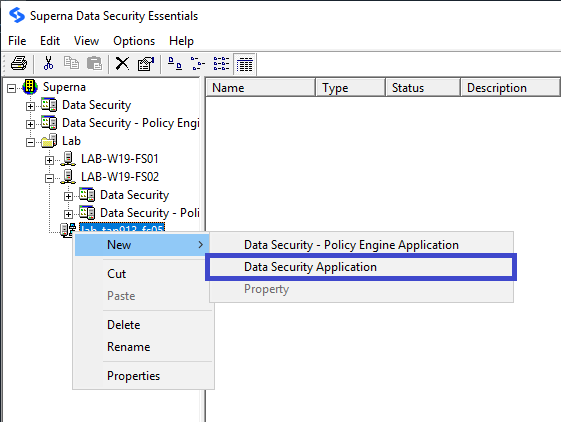
After adding the device to the collection of servers recognized by Superna Data Security Essentials, right-click the newly added device and select: New > Data Security Application.
-
Right-click the device and select:
New > Data Security - Policy Engine Application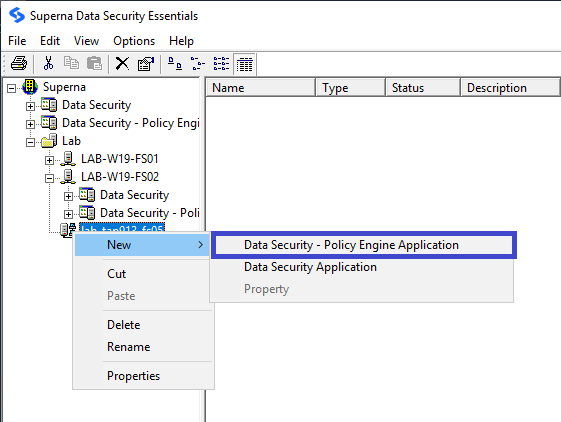
-
Now that the NetApp Filer has been added to the hierarchy, the Windows server managing the filer needs to be configured.
-
In the Superna Smart Policy Manager hierarchy view (the left pane), click the plus sign (+) adjacent to the name of the Windows-based server that will manage the NetApp Filer.
-
Right-click Data Security under that entry and select Properties to open the Data Security Configuration screen.
-
Click the NAS Connector tab.

-
Click the Add button.
-
Select whether to add a 7-mode or c-mode device.

-
For a 7-mode device, enter the name of the Filer/vFiler and click OK.

-
For a c-mode device, enter the following:
- CIFS Server Name: This is the NetBios name of the filer, which is not necessarily the svm name.
- Cluster IP Address: The ip address of the cluster where the cifs servers are defined.
- Credentials to access the cluster: local cluster account or domain account.
- Web settings: The web server API port and https/http settings.
- FPolicy details:
- Preferred Address: If the windows server has more than one ip address, one can be chosen or default to all addresses.
- Port: The port used to communicate with FPolicy. If a firewall exists between the windows server and the NetApp filer, it is best to specify a port so that a more granular rule can be created on the filer to allow the communications. If Dynamic Port is selected, an open port in the range 32000 to 65535 is assigned by the windows operating system to use.
- Sequence Number: This specifies the ordering of notifications from the filer when multiple servers are registered with FPolicy. The Data Security App defaults to 10.

-
Click OK in the Superna Data Security Essentials Configuration screen.
-
Right-click Data Security - Policy Engine and select Properties to open the Data Security - Policy Engine Configuration screen.
-
Click the NAS Connector tab.
-
Click the Add button.
-
Select whether to add a 7-mode or c-mode device.
-
For a 7-mode device, enter the name of the Filer/vFiler and click OK.
-
For a c-mode device, enter the following:
- CIFS Server Name: This is the NetBios name of the filer, which is not necessarily the svm name.
- Cluster IP Address: The ip address of the cluster where the cifs servers are defined.
- Credentials to access the cluster: local cluster account or domain account.
- Web settings: The web server API port and https/http settings.
- FPolicy details:
- Preferred Address: If the windows server has more than one ip address, one can be chosen or default to all addresses.
- Port – The port used to communicate with FPolicy. If a firewall exists between the windows server and the NetApp filer, it is best to specify a port so that a more granular rule can be created on the filer to allow the communications. If Dynamic Port is selected, an open port in the range 32000 to 65535 is assigned by the windows operating system.
- Sequence Number: This specifies the ordering of notifications from the filer when multiple servers are registered with FPolicy. The Data Security App defaults to 10.
-
Click OK in the Data Security - Policy Engine Configuration screen.