PowerStore Configuration
Adding a PowerStore NAS Server to the Data Security Essentials Policy Hierarchy
-
Open Superna Data Security Essentials Admin by navigating to:
Start > All Programs > Superna Data Security Essentials > Data Security Essentials Admin -
Right-click My Site and select:
New > Filer -
Create a New PowerStore Entry
Right-click My Site and select:
New > PowerStore System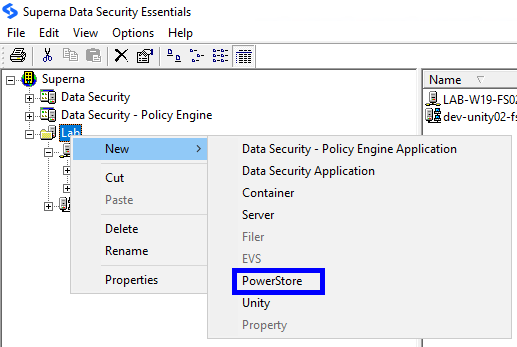
-
Name the PowerStore System
Enter a name that corresponds to the CIFS server name configured on your PowerStore system.
-
Add Data Security Application
After the PowerStore system appears in the list, right-click it and select:
New > Data Security Application -
Add Policy Engine Application
Right-click the PowerStore system and select:
New > Data Security - Policy Engine Application -
Configure Windows Server to Manage PowerStore
After adding the PowerStore system to the hierarchy, configure the Windows server that will manage it. -
Access Data Security Properties
In the Superna Smart Policy Manager hierarchy view (left pane), expand the Windows-based server entry, right-click Data Security, and select Properties. -
Configure Dell Connector
Click the Dell Connector tab.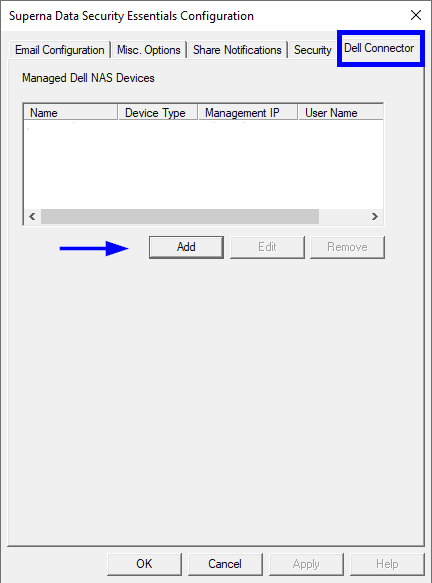
-
Select Device Type
Click Add, then select Dell NAS Device - PowerStore from the device type options.
-
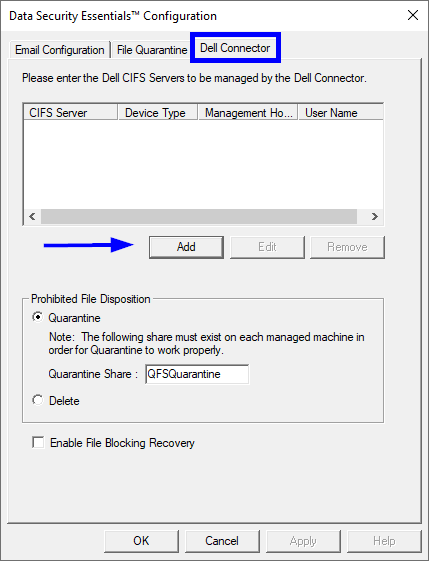
Add PowerStore Details
Enter the following information:
- CIFS Server Name: The NetBIOS name of your PowerStore file server
- IP Address: The IP address of your PowerStore system
- User Name: Administrator username with access to the PowerStore system
- Password: Administrator password
- Confirm Password: Re-enter the password to confirm
-
Optional: Edit Configuration
After adding a device, you can edit its configuration by selecting it from the list and clicking the Edit button (located next to the Add button). After editing the CIFS Server Name, IP Address, User Name, or Password and clicking Next, the system performs these validation checks:-
Log in to the management host
-
Retrieve configuration data (this may take a few minutes)
-
Locate CIFS server (example: sna-nas3)
-
Validate CIFS server type
-
Validate CIFS server permissions
-
Validate host version
-
Validate CIFS server registration with the managing Dell connector service
-
-
Save PowerStore Configuration
Click OK to save the PowerStore system configuration. -
Configure Policy Engine for PowerStore
Right-click Data Security - Policy Engine and select Properties. -
Add PowerStore to Policy Engine
Click the Dell Connector tab, click Add, select Dell NAS Device - PowerStore from the device type options, and enter the same PowerStore system information as in step 11. You can also use the Edit button to modify an existing configuration, which will perform the same validation checks described in step 12.
-
Save Policy Engine Configuration
Click OK to save the configuration changes.
Next Steps
After configuring your PowerStore system in the Data Security Essentials Policy Hierarchy, you need to complete the NAS Server Integration to enable event monitoring.
See PowerStore NAS Server Integration for detailed instructions on setting up event publishing for comprehensive file activity monitoring.