Policy Creation
This section outlines standard Superna Data Security Essentials procedures for creating a Data Security Essentials policy.
Data Security monitors two main types of paths: directory paths and share paths. For share paths all you need to do is add a share name. For directory paths the format depends on the device being managed:
- For the Windows platform the directory path format is
drive_letter:\<some directory>[…\optional subdirectory\another optional subdirectory]. - For the NetApp platform the directory path format is
\vol\<volume name>\<some directory>[…\optional subdirectory\another optional subdirectory]for 7-mode filers and<volume name>\<some directory>[…\optional subdirectory\another optional subdirectory]for c-mode filers.
When testing policies you have created, perform the tests from an independent machine that is not running Data Security Essentials.
File Audit Policies
This section walks you through creating a typical file audit policy. We will create a file audit policy for all your user home directories in a typical server configuration. This policy will be applied to all users in your Users directory.
-
In the Data Security Essentials hierarchy view, locate the Windows Server or NetApp Filer you added earlier. If necessary, click the plus sign (+) adjacent to this entry to expand the tree. Then click the plus sign next to Data Security to expand the policy types.
-
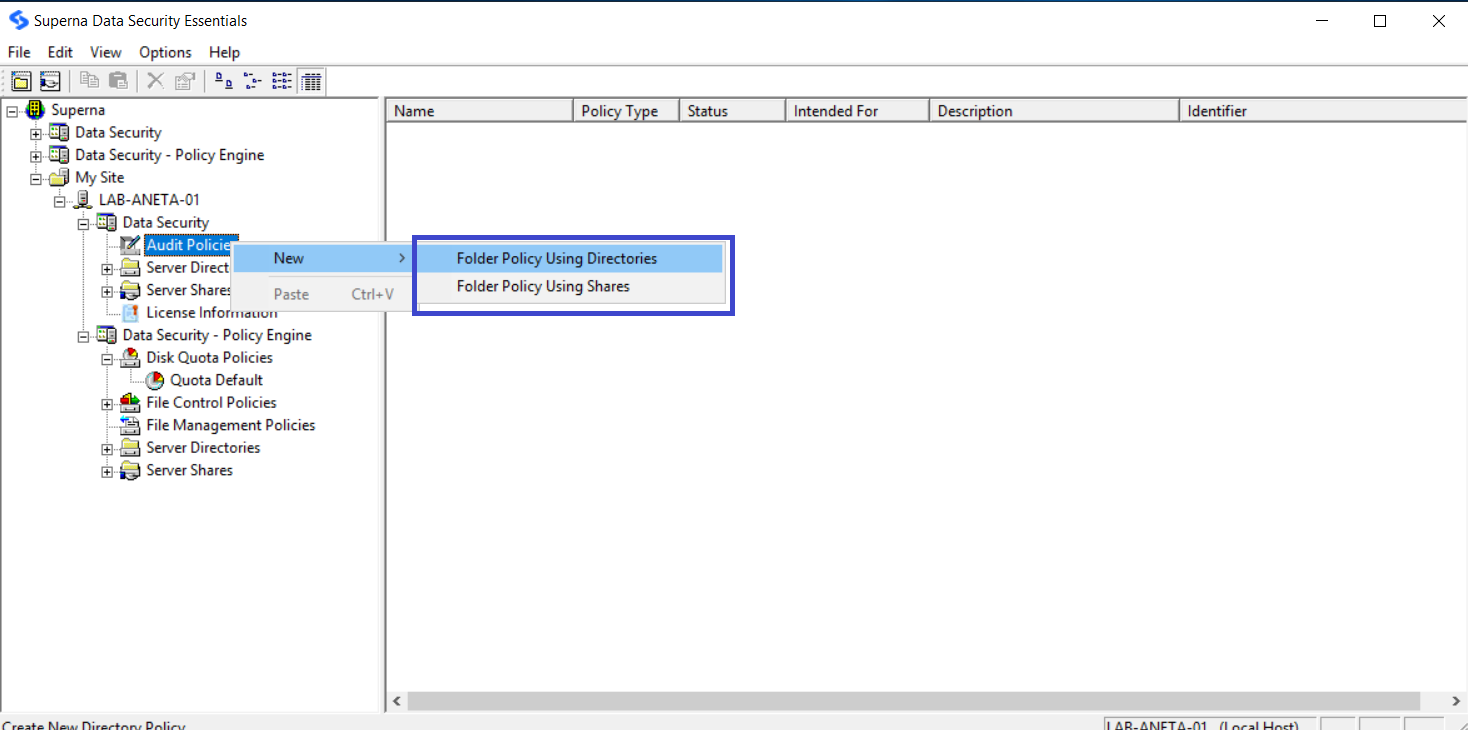
Right-click File Audit Policies and select New > Folder Policy Using Directories.
-
In the New File Audit Directory Policy dialog box, click the General tab. Enter a name and a description for your new policy.
-
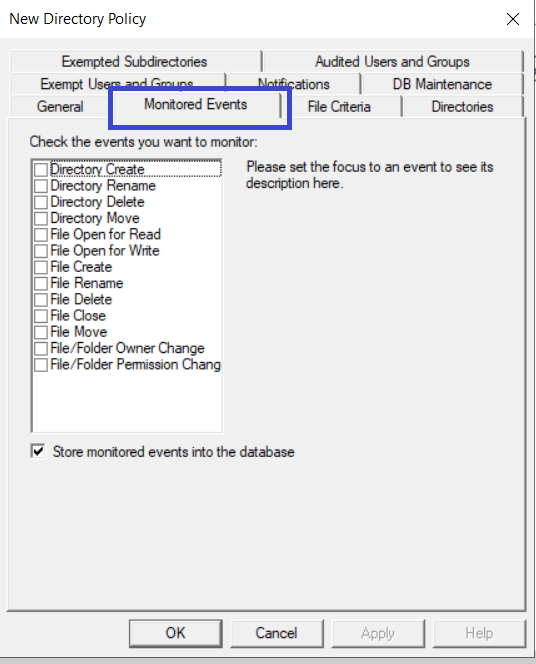
Click the Monitored Events tab; check the event(s) you want to monitor from the list of events. Check the Store monitored events into the database checkbox if you wish to store the monitored events in the Data Security Essentials database. You can clear the Store monitored events into the database checkbox if you wish to use the notifications option without recording the events to the Data Security Essentials database.
-
Click the File Criteria tab. Click the Add button, select the files that you wish to monitor and the associated patterns will be displayed automatically; you can also specify a custom pattern. Examples of custom patterns are using
*.*(to manage all files) and using*.rtf *.doc(to manage all Word files).infoIf the Patterns list is empty, the policy will audit all of the file(s).
-
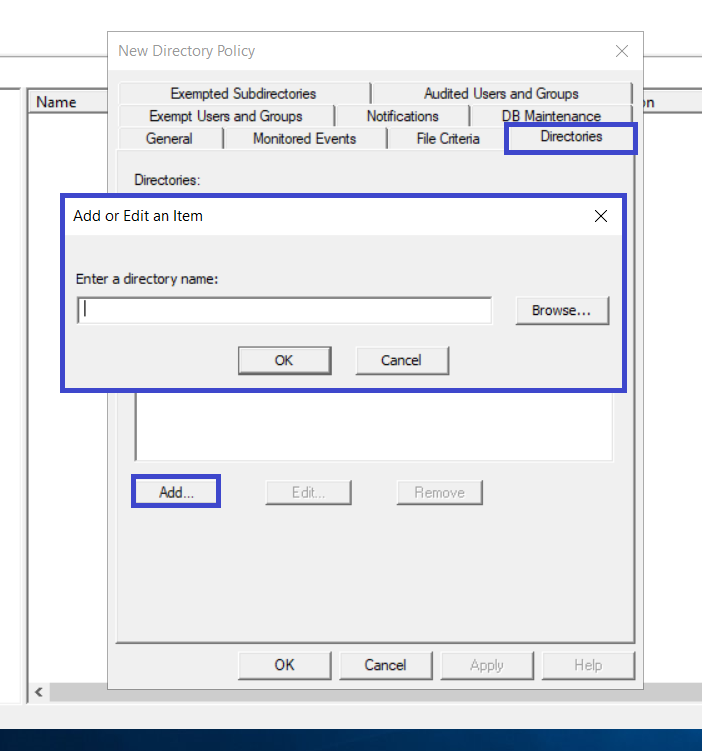
Click the Directories tab. Click the Add button, type the appropriate directory path for your Users directory followed by a backslash.
 info
infoBy default, this policy applies to all users. You can verify this fact by clicking the Managed Users and Groups tab.
-
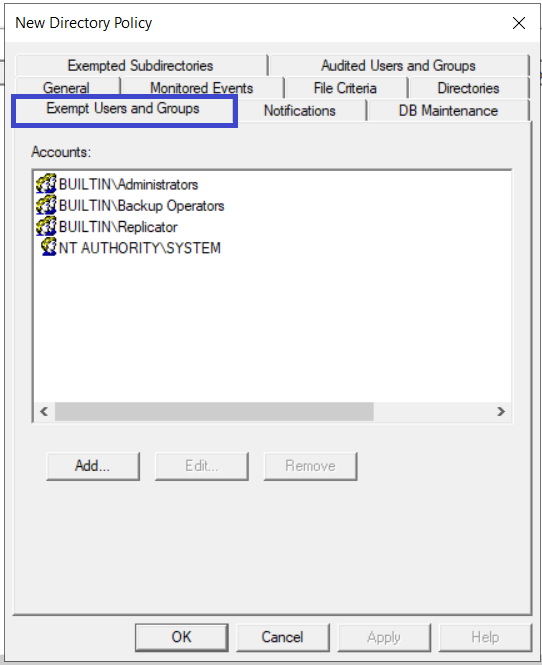
Usually administrators, backup operators, replicator, and the system account are exempt from policies. You can verify this fact by clicking the Exempt Users and Groups tab. To change this setting, select the appropriate entry and click Remove. To add an account, click the Add button, browse and search for users/groups in Active Directory, select the user/group and click OK. The selected user/group will be added to the Exempt users list.
-
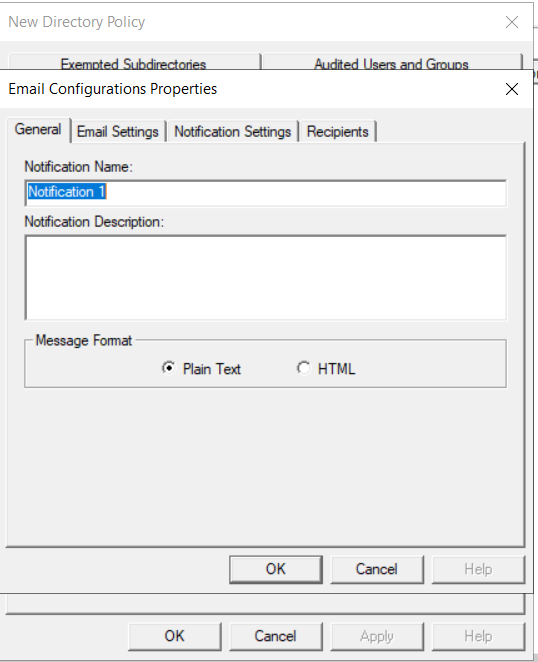
Click the Notifications tab, then click the Add button. On the Email Configurations Properties dialog General tab, specify the notification related details; including the notification name, description, and message format. On the Email Settings Tab, specify the email subject and the email body, customize the displayed information about the authorized users and the associating events, and choose the detail level. On the Notification Settings Tab, specify the notification frequency along with the types of events you wish to receive. On the Recipients Tab, specify the user(s) who should receive the email.
-
Click the Exempted Subdirectories tab. Click the Add button and type the subdirectory you want to exempt from the monitored directories list. This directory is appended to each of the directories specified on the Directories tab.
-
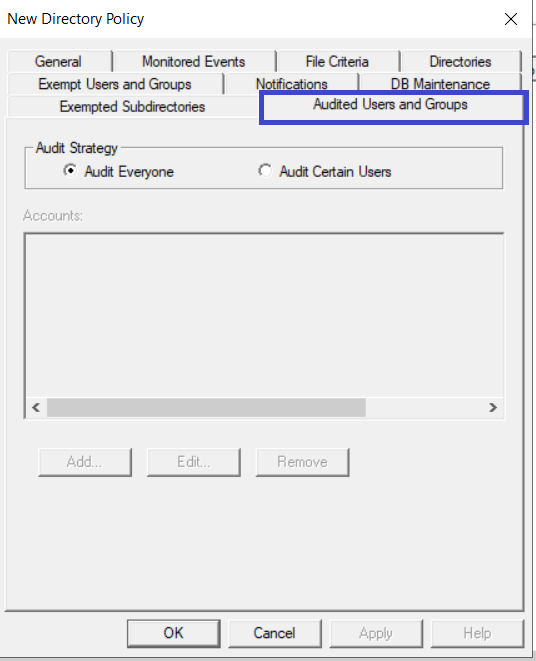
Click the Audited User and Groups tab, choose whether you want to audit all users within your environment or specify certain user(s) to audit.
-
Click OK to save the policy and close the New File Audit Directory Policy dialog box. If this policy was created at the top level Data Security application or a container level Data Security application, the policy will be inherited by all systems from this point down in your hierarchy.
Disk Quota Policies
This section walks you through creating a typical disk quota policy. We will create a quota policy for all your user home directories in a typical server configuration. This quota policy will be applied to all users in your Users directory. Each user will get a quota limit of 50MB.
-
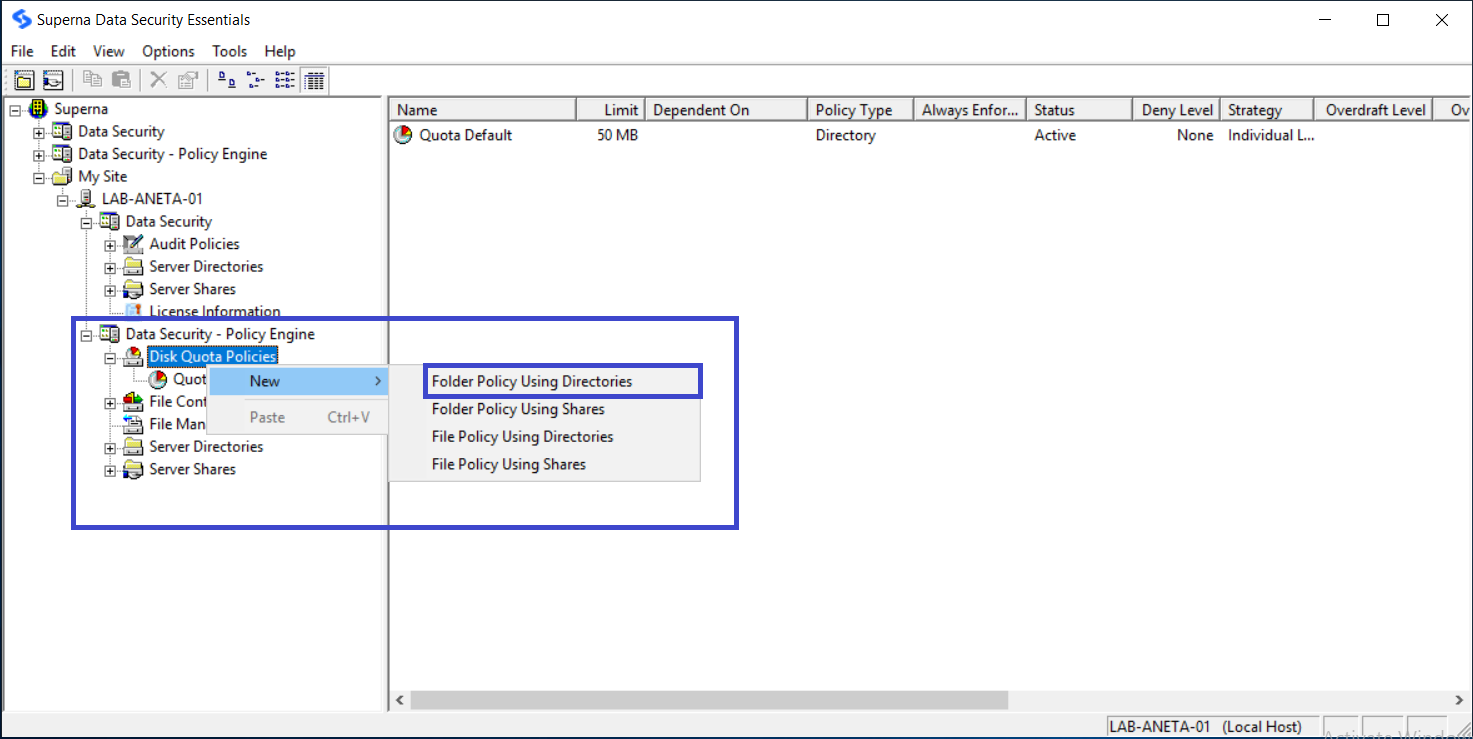
In the Data Security Essentials hierarchy view, locate the Windows Server or NetApp Filer you added earlier. If necessary, click the plus sign (+) adjacent to this entry to expand the tree. Then click the plus sign next to Data Security Policy Engine to expand the policy types. Right-click Disk Quota Policies and select New > Folder Policy Using Directories.
-
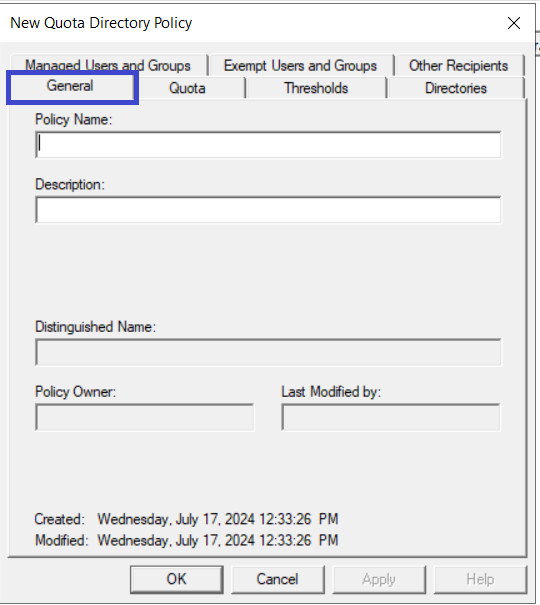
In the New Policy dialog box, click the General tab. Enter a name and a description for your new policy.
-
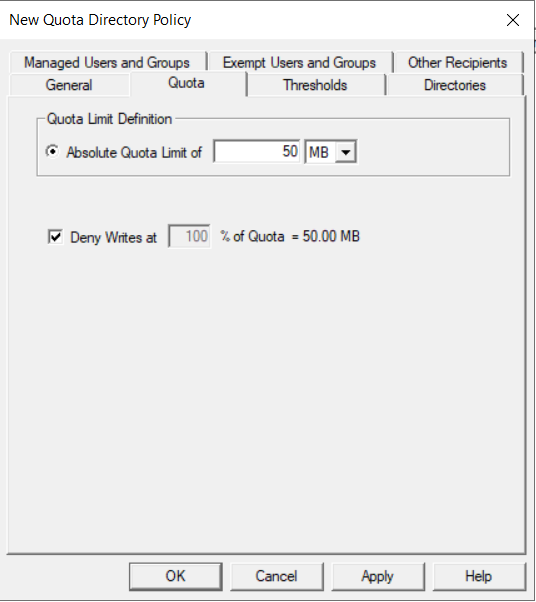
Click the Quota tab, select Absolute Quota Limit, enter 50 MB as the limit, click Deny Writes at 100% of quota, and leave Overdraft unchecked for this example.
 info
infoIn a production environment, it is a best practice to implement a 10% overdraft.
-
Click the Thresholds tab to view the thresholds for this quota policy. Notice that one threshold is already set up: At Quota 100%. Adding more thresholds is as simple as clicking Add and filling in the percentage information for that threshold.
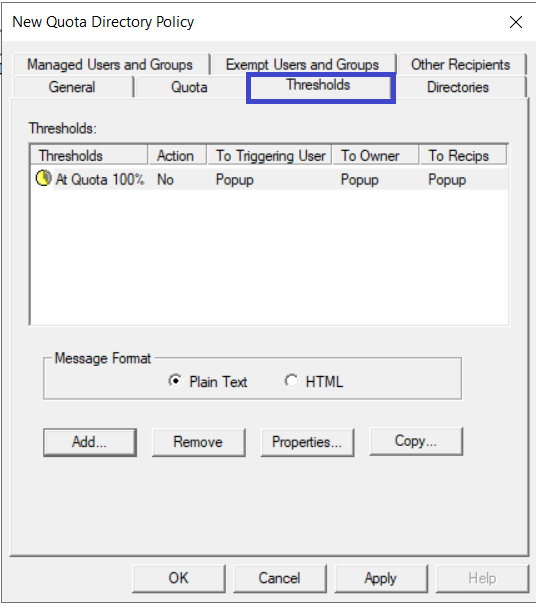
As space is consumed, these thresholds serve as triggers for various actions. Each threshold can send email or pop-up messages to the triggering user, the NTFS owner of the file, and/or to any other group or individual (network administrators, the Help Desk, and so on). A threshold can also run a third-party process – for example, running a virus scan on the file in question, or starting an archive to tape.
Superna Data Security Essentials lets you create up to 200 threshold levels for each policy. Common choices for additional levels are 75%, 85%, and 95%. As users hit each of these levels, you can customize your messages to suggest that users delete some files or contact the Help Desk and request a quota increase before their ability to save new documents runs out. It is also possible to integrate Superna Data Security Essentials with your intranet or automated workflow and process the limit increase automatically.
-
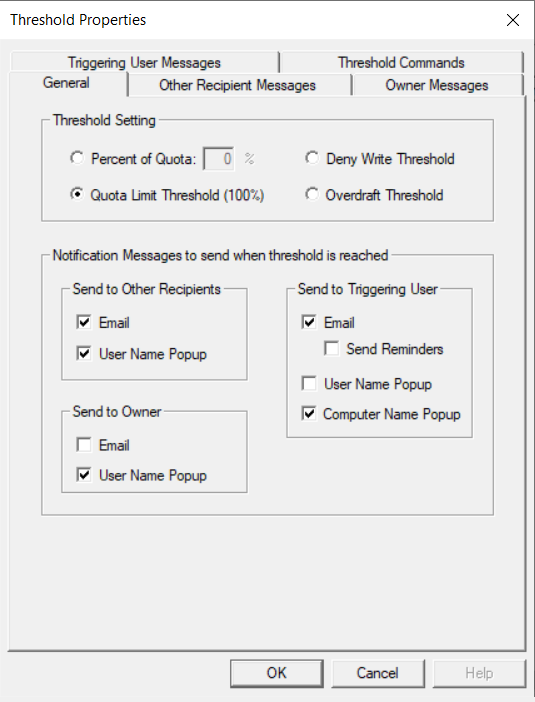
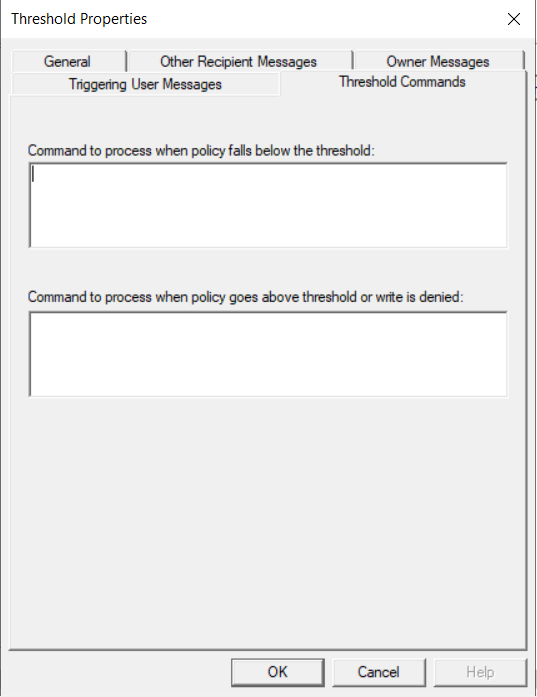
Double-click the At Quota 100% threshold. The Threshold Properties dialog box for that threshold level appears. If you configured Superna Data Security Essentials for email earlier, select the checkbox for email to the triggering user. The Messages tabs let you customize the text of the messages that will be sent. The Threshold Commands tab allows you to specify a program, script, or batch (.BAT) file that will run when the threshold is reached.
-
After you have chosen the appropriate settings for email and messages, click OK to return to the New Policy dialog box.
-
Click the Directories tab. Click the Add button, type the appropriate directory path for your Users directory followed by a backslash and asterisk (
\*) or type the directory path with an asterisk (\*) in the middle of the path to manage a subpath under each user directory. For asterisks in the directory path, only one asterisk is allowed.infoBy default, this quota applies to all users. You can verify this fact by clicking the Managed Users and Groups tab.
Administrators, Backup Operators, Replicator, and the System account are exempt from quotas. You can verify this fact by clicking the Exempt Users and Groups tab. To change this setting, select the appropriate entry and click Remove.
-
Click the Exempted Directories tab. Click the Add button, type the subdirectory you want to exempt from the managed directories list.
infoAsterisks (
*) are not supported to be part of the exempted path. -
Click OK to save the policy and close the New Quota Directory Policy dialog box. If this policy was created at the top level Data Security application or a container level Data Security application, the policy will be inherited by all systems from this point down in your hierarchy.
File Control Policies
This section shows you how to create a file control policy. Perhaps your company has a corporate policy that forbids downloading music files from the Internet. To help the staff comply with this policy, let’s create a file control policy that prohibits creating music files on the server.
-
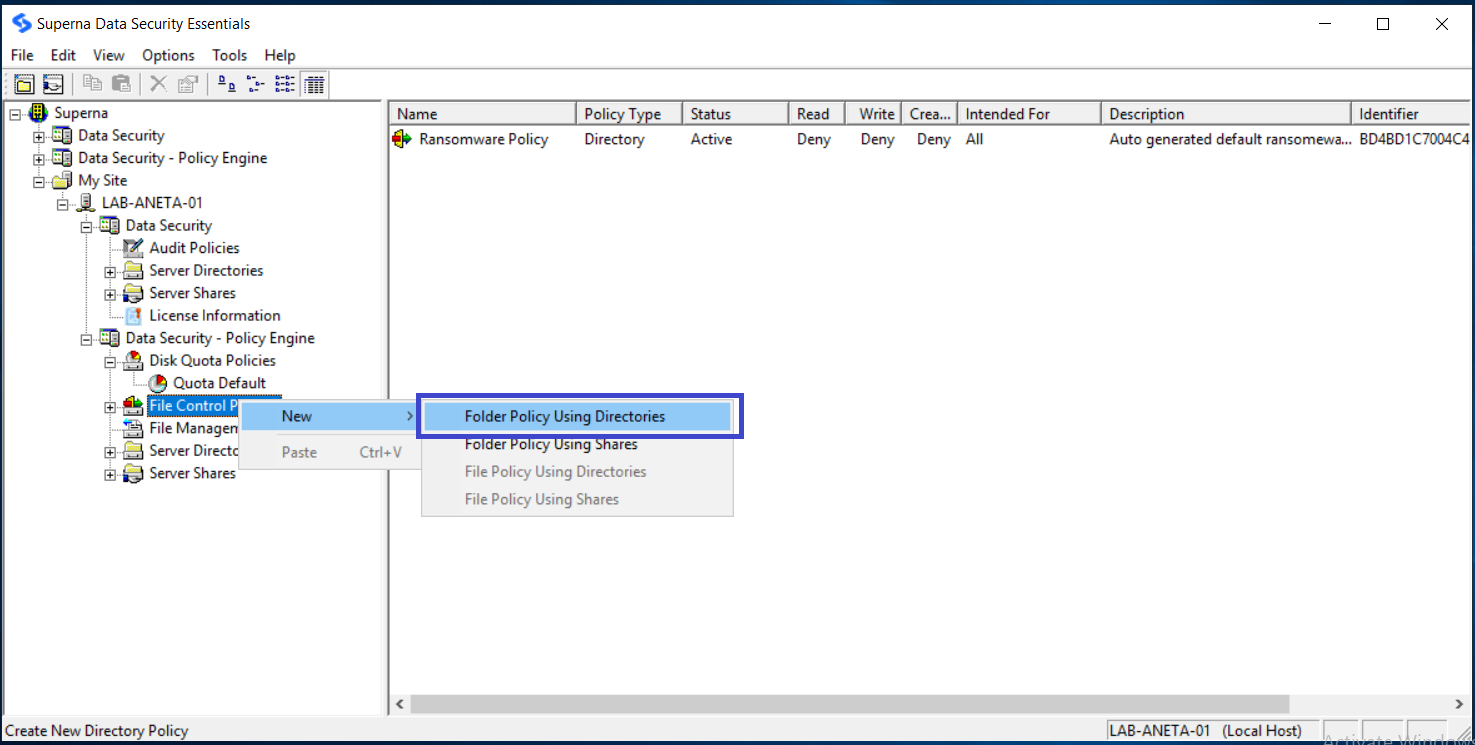
In the Data Security Essentials hierarchy view, locate the Windows Server or NetApp Filer you added earlier. If necessary, click the plus sign (+) adjacent to this entry to expand the tree. Then click the plus sign next to Data Security Policy Engine to expand the policy types. Right-click File Control Policies and select New > Folder Policy Using Directories.
-
The New File Control Policy dialog box opens. Give your policy a name and description.
-
Click the Criteria tab. Then click Add and enter the file patterns you want to block (for example
*.AVI *.MP3 *.MPG *.MP2and*.VBS).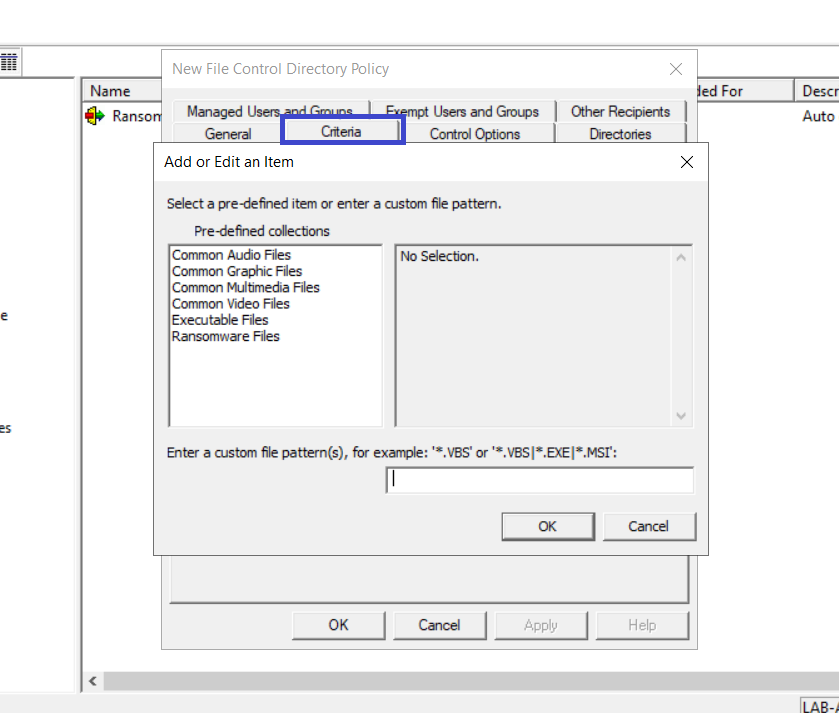 info
infoBe sure to include the asterisk and period (
*.) when you specify a file type. Superna Data Security Essentials follows the normal Windows rules for wildcard file specifications. For example, enter*.MP?to include.MP3 .MP2 .MPGetc. — all music files.This tab also includes two options, Block Zip files containing prohibited content and Enable Superna DeepScan Technology, which enable the administrator to decide how thoroughly files are scanned for the policy. See the following sections of this document for more detailed information on these features.
-
Click OK to return to the New File Control Policy dialog box.
-
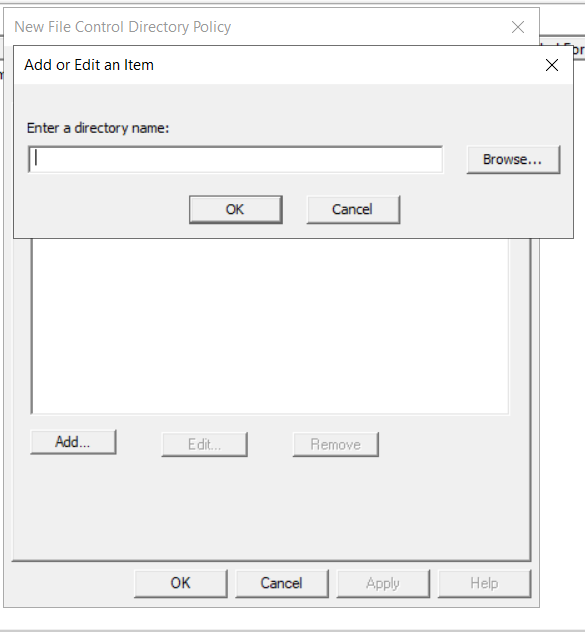
Click the Directories tab. Click the Add button and either type the directory path or type the appropriate directory name followed by a backslash and asterisk (
\*).
-
Click the Control Options tab. Because our policy is to prevent the creation of these files, select the radio button labeled Always Deny under the options Open for Read, Open for Write, and Create New.
-
By default, user accounts with Administrator privileges are exempt from any policy you create. If you want to change this setting, click the Exempt Users and Groups tab, select the Administrators entry and click Remove.
-
Click OK to save the policy and close the New File Control Policy dialog box. If this policy was created at the top level Data Security application or a container level Data Security application, the policy will be inherited by all systems from this point down in your hierarchy.
Default Policy - Ransomware Defender / Enabling Security Policies - Collections
Data Security Essentials comes with a new predefined Ransomware Policy which provides basic ransomware defense. This policy will block Read, Write, and Create operations for files that meet the specified criteria. The patterns that match are part of the new Ransomware Files extension collection. By default, only the TemplateTest folder is part of the policy, which is located in the installation folder.
File Management Policies
This section walks you through creating a file management policy. Your company may have a corporate policy that allows your employees to store files in a central or shared location. As an administrator, you are responsible for maintaining the data stored in this location, which includes deleting old or obsolete data. Let’s create a file management policy that automatically manages aged files.
-
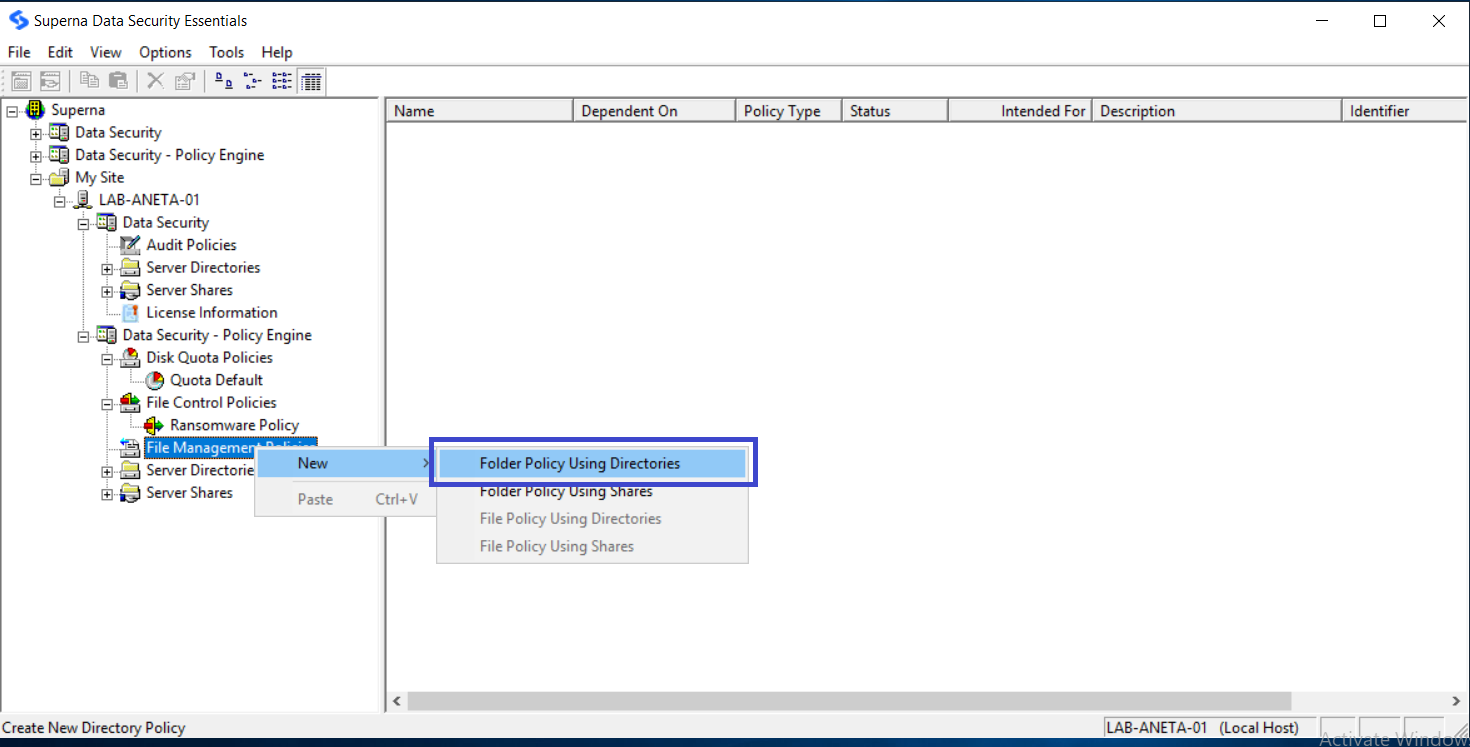
In the Data Security Essentials hierarchy view, locate the Windows Server or NetApp Filer you added earlier. If necessary, click the plus sign (+) adjacent to this entry to expand the tree. Then click the plus sign next to Data Security Policy Engine to expand the policy types. Right-click File Management Policy and select New > Folder Policy Using Directories.
-
The New File Management Policy dialog box opens. Give your policy a name and description.
-
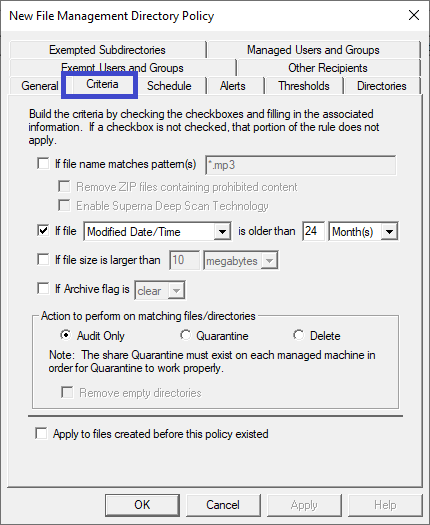
Click the Criteria tab. Set the aspects of the policy: file patterns to remove, age of the files, size, and archive status. You can also select a specific action to take for the files– for example allowing audit, quarantine, or removal when the policy is triggered. Specify when to enforce the policy and whether it will be applied retroactively to files created before the policy.
infoWhen the file management policy is configured to “remove” old or obsolete data, it will remove empty directories after processing them. If a managed directory was not empty and the file removal policy controlling it has deleted all files in the managed directory, the policy will remove this directory if the Remove Empty Directories option is checked.
-
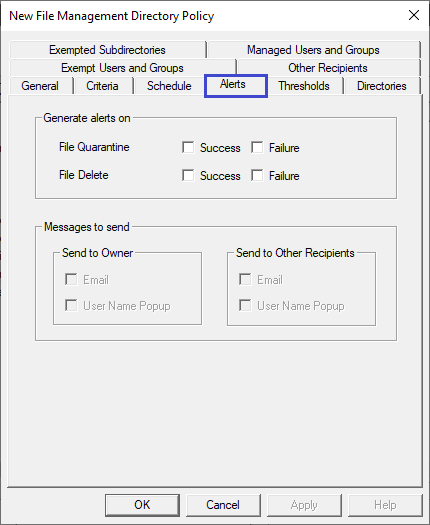
Click the Alerts tab. As desired, turn on alerts for the quarantine and deletion of files. Once the alert is enabled, you have the option of enabling email (if the email server has been configured).
-
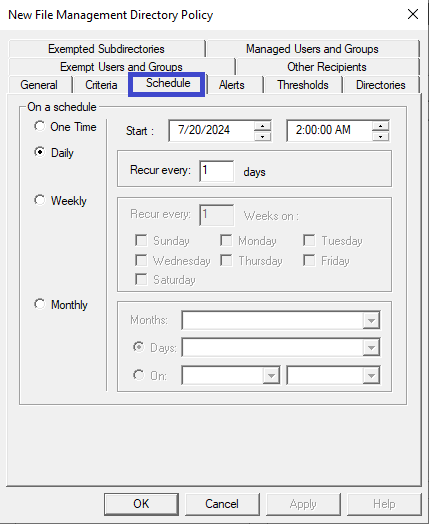
Click the Schedule tab. Select the desired schedule when this policy will run.
-
Click OK to save the policy and close the New File Management Policy dialog box. If this policy was created at the top level Data Security application or a container level Data Security application, the policy will be inherited by all systems from this point down in your hierarchy.
Viewing Directories
This section shows how you can view all the directories that are located on the managed device.
-
In the Superna Smart Policy Manager hierarchy view, locate the device containing directories you want to view. If necessary, click the plus sign (+) adjacent to this entry to expand the tree.
-
Click the plus sign next to Data Security.
-
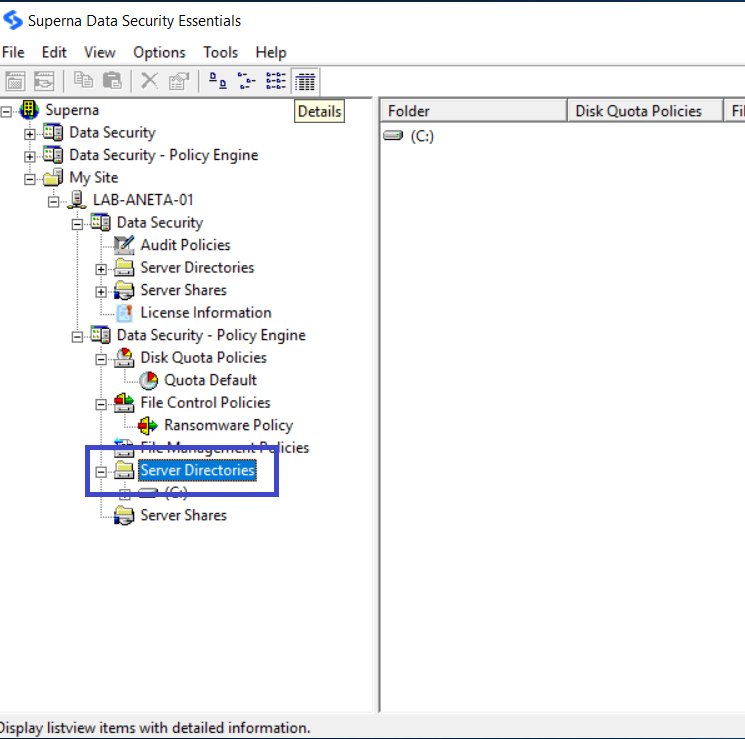
For a Windows server, click the plus sign next to Server Directories to view the volumes located on the server.
-
For the Filer, click the plus sign next to Filer Directories to view the volumes located on that Filer.
 info
infoYou can view that feature if you have a NetApp Filer attached to the Data Security application.
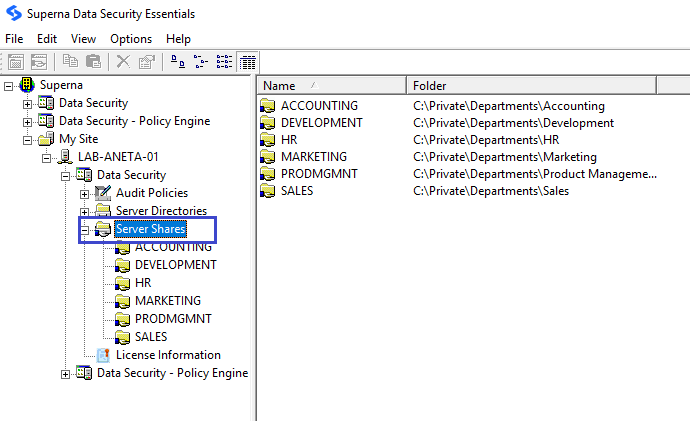
Viewing Shares
This section shows how you can view all the shared directories located on a managed device.
-
In the Superna Smart Policy Manager hierarchy view, locate the device with shared directories you want to view. If necessary, click the plus sign (+) adjacent to this entry to expand the tree.
-
Click the plus sign next to Data Security.
-
For a Windows server, click the plus sign next to Server Shares to view the shares located on that server.
-
For a NetApp Filer, click the plus sign next to Filer Shares to view the shares located on that Filer.
 info
infoYou can view that feature if you have a NetApp Filer attached to the Data Security application.