VAST Installation Guide
System Requirements
Ensure you have the following:
-
Valid licenses for Superna solutions.
-
The Security Guard appliance requires a dedicated AD user account and a network share where that AD user has the necessary access permissions
-
An account in VAST with full administrative permissions. This account is required to install the Eyeglass and ECA components:
- Create a Role name
supernaAdminwith the following permissions. Be sure to leave tenants blank
Permissions Details
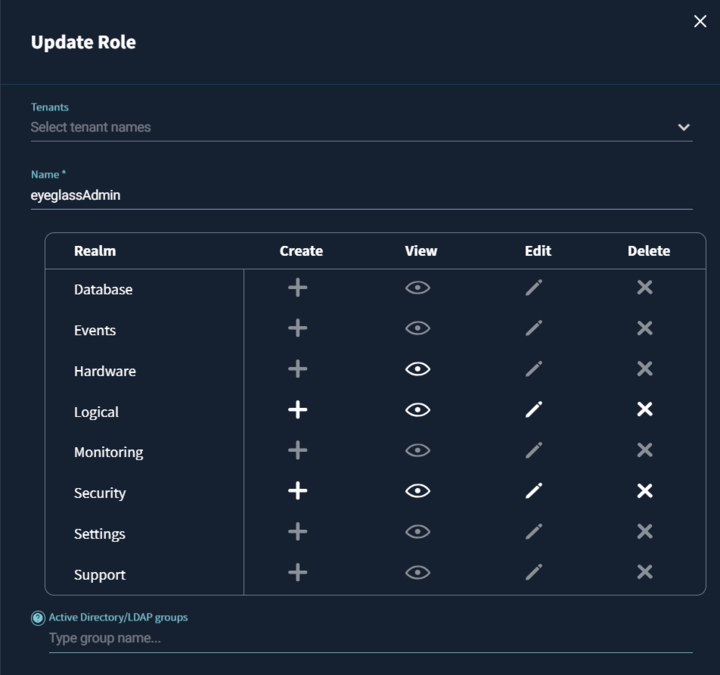
Realm Permissions required Description Hardware View Needed to display the inventory and information about clusters. Events No access required Logical Create, View, Edit, Delete Access to Views and Snapshots is required for Data Security. Protected Paths, Replication stream, and Quotas are required for Disaster Recovery. Security Create, View, Edit, Delete To accurately display user data, user groups, and review permissions (including user lockout and restoring user access). Application No access required Database No access required Settings No access required Monitoring No access required Support No access required - Create superna user account. And then add the
supernaAdminrole to the superna user.importantNo additional user role permissions are required for reading the audit data. However, the root user must be added to the Read Access Users in the audit settings. This is because it is the root user who will be accessing the audit mount in ECA. To reduce access, only the ECA ips should be added to the Read Only access for the view policy. No Squash must be set to.
- Create a Role name
-
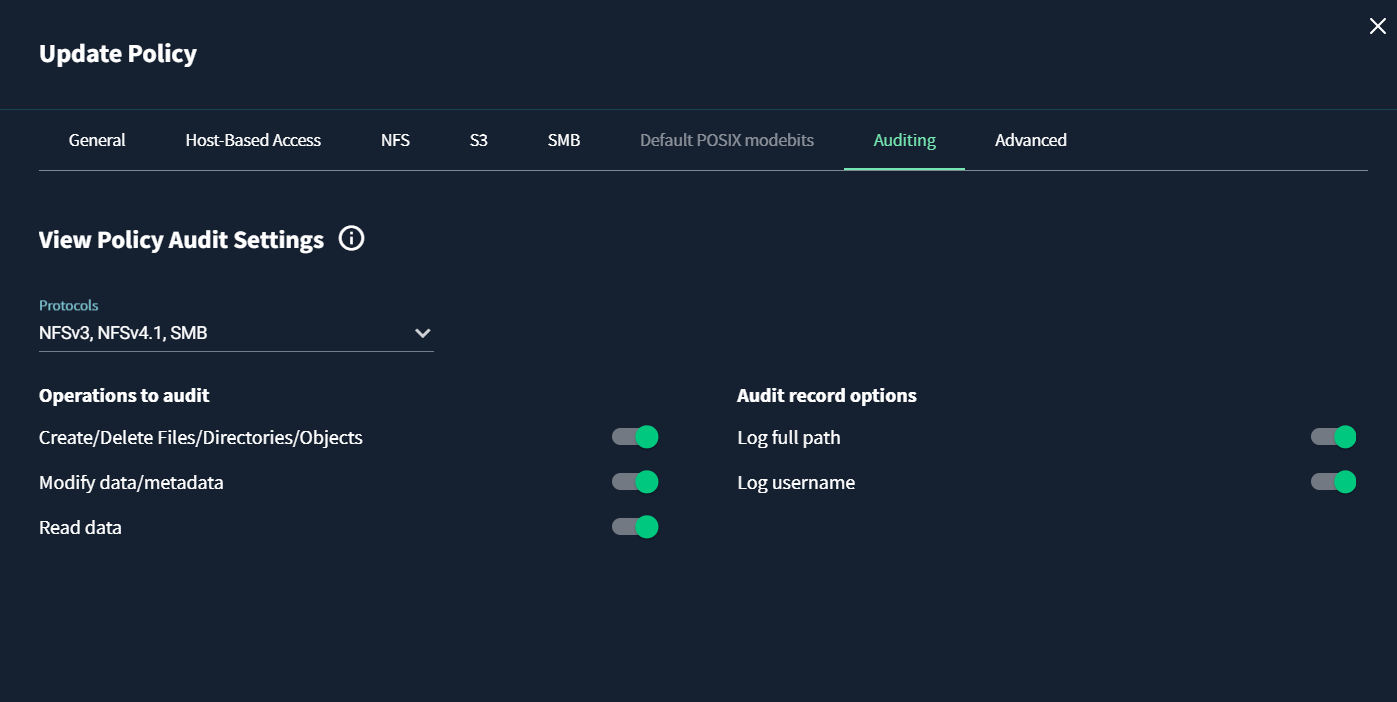
Audit settings for Data Security
To enable Data Security events, ensure that the audit settings are correctly configured.-
Auditing must be enabled on the view policy.
-
All monitored protocols and operations must be enabled.
-
Full path and username options must be enabled in the audit record options.
tipAlternatively, you can enable these settings globally using the Global Baseline Audit Settings to apply across all view policies.
-
-
A dedicated AD user account for the Security Guard feature.
-
A network share accessible by the AD user.
Deployment and Configuration
-
Platform configuration
In order to support Data Security Edition, some configuration must first be set on the VAST platform itself.
First we will enable auditing, then we will create a VAST view that will allow the Extended Cluster Agent to access audit information through NFS.
Enable auditing:
Auditing is essential for detecting suspicious activities.
Open the VAST UI.
Navigate to: Settings -> Auditing
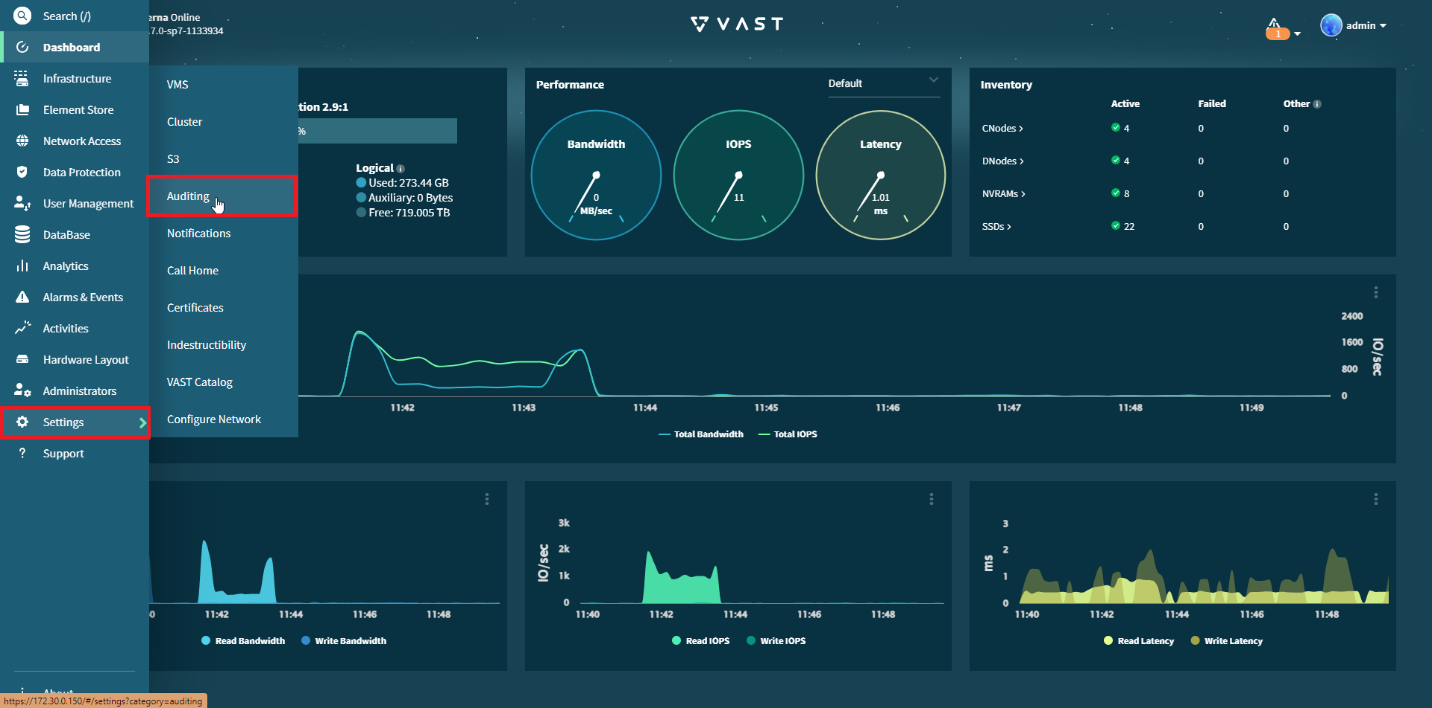
Add a name for the audit directory (default
.vast_audit_diris fine) and add therootuser to Read-access Users.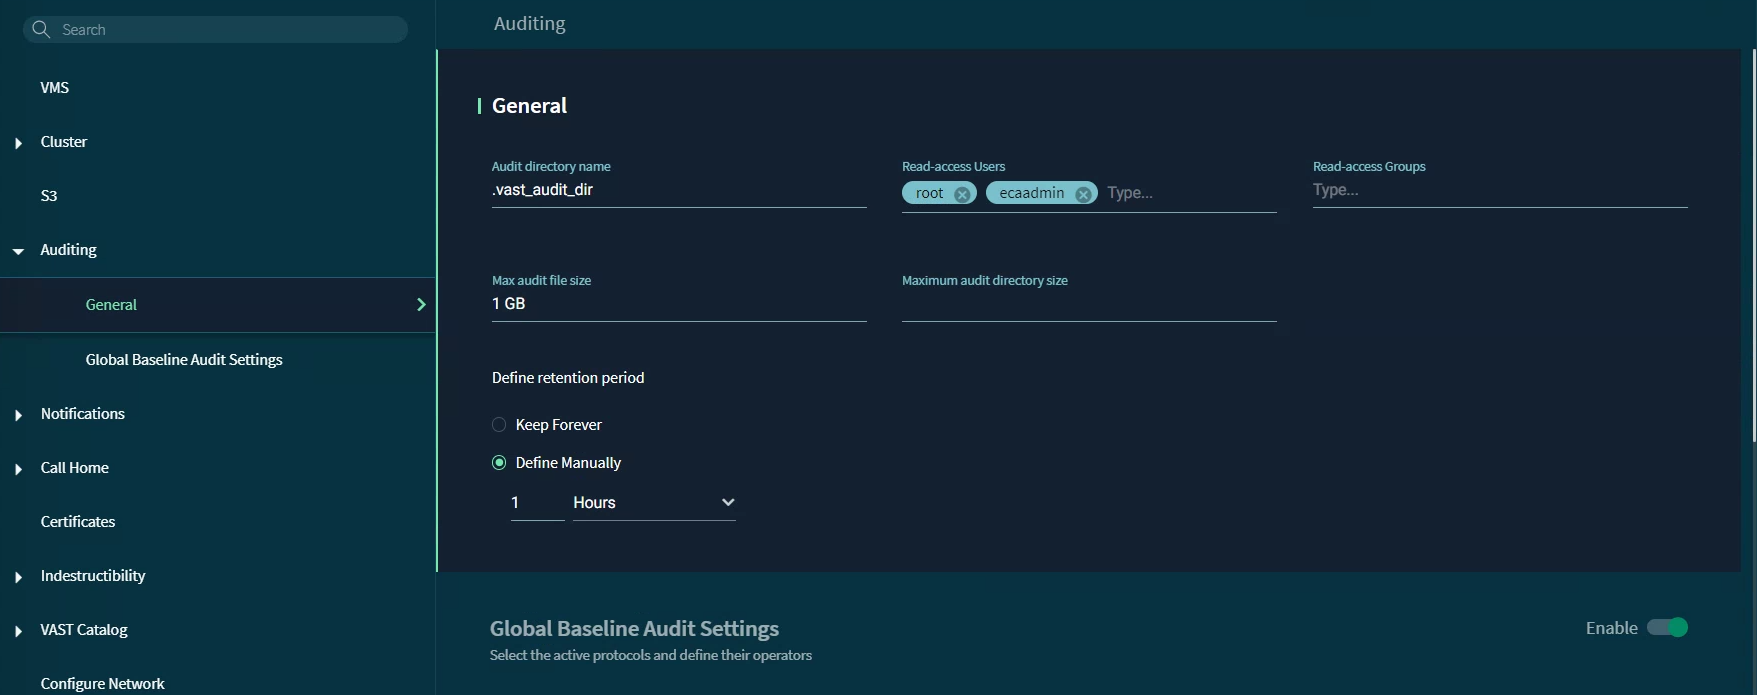 info
infoIf the option to add a root user is not available in the VAST interface, you can add one using the following command:
curl -k -s -u admin:123456 'https://<vast_ip_address>/api/latest/clusters/1/auditing/' \
-X 'PATCH' \
-H 'accept: application/json, text/plain, */*' \
-H 'Content-Type: application/json' \
--data-raw '{"audit_dir_name":".vast_audit_dir","read_access_users":["root"],"read_access_users_groups":[],"max_file_size":1000000000,"max_retention_period":1,"max_retention_timeunit":"h","protocols_audit":{"log_full_path":false,"log_hostname":false,"log_username":false,"log_deleted_files_dirs":false,"create_delete_files_dirs_objects":false,"modify_data":false,"modify_data_md":false,"read_data":false,"read_data_md":false,"session_create_close":false},"protocols":[]}' --insecurewarningWhile this command does indeed add the root user, it will also reset the maximum file size, maximum retention period, and the global audit settings.
Auditing can be enabled on specific view policies, allowing for targeted auditing of user activities. Administrators have the flexibility to configure which activities are audited per View Policy.
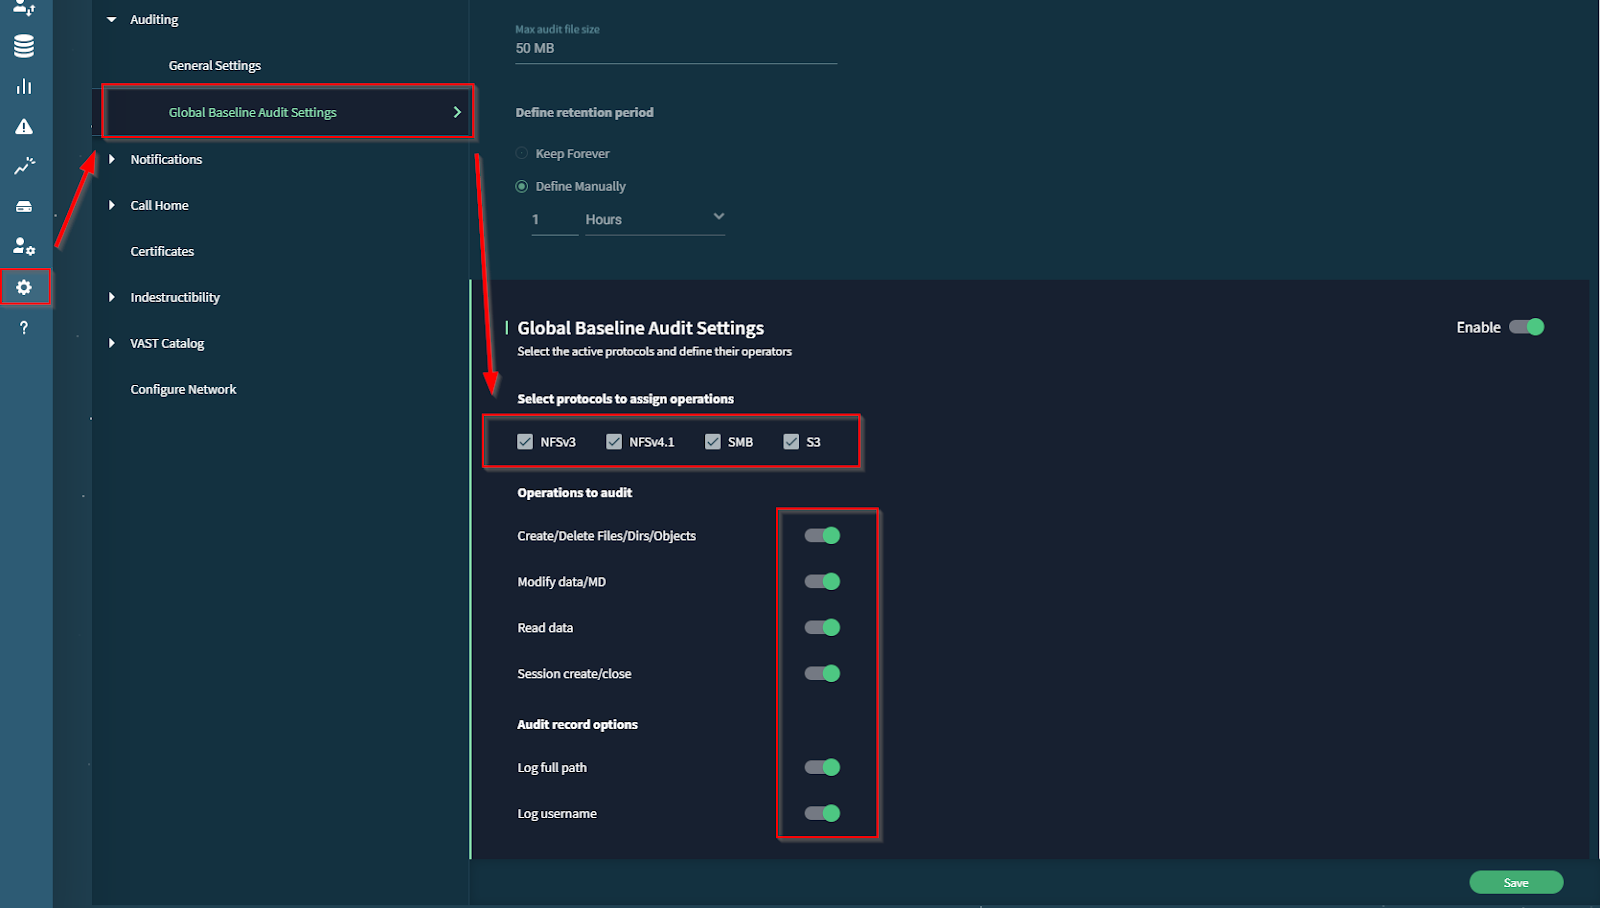
To audit all views and collect all user activities (global auditing), navigate to Settings -> Auditing -> Global Baseline Audit Settings and make sure all settings are enabled.
VAST - Configure NFS Protocol View:
Now that auditing is enabled, VAST will track all user activity.
In order to read the VAST audit data on our own systems, we will create an NFS export to read the audit data from. In order to create an NFS export, we need to create a VAST View on that path.
Create a View Policy:
To create a View, first create a View Policy.
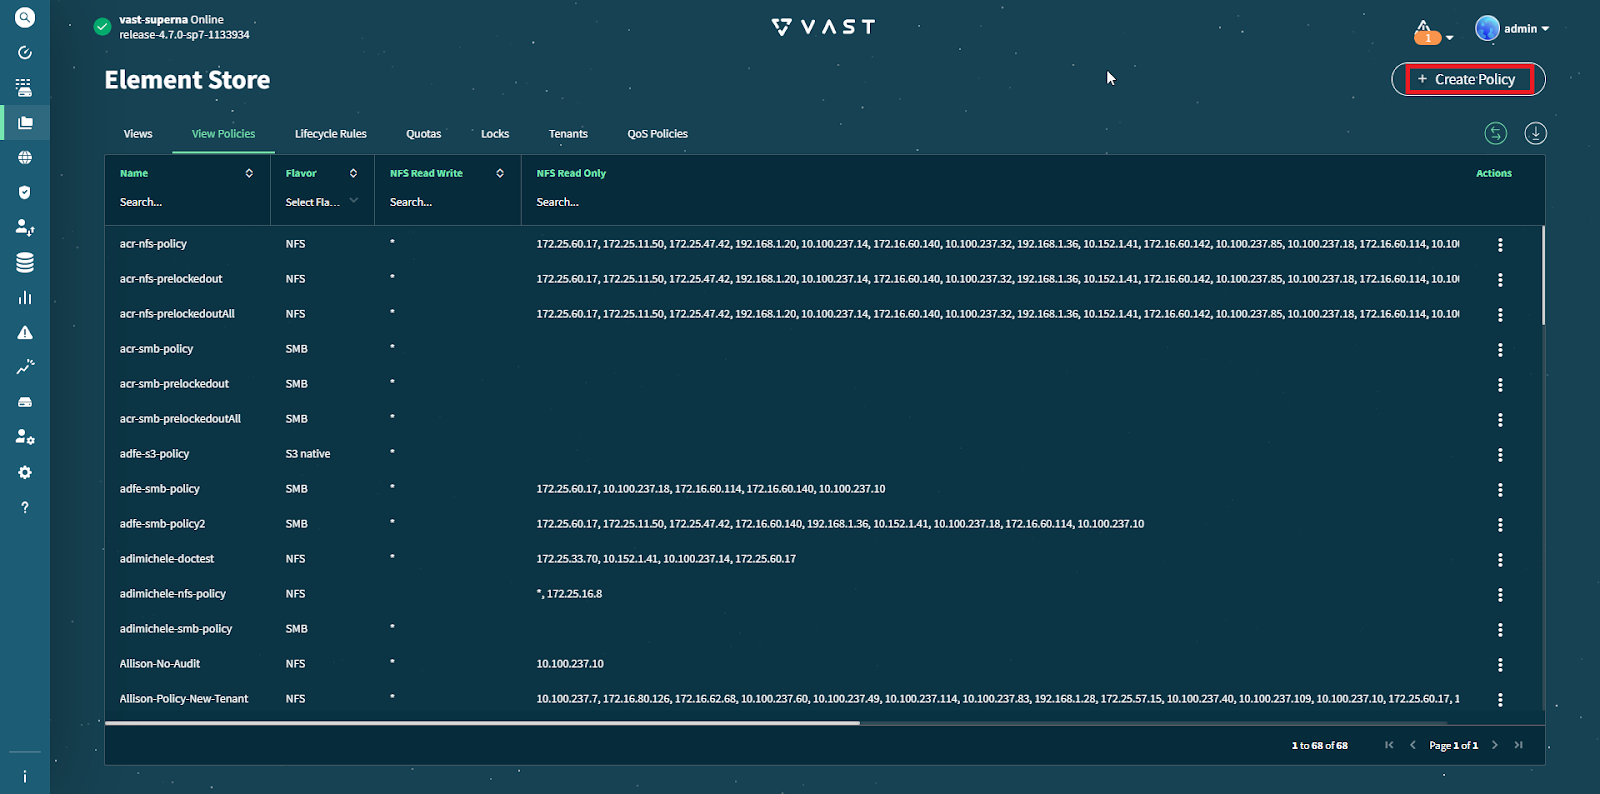
Navigate to: Element Store -> View Policies, and select Create Policy.
In the General Tab:
- Tenant: Default
- Name:
- Security Flavor: NFS
- VIP Pools: Any Virtual IP Pool can be chosen, but please take note of the name for later.
- Group Membership Source: Client or Client And Providers
infoIf a Virtual IP Pool does not yet exist, it can be created under Network Access -> Virtual IP Pools
The VIP Pool must be assigned the PROTOCOLS role. The range can be any valid IP range in the network.
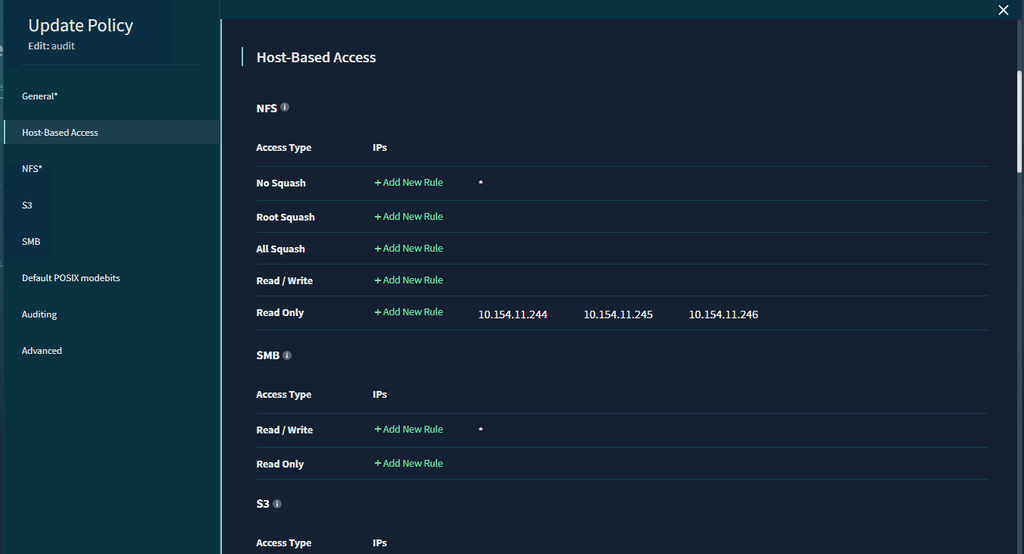
In the Host-Based Access tab:
NFS:
- Add '*' to No Squash by clicking Add New Rule
- Add your ECA IPs to Read Only by clicking Add New Rule
- Root Squash, All Squash and Read/Write should be empty
- Default values can be used for everything else in the View Policy.
Create a View:
Now, we need to create a View.
Navigate to Element Store -> View
Select Create View
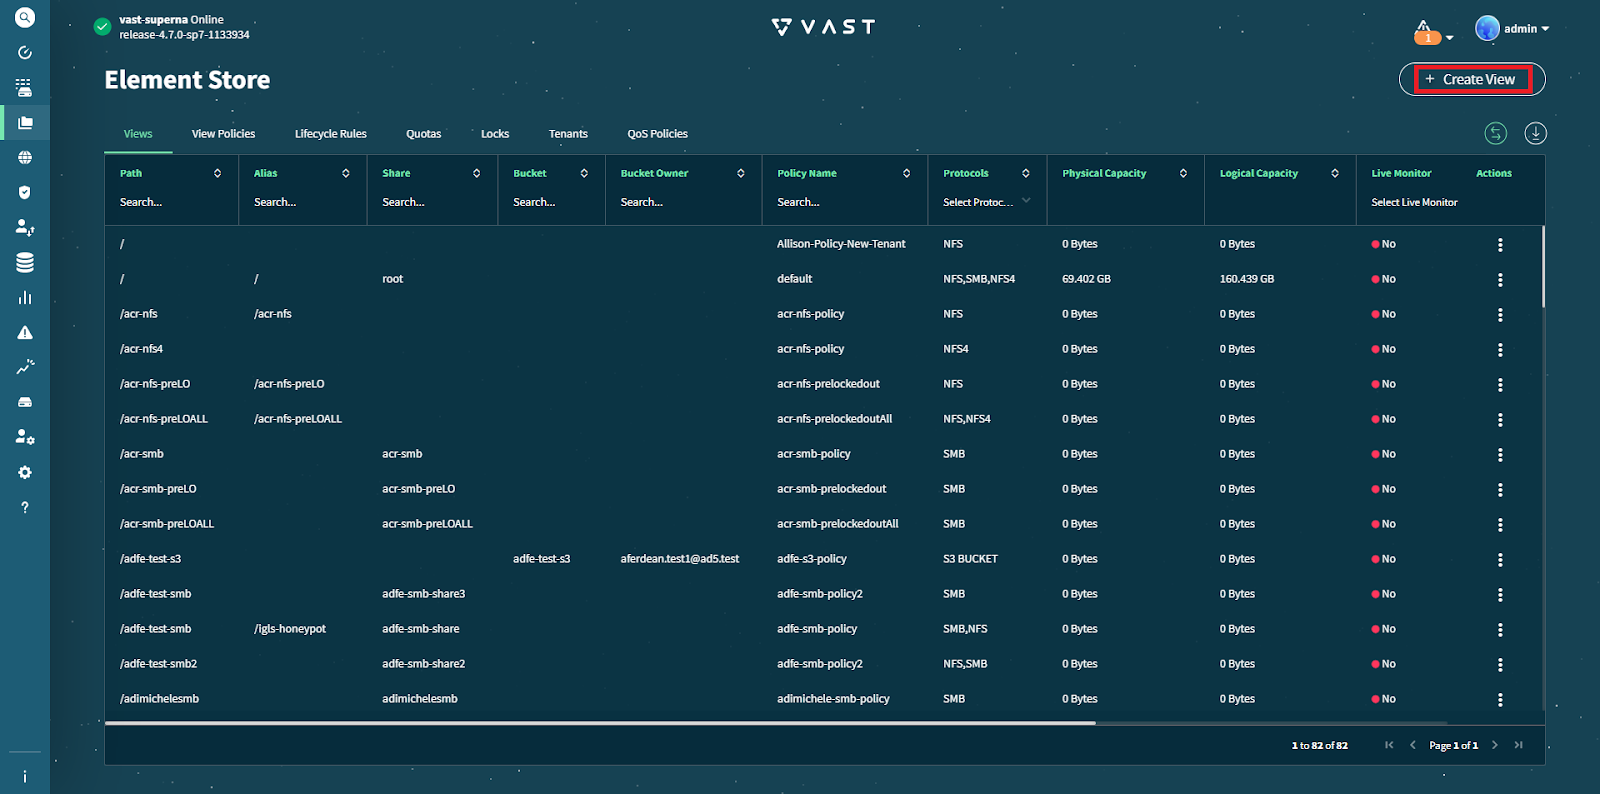
VAST will display the window for creating/adding a new view.
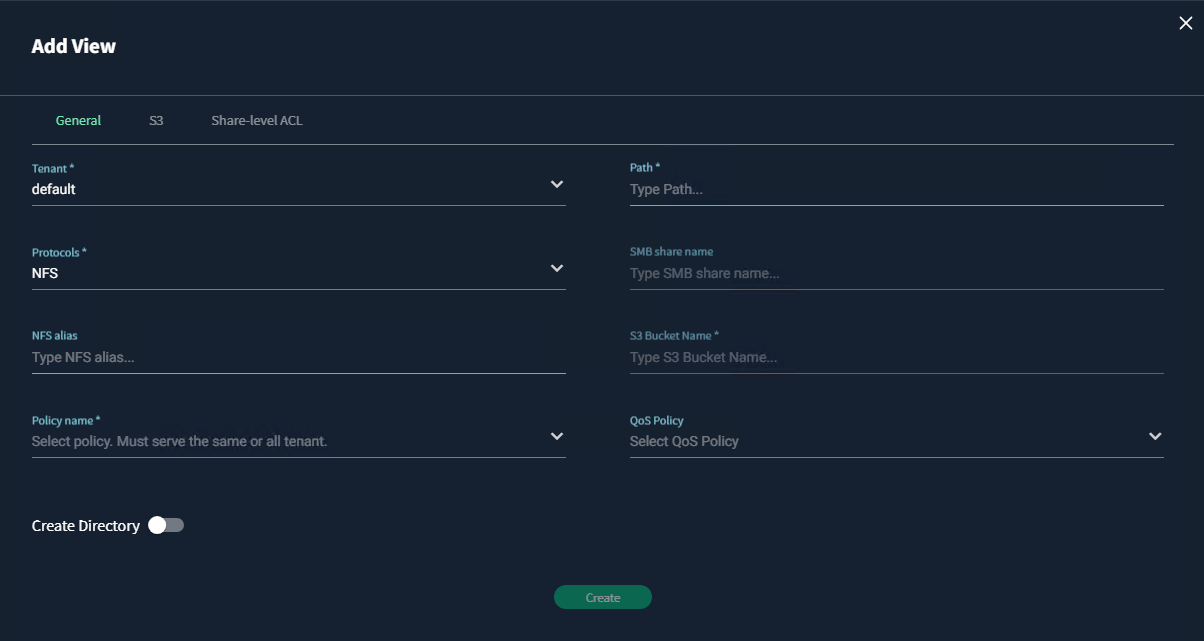
In the General Tab:
- Path: Should be the same as the audit directory (i.e.
/.vast_audit_dir). Use the complete path wherever applicable.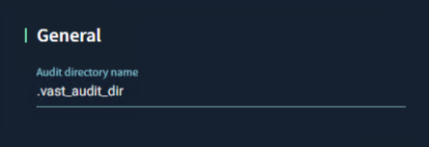
- Protocols: NFS
- Policy name: should be the View Policy created in the previous step.
- NFS alias: choose an alias for the NFS export (optional)
- Use default values for everything else.
- There is no need to enable the 'create directory' value.
This concludes the set up needed on the VAST machine itself. We will now proceed to the configuration needed on Eyeglass and ECA.
-
ECA configuration
Add cluster to Eyeglass:
noteMake sure you've added the appropriate licenses according to the instructions in Step 2.
Select Add Managed Device from the Eyeglass Main Menu at the bottom left corner.
Fill the IP Address of the VAST Data, as well as the username and password.
Click Submit to continue. Eyeglass will display a confirmation when the job is successfully submitted for inventory collection.
To see the cluster just added, return to the Eyeglass desktop and select Inventory View.
Inventory View displays the cluster just added in the list of Managed Devices.
Enable functionality on ECA:
-
SSH into the primary ECA node using an SSH client of your choosing.
-
Run the command to set up keyless SSH for the
ecaadminuser to manage the cluster:ecactl components configure-nodes -
Bring down the ECA cluster before editing the configuration file:
ecactl cluster down -
Edit the configuration file
/opt/superna/eca/eca-env-common.confusing the vi text editor:vi /opt/superna/eca/eca-env-common.conf -
In the vi editor, add the following lines to enable VAST support on ECA:
export TURBOAUDIT_VAST_ENABLED=true
export VAST_LOG_MOUNT_PATH="/opt/superna/mnt/vastaudit" -
Change the automount line to
true:export STOP_ON_AUTOMOUNT_FAIL=true -
After making these changes, save the file and exit the editor.
Mount the Audit Path to the ECA Node:
To set up the NFS mount for accessing audit data from VAST on the primary ECA node (ECA Node 1), follow these steps:
Run the following commands in your ECA Node 1. Note the items in
<angle brackets>, which must be replaced with the appropriate information.noteIf this is your first time following the installation guide on an ECA Node 1 cluster, use the provided command. However, if the command has already been executed, running it again may overwrite existing configurations. Follow the next steps to verify the current file configuration before proceeding.
ecactl cluster exec "mkdir -p /opt/superna/mnt/vastaudit/<VAST_cluster_name>/<VAST_cluster_name">
echo -e "/opt/superna/mnt/vastaudit/<VAST_cluster_name>/<cluster_name> --fstype=nfs <vip_pool_ip>:/<audit_dir_name>" >> /opt/superna/eca/data/audit-nfs/auto.nfs
For
vip_pool_ip, select any IP within the range of the VIP-pool.This command creates the necessary directory structure and adds NFS mount configuration to the auto.nfs file.
To check the file configuration, use a command utility or text editor to read the contents of
/opt/superna/eca/data/audit-nfs/auto.nfs -
Push the configuration to all ECA nodes
a. ecactl cluster push-config
-
Restart Auto mount service a. ecactl cluster exec "sudo systemctl restart autofs"
Here is an example of a correct auto.nfs file configuration:
# Superna ECA configuration file for Autofs mounts
# Syntax:
#   /opt/superna/mnt/audit/<GUID>/<NAME> --fstype=nfs,nfsvers=3,ro,soft <FQDN>:/ifs/.ifsvar/audit/logs
#
# <GUID> is the VAST cluster's GUID
# <NAME> is the VAST cluster's name
# <FQDN> is the SmartConnect zone name of a network pool in the VAST cluster's System zone.

/opt/superna/mnt/vastaudit/VASTEMEA/VASTEMEA --fstype=nfs 10.252.30.1:/.vast_audit_dir
Finally, we need to restart the cluster.
ecactl cluster down
ecactl cluster up
After this, we should be able to raise VAST event.
Continue to the following articles to configure Security Guard for VAST and Recovery Manager for VAST.
-
Additional configuration
Kafka Additional Memory:
Additional memory needs to be allocated to the Kafka docker container.
Do the following:
- SSH to ECA1 (user: ecaadmin, password: 3y3gl4ss).
- Open the
docker-compose.overrides.ymlfile for editing:
vim /opt/superna/eca/docker-compose.overrides.yml
- Add the following lines. IMPORTANT: Maintain the spacing at the start of each line.
version: '2.4'

#services:
#  cadvisor:
#    labels:
#      eca.cluster.launch.all: 1
services:
  kafka:
    mem_limit: 2048MB
    mem_reservation: 2048MB
    memswap_limit: 2048MB
- Save changes with: ESC + wq!
Zookeeper Retention:
We will be implementing the following changes to prevent zk-ramdisk exhaustion from occurring. When zk-ramdisk reaches 100% utilization, this causes event processing to halt.
Do the following:
- SSH to ECA1 (user: ecaadmin, password: 3y3gl4ss).
_vim /opt/superna/eca/conf/zookeeper/conf/zoo.cfg.template_- Add the following configurations to the bottom of the file:
snapCount=1000
preAllocSize=1000
- Save changes with: ESC + wq!
Cron Jobs:
Cron job needs to be created to restart the fastanalysis docker container on a schedule. Do the following:
- SSH to ECA1 (user: ecaadmin, password: 3y3gl4ss).
ecactl cluster exec "sudo -E USER=ecaadmin ecactl components restart-cron set fastanalysis 0 0,6,12,18 \'*\' \'*\' \'*\'"
- Validate cron job added:
ecactl cluster exec 'cat /etc/cron.d/eca-*'
Cluster up from ECA1 (must be done before configuring auditing):
_ecactl cluster up_