How to Use Recovery Manager
Introduction
Recovery Manager extends the capabilities of Data Security by automating data recovery in the event of a cyberattack. Integrated into the Event and Event History tabs, Data Security caches audit event history, allowing for recovery of data from before an attack is detected. This historical data is accessible through Recovery Manager, where you can perform targeted recoveries using file or path-based filters.
This solution provides full coverage across detection, response, and recovery, automating each step of the attack lifecycle. Recovery Manager highlights recoverable data if a snapshot was taken before the first event affecting the relevant path.
Example
- A file
/ifs/test/document.txtis renamed to/ifs/test/document.lockyat 5:00 PM. - A snapshot was taken on the path
/ifs/test/at 4:00 PM.
Result: The file is recoverable. - If the only snapshot is from 5:03 PM and no previous snapshot exists, the file is not recoverable.
- If a snapshot exists on a different path, such as
/ifs/otherpath/, but not for/ifs/test/, the file is unrecoverable.
Post-Mortem Analysis and Forensics
Recovery Manager includes an automated quarantine feature that moves affected files into a hidden location for analysis. This not only isolates harmful files from the system but also makes them invisible to end users, while still accessible for future investigation.
Prerequisites
- Release Version: 2.5.9 or later.
- Licenses:
- Requires an Eyeglass DR license for inventory and snapshot management.
- Requires an Eyeglass RWD license for ransomware event detection.
- Default Activity: User activity is logged 1 hour before the event.
- Retention Period: Data is retained for 7 days after the event. After this period, user activity data for a specific event is automatically purged.
To extend retention to 30 days:
-
On ECA Node 1, open the configuration file:
nano /opt/superna/eca/eca-env-common.conf -
Add the following line:
export ECA_KAFKA_USER_TOPIC_RETENTION_DAYS=30 -
Save and exit by pressing
Ctrl + X. -
Restart the cluster:
ecactl cluster down
ecactl cluster up
How to Use Recovery Manager
Recovery Manager allows you to access and manage file recovery through the Actions Menu of an event in either the Active Events or the Event History tab. Follow these steps to navigate and utilize the Recovery Manager:
Old UI
-
Access the Recovery Manager:
- Open the Actions Menu from an active event or by navigating to the event history tab.
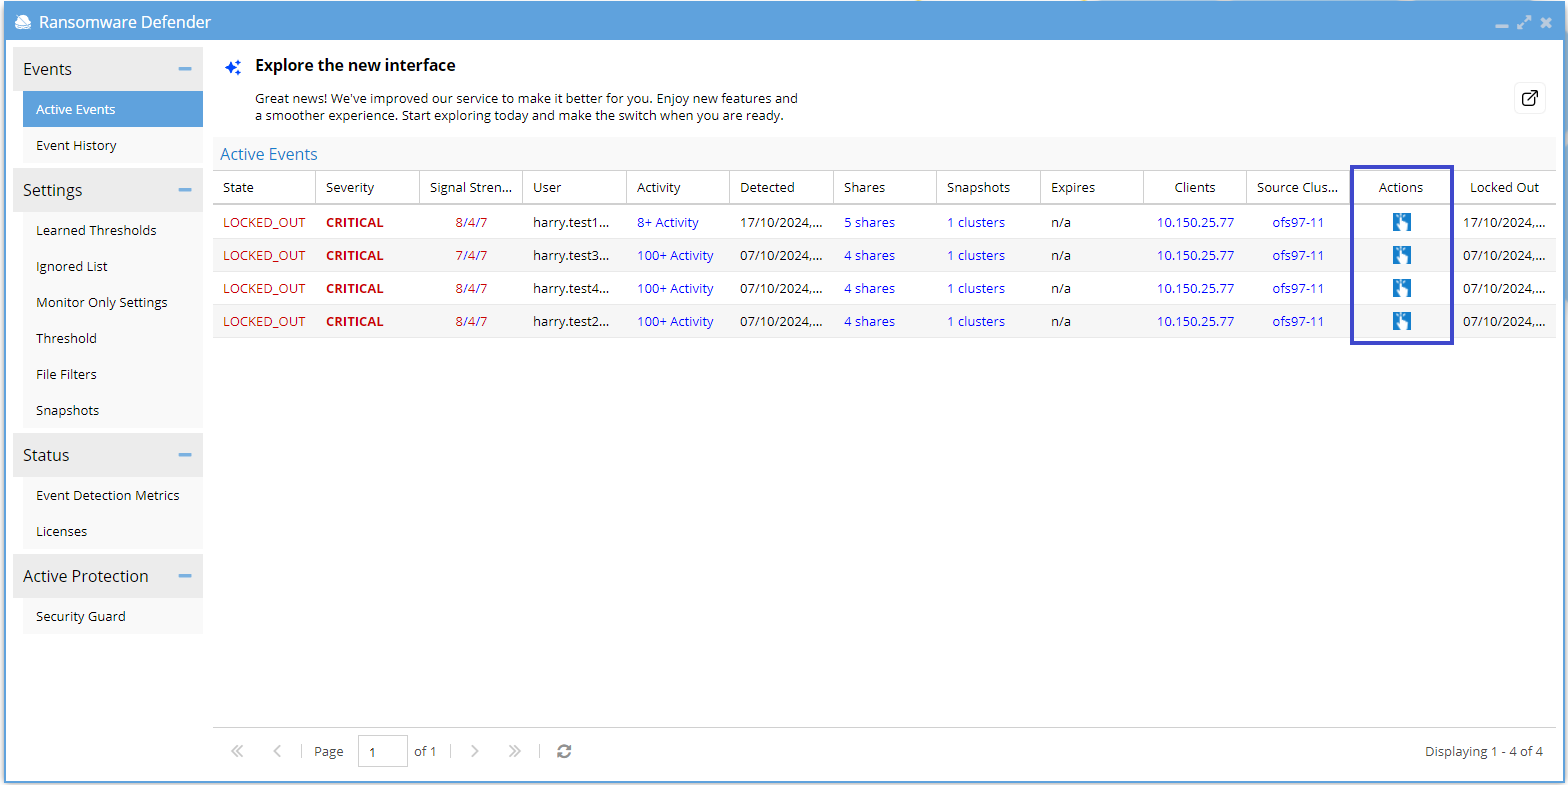
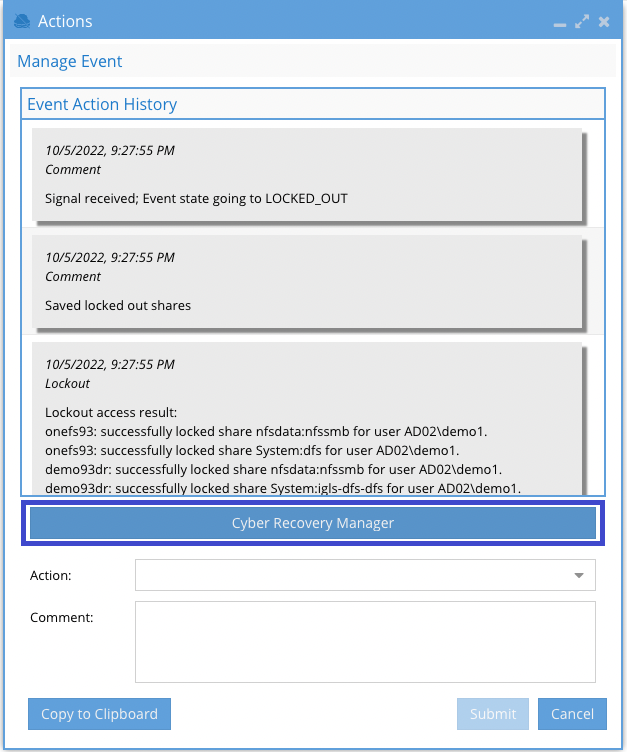
infoCyber Recovery Manager Button Availability
- The button is available for active events and for archived events with an active Kafka topic.
- For full details, see Recovery Manager Availability section.
- Open the Actions Menu from an active event or by navigating to the event history tab.
-
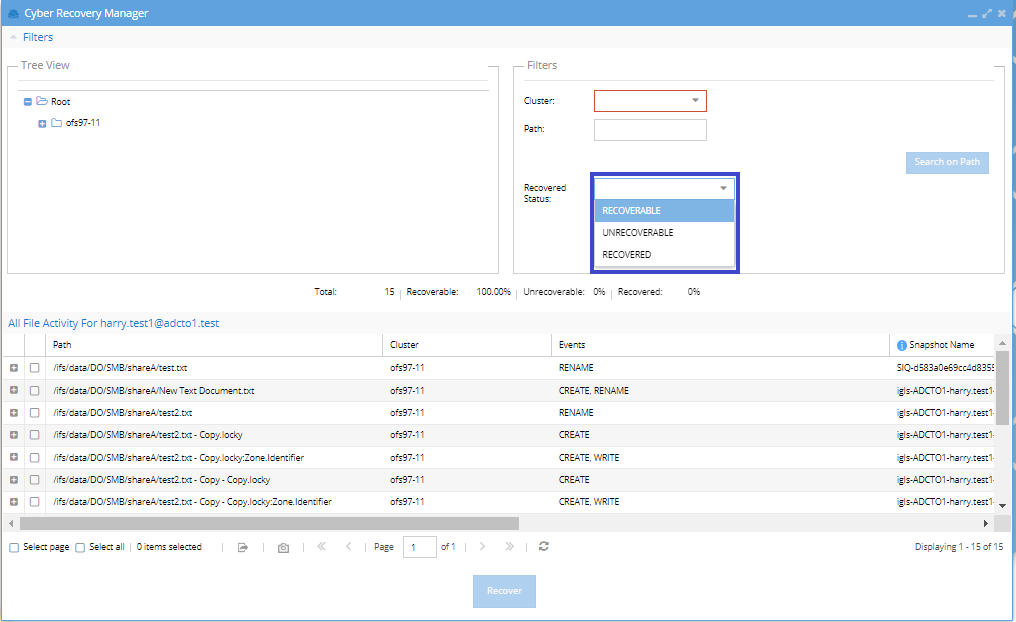
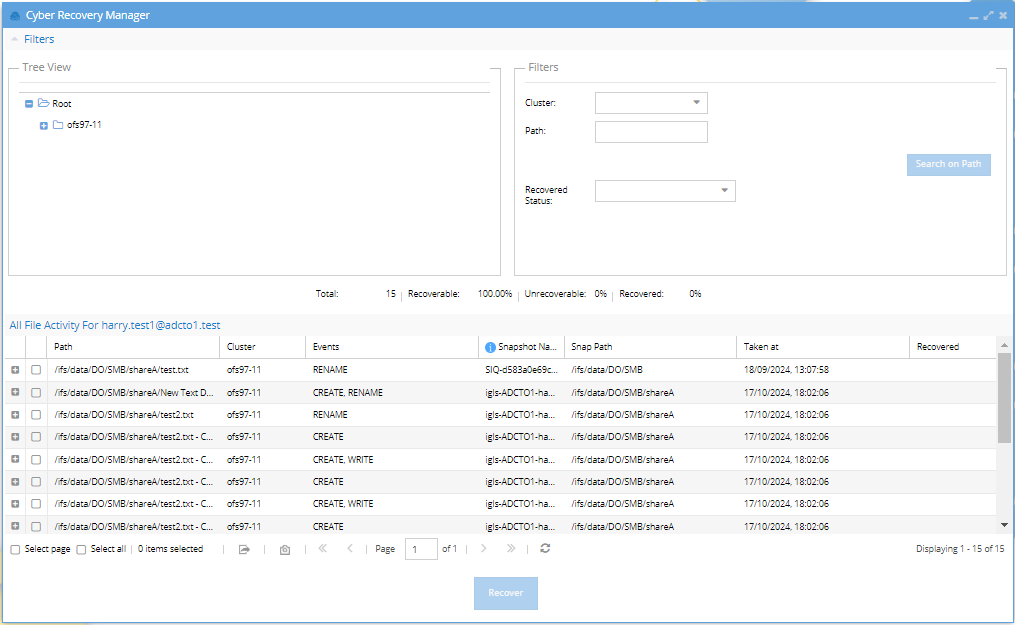
Tree View:
- The Tree View displays affected paths and files.
- Use this view to browse the file system and identify which folders and files have been impacted by the attack.
-
Filters (Optional):
- Select a cluster and enter a specific path (e.g.,
/ifs/data/home). - Click Search on Path to search through the affected files list for the selected event, showing only files at or below the entered path.
- Select a cluster and enter a specific path (e.g.,
-
Recovered Status:
 warning
Snapshot Recovery
To ensure effective recovery, it is essential to have a snapshot that contains the original file saved prior to any attack. While Data Security will automatically create snapshots when a ransomware event is raised, a good practice is to manually create a snapshot that saves all files needing protection.This is especially important for Threat Detectors (TDs) other than TD07, where ransomware events are raised only if sufficient repeated file I/O patterns are recognized (e.g., encrypting an original file to a new file, deleting the original, and renaming the encrypted file).
During the period before Data Security raises an ransomware event, several files could already be affected, and the snapshots automatically taken at that time may not include all original files. In such cases, having an older manually created snapshot ensures that a recovery option is available.
infoFor TD07 specifically, it looks for recognized banned file extensions, such as .locky files. This makes TD07 unique compared to other TDs, which focus on file I/O patterns.
infoIt is possible to adjust the detection sensitivity in Threshold Settings to detect potential ransomware events faster. However, increasing sensitivity may also lead to more false positives.
- The default filter is RECOVERABLE, which shows all files that have a valid snapshot from before the attack.
- You can change this filter to:
- UNRECOVERABLE: Shows files without a snapshot, making them unrecoverable.
- RECOVERED: Shows files that have already been recovered.
-
Recovery Statistics:

- Recovery Manager tracks the status of the recovery process and displays key statistics, including:
- Total files affected by the user identified in the event, for one hour before the event was detected. This value will not change once an event is archived.
- Recoverable files: Based on snapshot analysis, indicating files that can be restored.
- Unrecoverable files: Files that cannot be recovered due to missing snapshots.
- Recovered files: Files that have already been successfully recovered.
- Recovery Manager tracks the status of the recovery process and displays key statistics, including:
-
All File Activity For the user:

-
The files section displays important information, including:
- Path to the file.
- Cluster name.
- Events actions associated with the file. Click the + button to expand and view all actions and details.
- Snapshot name to be used for recovery.
- Date and time the snapshot was taken.
- Recovery status: A check mark indicates successful recovery.
infoWithin the navigation bar, other than the pagination options, there are three buttons:
-
Export Grid to CSV - exports the user activity list to a csv file
-
Refresh Cache - refreshes the cache and recalculates snapshots
-
Refresh - refreshes the user activity list
warningCache: Clearing the cache is important.
The cache will contain inaccurate information if:
-
new snapshots are added to inventory
-
more items are added to the kafka topic
Click the camera icon at the bottom to clear the cache.
Eyeglass will only become aware that snapshots exist after inventory is run (such as, during Replication).
If the Recovery Manager is invoked before inventory is run, it might not display the most accurate snapshots. Refreshing the cache will immediately recalculate snapshots based on the most recent inventory.
-
-
File Selection:

- You can select individual files, click Select page (to select all displayed files), or choose Select All (to select all files across all pages).
- Use the page navigation buttons to browse through all available files before making a selection.
infoIt is normal to see both the original file names and affected file names such as
file.txtand the affected version of the file:file.txt.lockyin the list. And that the number of files might be more than expected because of this.Recovery Manager chooses the snapshot programmatically for each file and it is possible that not all files will use the same snapshot in the same recovery job.
Example: If a snapshot includes 10 .txt files and those files were later renamed to .locky, selecting all files and restoring will bring back the original 10 .txt files and remove the renamed .locky versions.
-
Recovery Process:
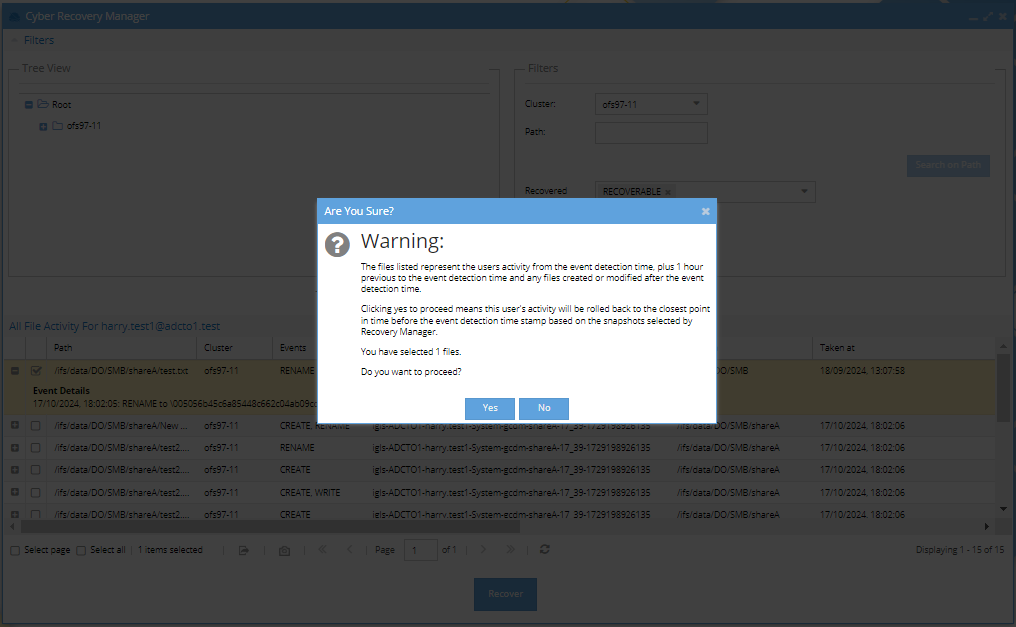
- After selecting files, click the Recover button.
- A confirmation message will appear—click Yes to proceed.
- The Show Running Jobs view will display the progress and status of the recovery job.
-
Recovery Job Details:

The Recovery Job Details section provides a breakdown of the current recovery job’s status. Each job is displayed in a tree view, showing the following information:
- State
- The check mark (✔) indicates that the recovery or quarantine process for the file has been completed successfully.
- Job Name
- This column displays the specific task being executed in the recovery job.
- For example:
- Quarantine & Restore: Shows the process of moving files to quarantine and restoring the original file from the snapshot.
- Moving files: Indicates the process of relocating files, such as from the path
/ifs/data/demo2/virus, to the quarantine directory. - Restoring files: Displays the process of restoring files from the snapshot to their original paths in the production system.
- State
-
Cyber Recovery Life Cycle:
- The recovery tool can be used across multiple days to manage and track recovery progress.
- Add Recovered to the filter list to track files that have been successfully restored (indicated by a check mark).
The data in the cache is temporary and will be deleted after several days. Ensure that recovery efforts are completed before the files in the history cache are purged.
New UI
Alerts & Filters
-
Access the Alerts Tab:
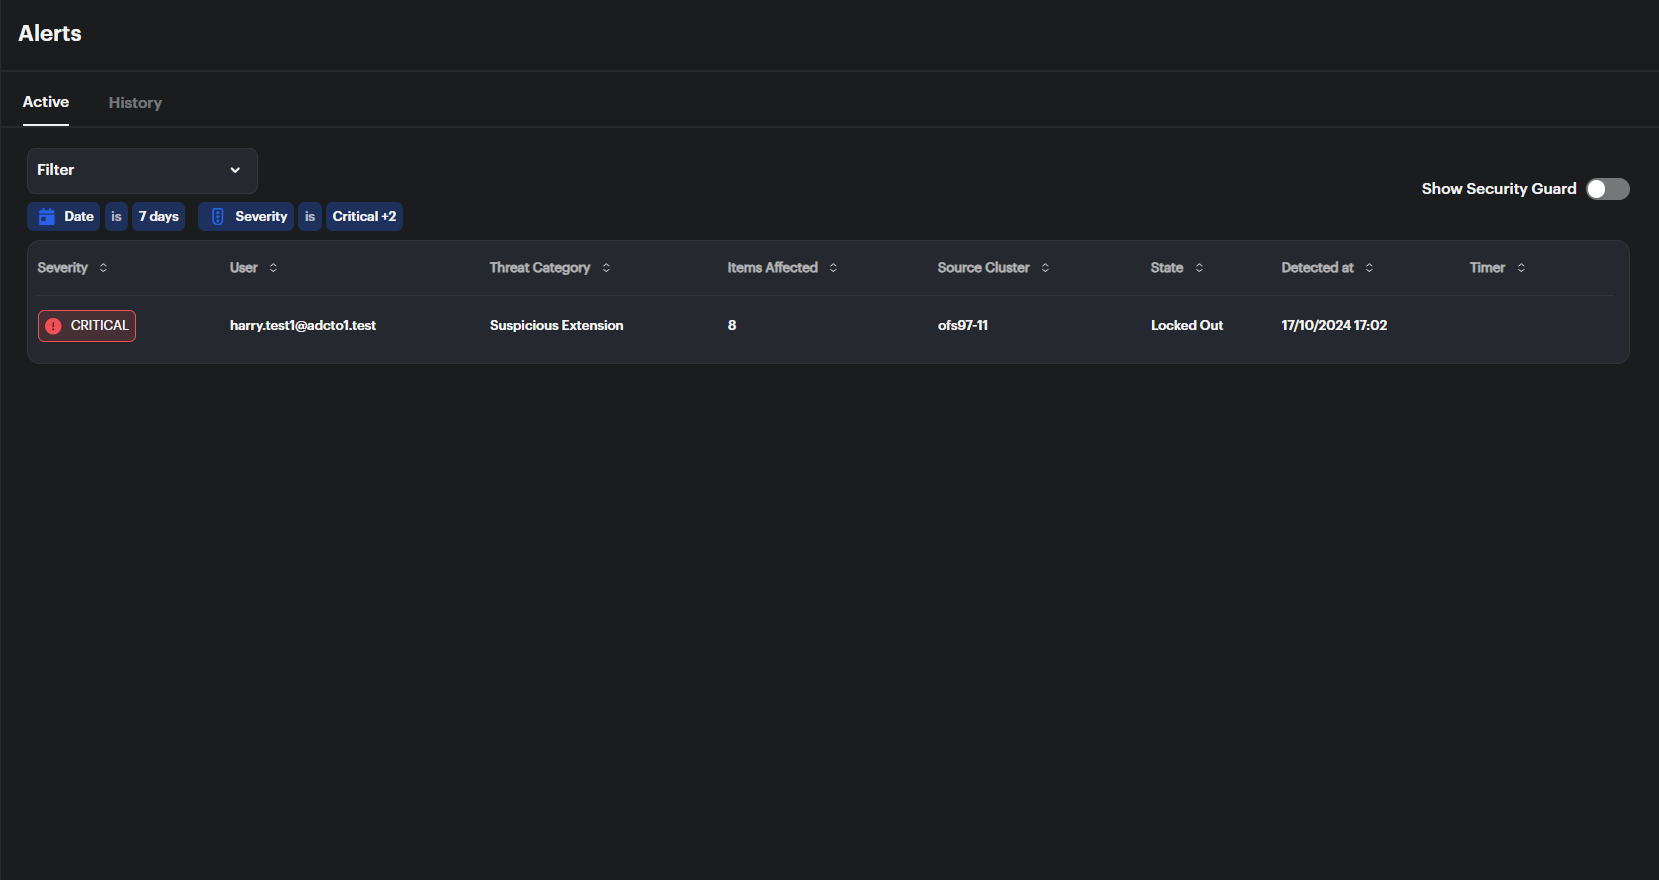
- Go to the Alerts section from the sidebar. You can switch between Active and History tabs to monitor real-time or past events.
- Active alerts display details such as Severity, User, Threat Category, and State.
-
Applying Filters:
- Use the filters to customize the alert view:
- Date: Choose a time frame (e.g., Last 7 Days, Past Year).
- Severity: Filter by Critical, Major, or Warning alerts.
- User: Filter by the user associated with the event.
- State: Choose a state from the following list:
- Monitor
- Warning
- Acknowledged
- To Lockout
- Locked Out
- Delayed Lockout
- Access Restored
- Recovered
- Unresolved
- False Positive
- Self Recovery
- Error
- After selecting the desired filters, click Apply to display the relevant alerts.
- Use the filters to customize the alert view:
-
Event Details:

- Each alert shows the following:
- Severity: Indicates the alert level (Critical, Major, or Warning).
- User: Displays the user who triggered the event.
- Threat Category: Describes the type of suspicious activity (e.g., Suspicious Extension).
- Items Affected: Shows how many items are impacted.
- Source Cluster: Displays the affected cluster (e.g.,
ofs97-11). - State: Shows the current status of the alert (e.g., Locked Out, Recovered).
- Detected At: The time the alert was identified.
- Timer: Any relevant timers or countdowns related to the event.
- Each alert shows the following:
-
History Tab:
- The History tab keeps a record of past events. You can apply filters similar to the Active tab, narrowing down historical alerts by users, severity, and state.
-
Critical Alerts:
- Critical alerts lock the user to prevent further access until the issue is resolved. These alerts are marked with a red badge for urgency.
-
Job Monitoring (Security Guard Toggle):
- Toggle Show Security Guard to view the alerts.
Viewing Active Alerts and History Alerts
When you click on an active alert or one from the history, two sections are displayed: Overview and Recovery Manager.
Overview
-
Alert Information Display:
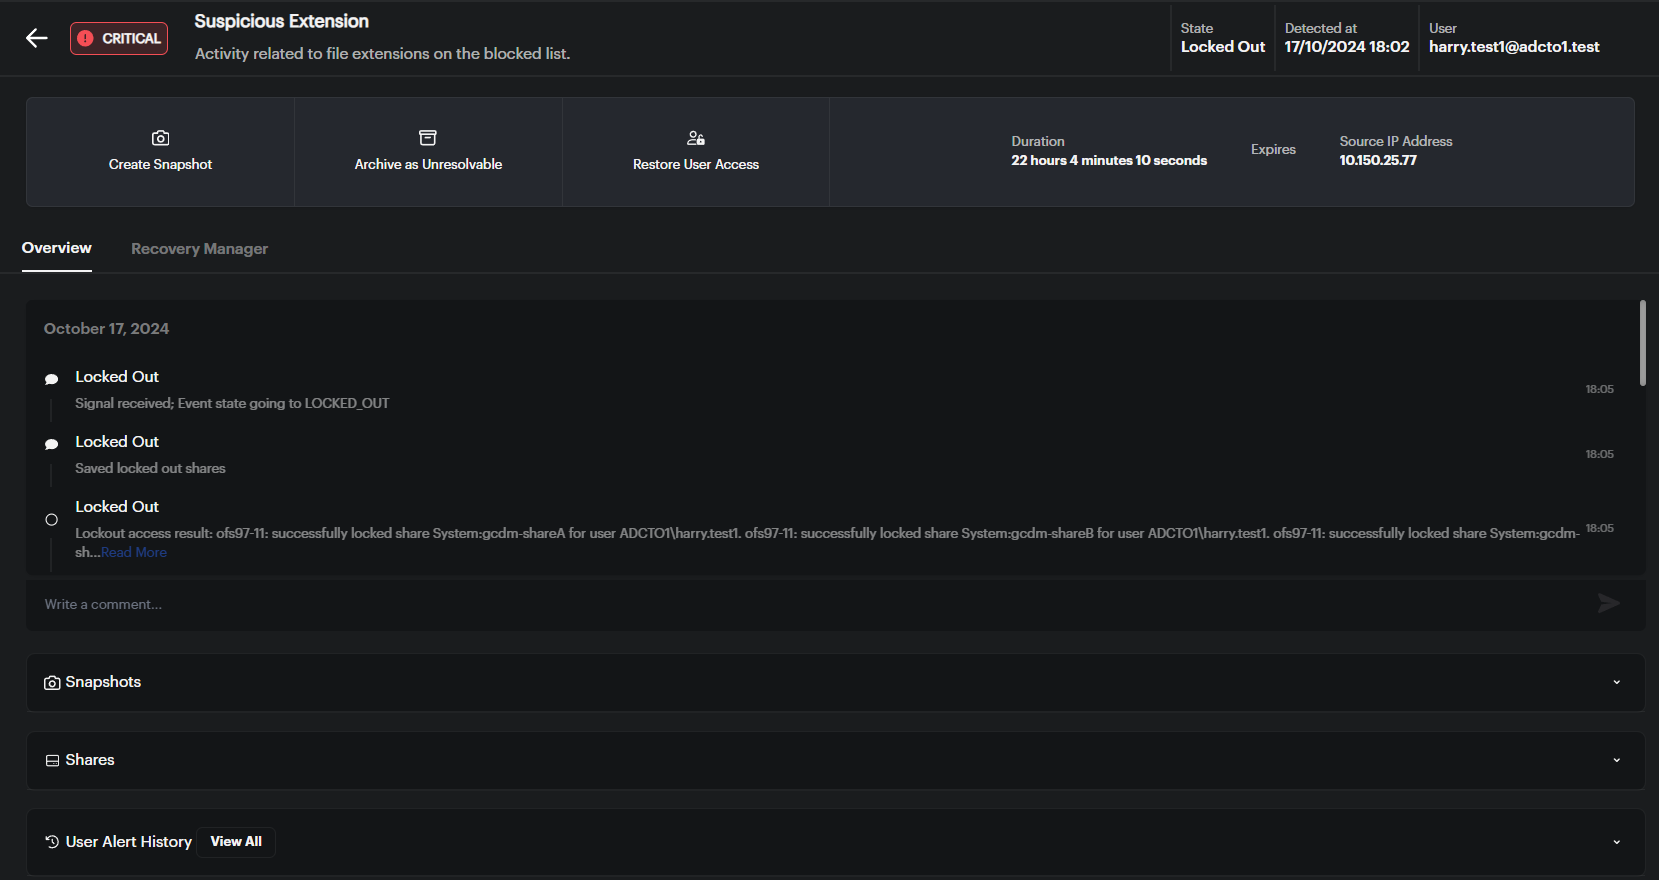
- At the top of the screen, you’ll see important details about the alert:
- Severity: Shows how critical the alert is (Critical, Major).
- User: Displays the associated user.
- State: The current status of the alert.
- Detected At: The timestamp when the alert was first detected.
- Source IP Address: The IP address that triggered the alert.
- Duration: The total time the alert has been active.
- At the top of the screen, you’ll see important details about the alert:
-
Alert Action Options:
- Manage the alert using the following options:
- Create Snapshot: Capture the current system state.
- Archive as Unresolvable: Archive the alert if it cannot be resolved.
- Restore User Access: Re-enable the affected user’s access after resolving the issue.
- Manage the alert using the following options:
-
Alert Overview:
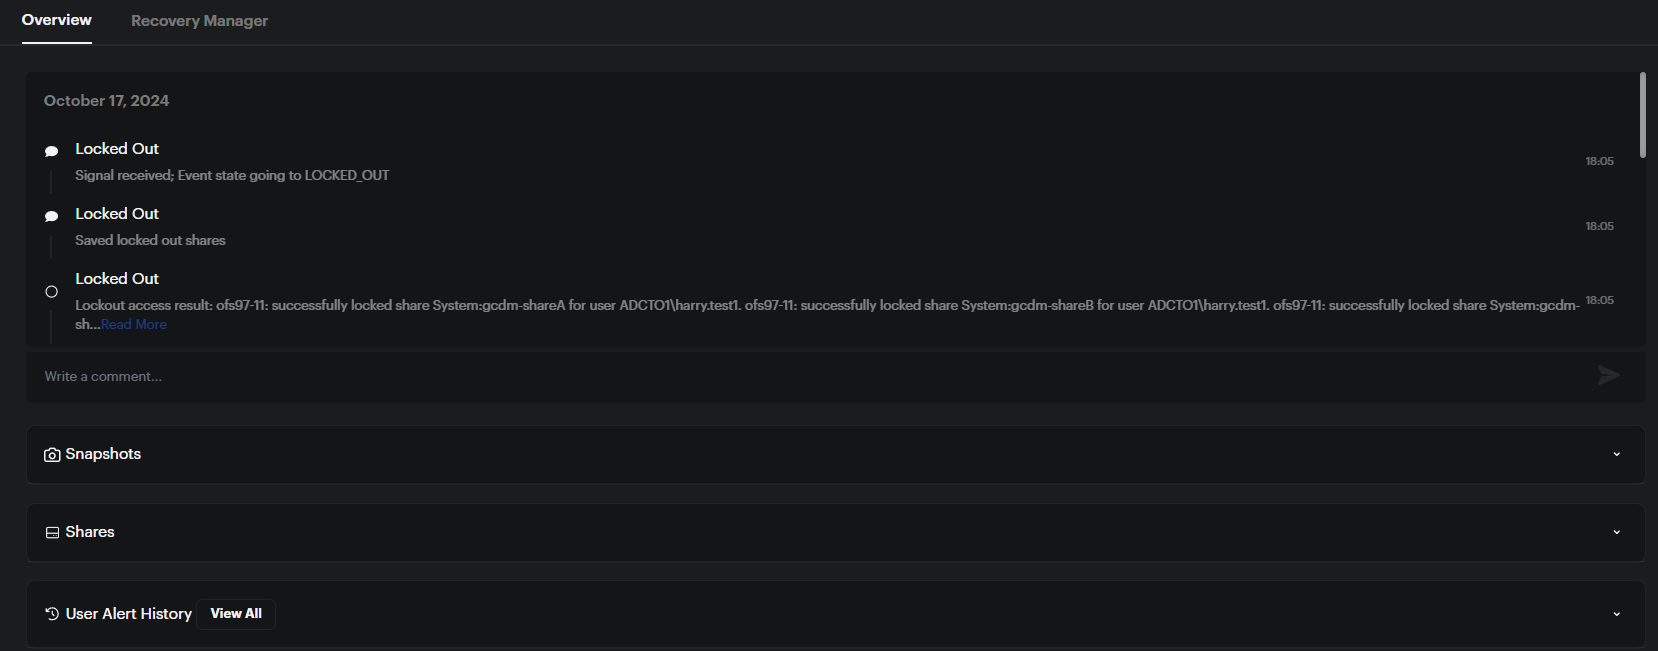
- The Overview section shows a timeline of actions taken during the alert:
- Recovered: Displays any recovery actions taken.
- Snapshots: Lists snapshots taken during the event.
- Shares: Shows the shares impacted by the event.
- User Alert History: View past alerts associated with the user.
- The Overview section shows a timeline of actions taken during the alert:
Recovery Manager
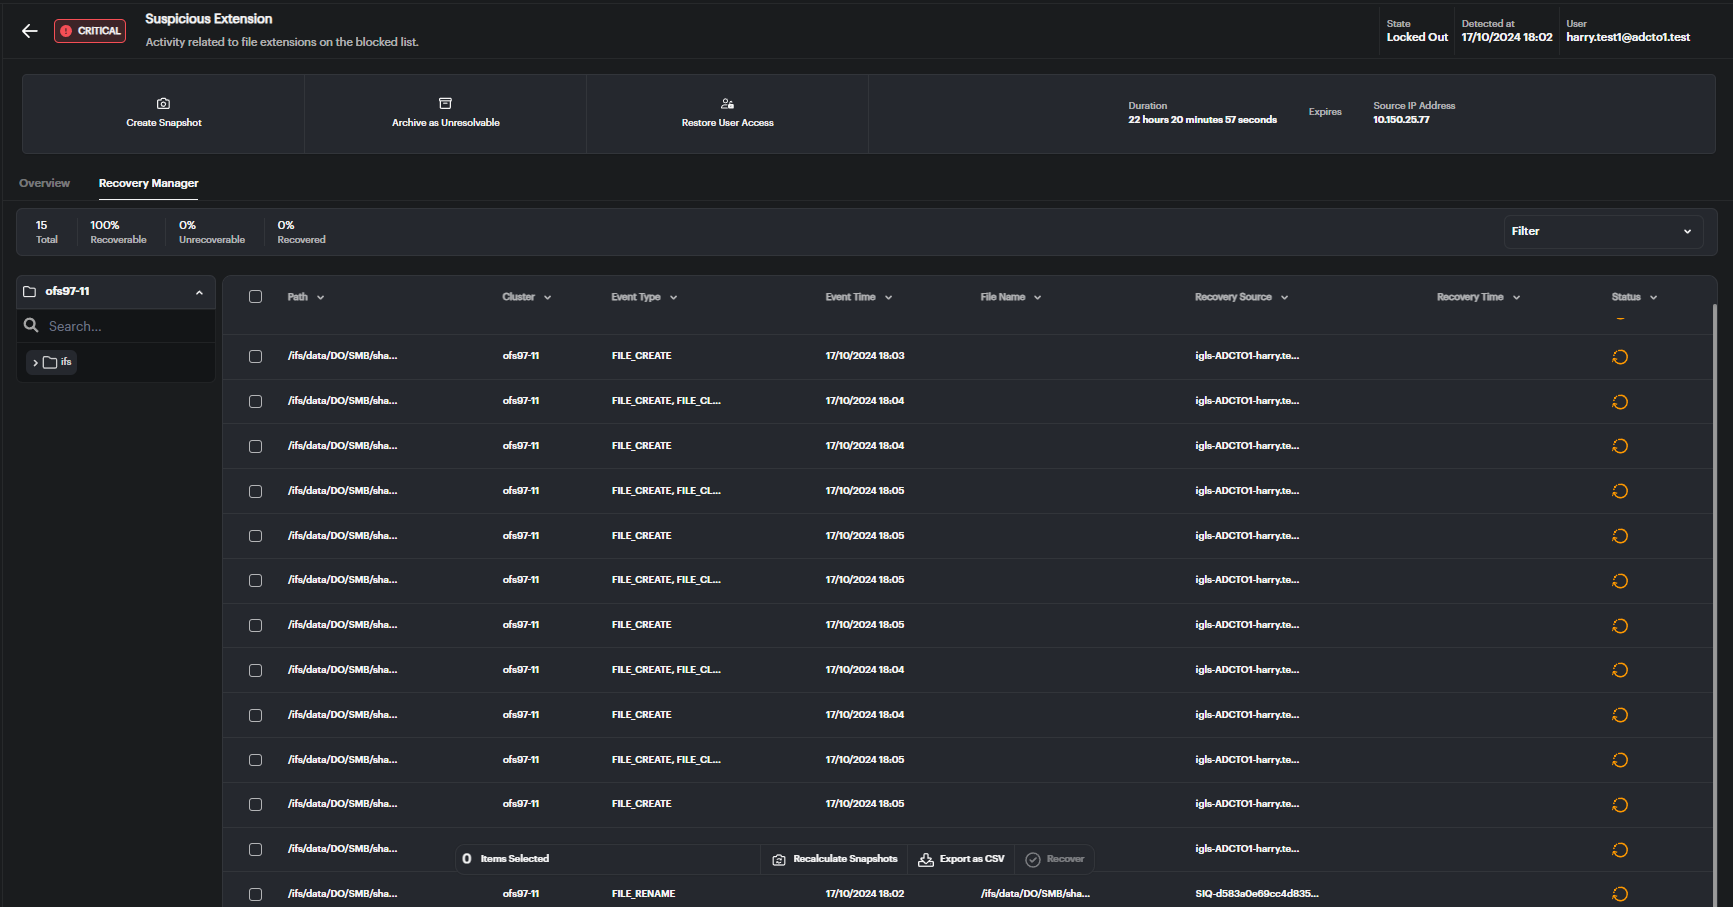
The Recovery Manager allows users to view and manage the recovery process for files impacted by security events. It provides an overview of affected files, recovery status, and filtering options to help navigate large datasets easily. Below is a step-by-step guide to using this feature.
Viewing Recovery Statistics
At the top of the Recovery Manager, users can see a summary of the recovery process:
- Total: Displays the total number of files impacted by the event.
- Recoverable: Indicates the percentage of files that can be recovered based on available snapshots.
- Unrecoverable: Shows the percentage of files that cannot be recovered due to missing snapshots.
- Recovered: Tracks the percentage of files already restored.
Filtering and Selecting Files
To efficiently manage large numbers of affected files, the Recovery Manager offers powerful filtering options:
- Cluster: Filter the list of files by selecting the cluster associated with the files.
- Path: Narrow down the list by specifying a path to focus on files in a particular directory.
- Recovery Status: Choose from statuses such as recoverable or unrecoverable to see the current state of the files.
- Event Type: Filter based on actions taken on the file, such as file creation or renaming.
- Event Time: Filter files by the time of the event to focus on a specific period.
File Tree View
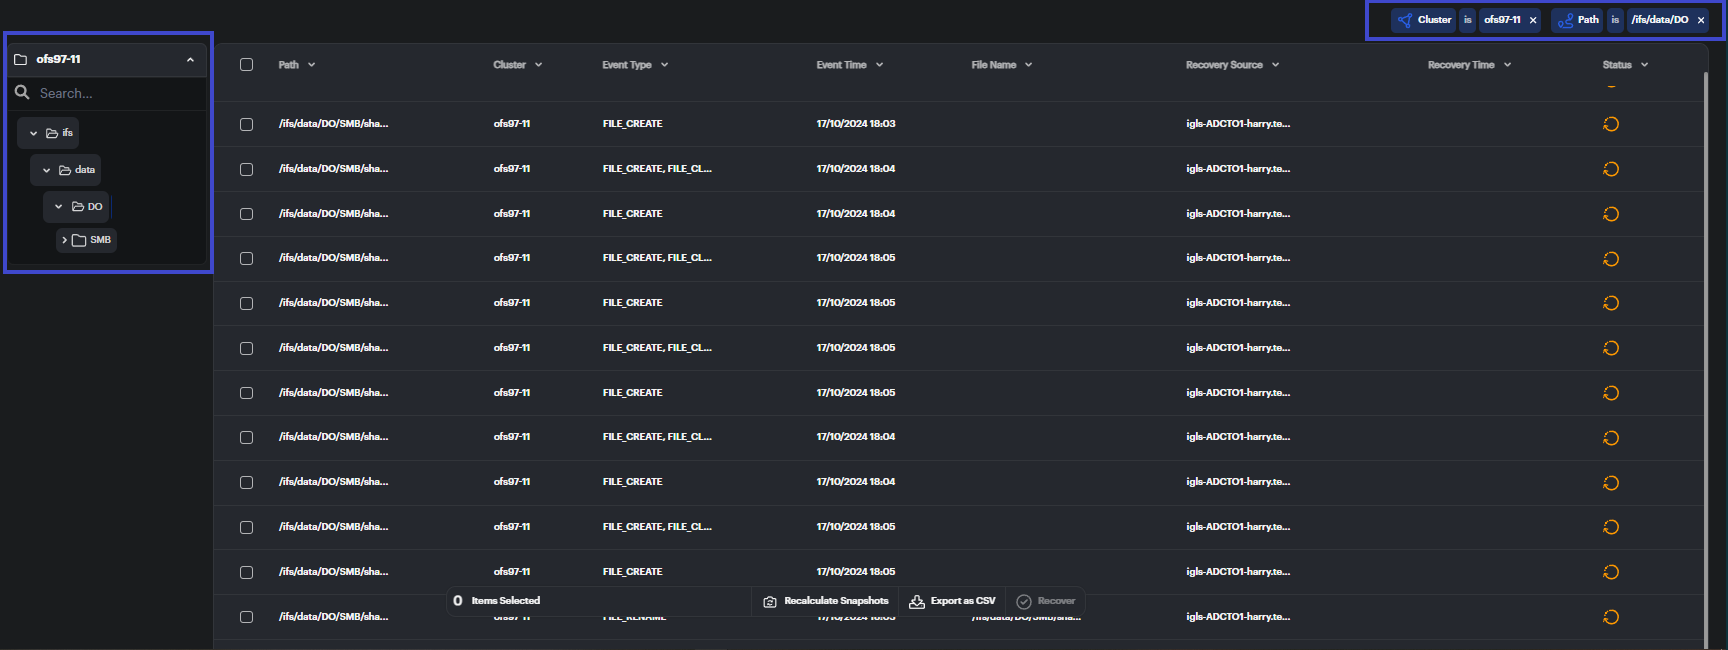
On the left-hand side, the File Tree View provides a directory-based navigation system. Users can expand directories to explore specific paths and see which files were impacted within each folder.
Viewing File Activity
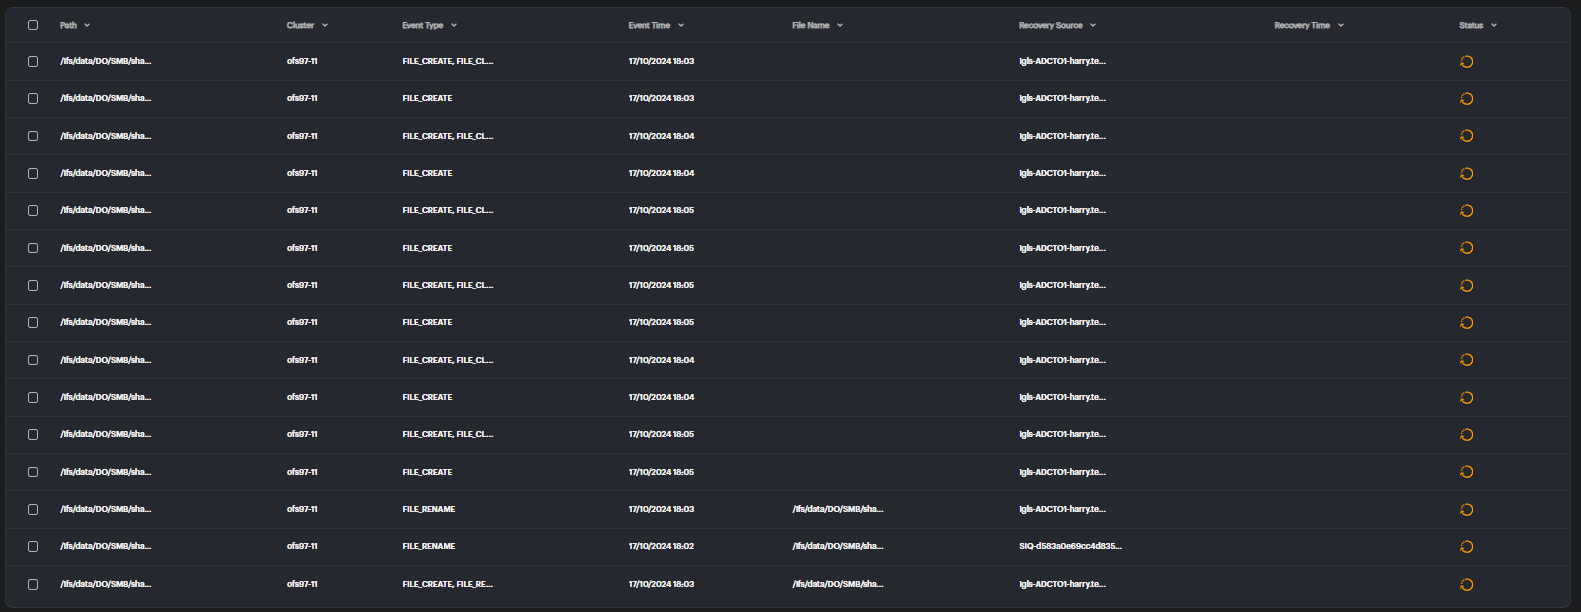
Each file in the recovery list includes detailed information to help users make informed decisions during the recovery process:
- Path: The file path where the affected file is located.
- Cluster: The cluster associated with the file.
- Event Type: The action that occurred on the file, such as file creation or renaming.
- File Name: The name of the affected file.
- Recovery Source: The snapshot or source being used to restore the file.
- Recovery Time: The time required to complete the recovery process.
- Status: The current status of the recovery process, such as whether the file is recoverable or if the recovery is in progress.
Recalculate Snapshots
If the available snapshots for a file have changed or new data is available, users can click Recalculate Snapshots. This will refresh the snapshot data for the selected files and provide updated recovery points. It ensures that the latest snapshots are used during recovery, improving the chances of a successful restore.
Export as CSV
Users can export the list of affected files and their recovery statuses to a CSV file for external reporting, auditing, or tracking purposes.
Recover Files
After selecting the files you wish to recover, follow these steps:
-
Select Files: Check the box next to each file you want to recover. You can select multiple files at once.
-
Recover: Click the Recover button at the bottom of the screen. A confirmation dialog will appear, prompting you to confirm the recovery action.
-
Confirmation: Once confirmed, the selected files will be restored from the most recent available snapshot, bringing them back to their last known good state before the event.
Recovery Manager Availability
Active Events
- The Cyber Recovery Manager button is always displayed in the event Actions window for active events.
- If the associated Kafka topic for an active event is deleted, the button will still remain available.
Archived Events in the History Tab
- For archived events in the History tab, the Cyber Recovery Manager button is shown only if a Kafka topic exists.
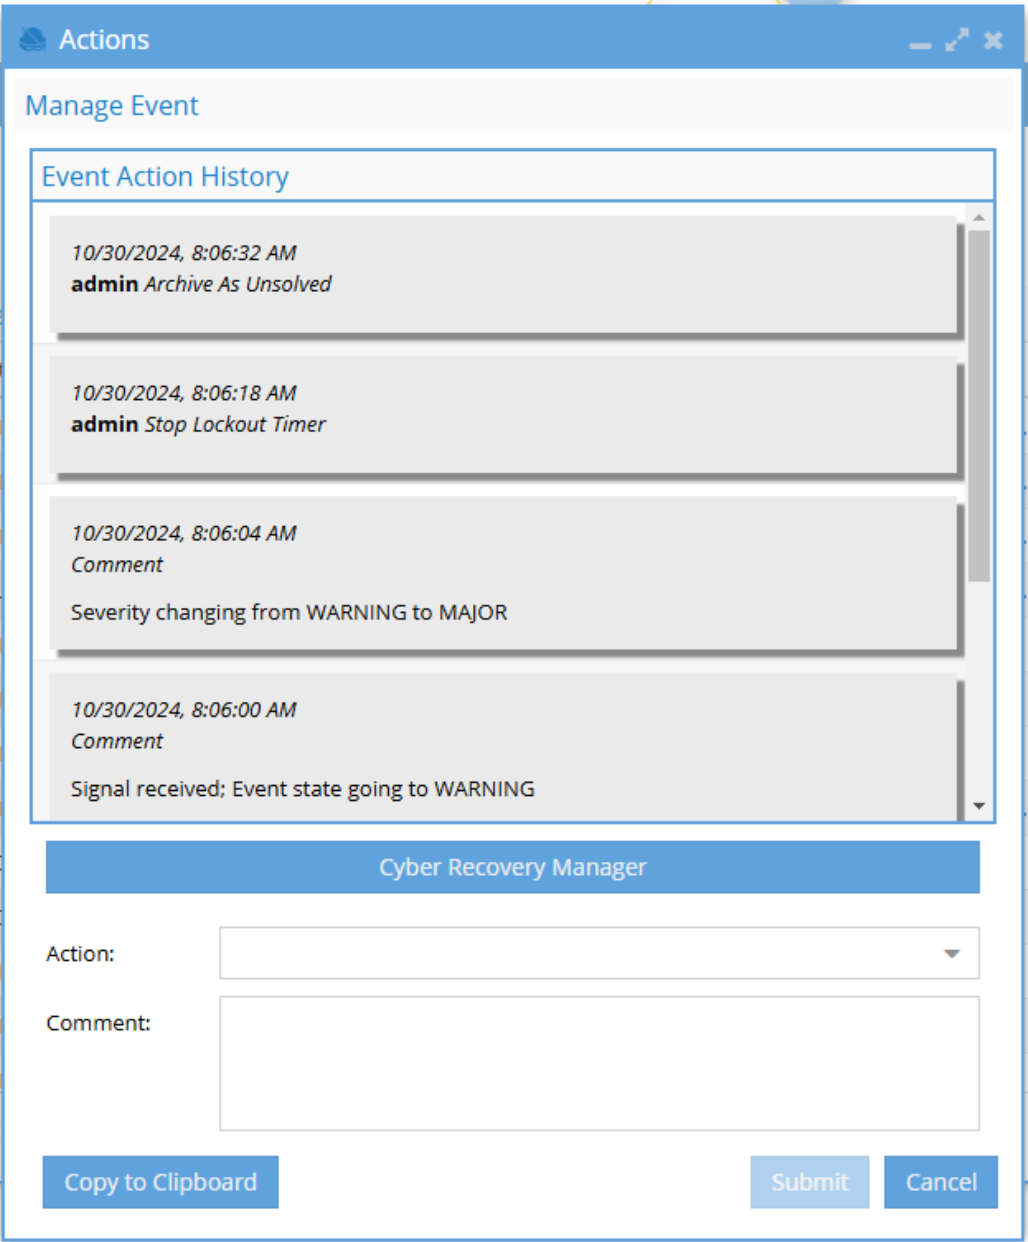
- The button will not appear in the History tab if the Kafka topic has been deleted.
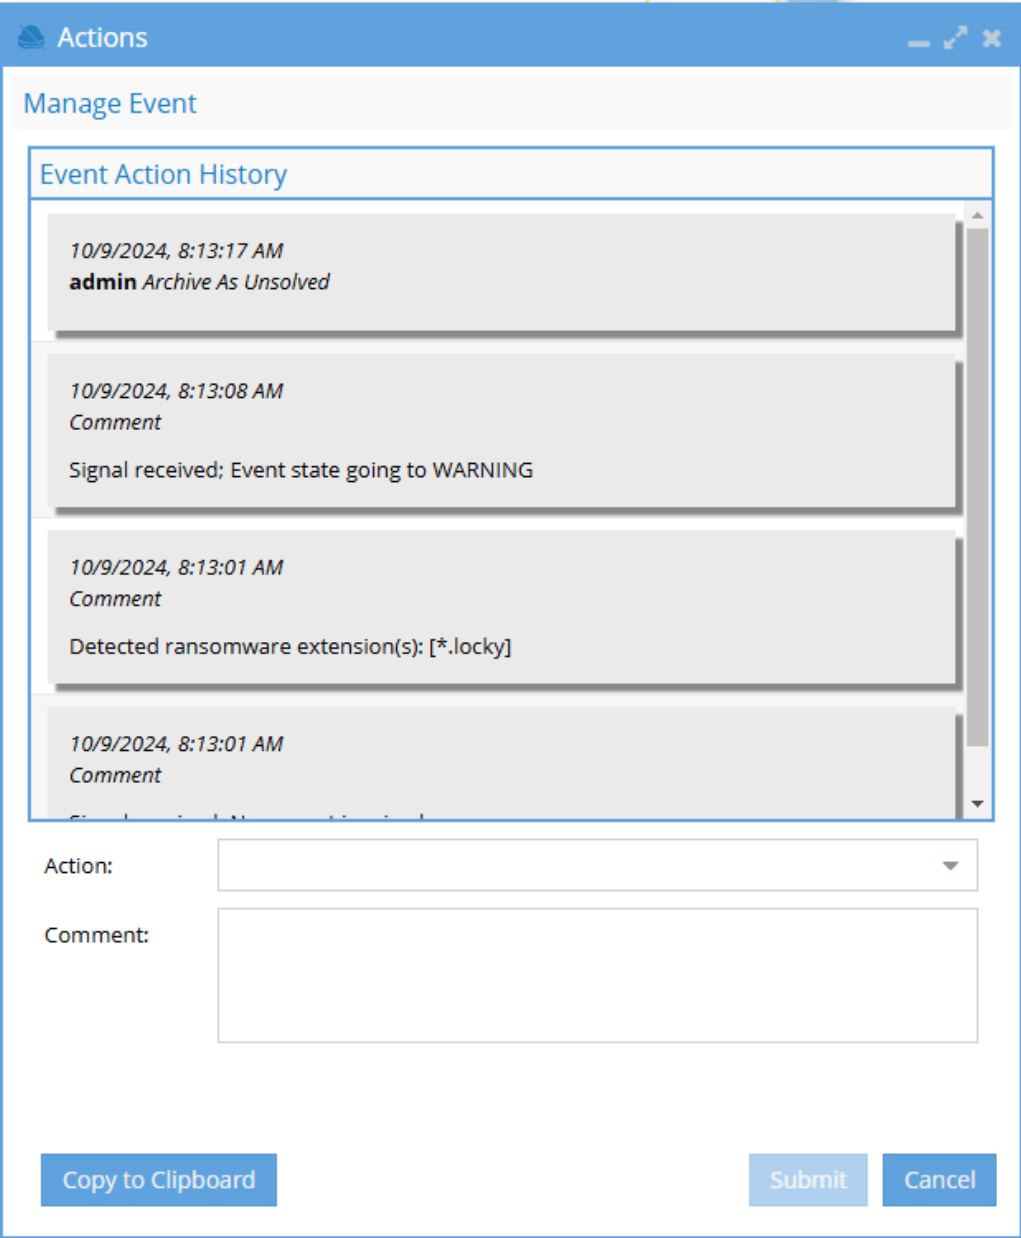
Understanding Kafka Topics
A Kafka topic is a message queue where audit records for each event are temporarily stored. When a new event or alert arrives in Ransomware Defender (RWD), recent audit logs are searched to gather activity from the past hour for the event user. This information is then saved in a Kafka topic.
Kafka Topic Retention:
- Default Retention Period: Kafka topics are retained for seven days by default. This applies to both active and archived events.
- Configurable Retention: Adjust the retention period by setting
ECA_KAFKA_USER_TOPIC_RETENTION_DAYSin theeca-env-common.conffile.
After the retention period, Kafka topics are automatically deleted. For archived events, this means the Recovery Manager button will no longer appear in the History tab of the Actions window, and the User Activity window will display only the tree view sample instead of a comprehensive list of file activity.
How to Complete Forensics of Quarantine Data
When recovering compromised files, follow these steps to perform a forensic analysis of the quarantined data:
- All compromised files are moved during recovery to a quarantine location in
/ifs/.ransomwaredefender/corrupted/. - Under this location, each user's SID is created as a subfolder, and the full relative path to each file is maintained, allowing for targeted scanning with security or decryption tools.
- This structure also serves as a map of the attacked data, enabling the cyber recovery team to analyze the attack pattern within the file system.
- The quarantine location is secured outside of any SMB or NFS exports, keeping the data hidden in a protected area.
- If necessary, create an SMB share with read-only access for cyber recovery teams to analyze the quarantined data.
How Recovery Manager Determines Which Version to Restore
When our software detects activity by a bad actor, it raises a ransomware event.
Once the event occurs, Recovery Manager tracks all events by the bad actor starting from 1 hour before the event.
Recovery Manager compiles a list of all files—or objects (in the case of AWS/ECS)—that the bad actor modified. Modifications include:
- Writing to files or objects,
- Creating new ones,
- Deleting existing ones,
- Renaming them.
For each file or object, Recovery Manager refers to the snapshot that was created before the event and selects the version of the file from this snapshot for recovery. This version comes from before the first modification by the bad actor, within the one hour before the ransomware event.
PowerScale Case: Finding the Correct Snapshot for Recovery
To understand how Recovery Manager determines the best snapshot for recovery, the following criteria are used:
-
Snapshot Location:
- The snapshot must exist on the same path as the file.
-
Snapshot Timing:
- The timestamp of the snapshot must be earlier than the timestamp of the first event initiated by the bad actor on that file, as tracked by Recovery Manager.
-
Best Snapshot Selection:
- Among all snapshots that meet the above criteria, the best snapshot is the one that is closest in time to the first event on the file. This ensures the most recent and relevant version of the file is recovered.
Snapshot Recovery Example
Let’s consider the case of a file called document.txt located at /ifs/test.
- A bad actor renames the file to
document.lockyat 5:00 PM.
Recoverable Scenario
- A snapshot was taken on the path
/ifs/test/before the file was renamed, at 4:00 PM.- In this case, the original
document.txtfile is recoverable because the snapshot predates the malicious change.
- In this case, the original
Not Recoverable Scenario 1
- A snapshot was taken after the file was renamed, at 5:03 PM, and no prior snapshot exists on the system that covers the
/ifs/testpath.- In this case, the
document.txtfile is not recoverable because no valid snapshot exists from before the rename.
- In this case, the
Not Recoverable Scenario 2
- There is only one snapshot on the system for a different path,
/ifs/otherpath/, and no snapshot covers/ifs/test.- The
document.txtfile is not recoverable because no relevant snapshot exists for its directory.
- The
If a previous ransomware event corrupted the file, and the administrator restored it to a previous version after acknowledging the event and archiving it, there is a chance the most recent snapshot may still contain the corrupted version if another ransomware event is raised within the hour.
AWS/ECS Case: Recovering an Object
To recover an object, bucket versioning must be enabled. Recovery Manager will restore the most recent version from before the first modification tracked by the bad actor.
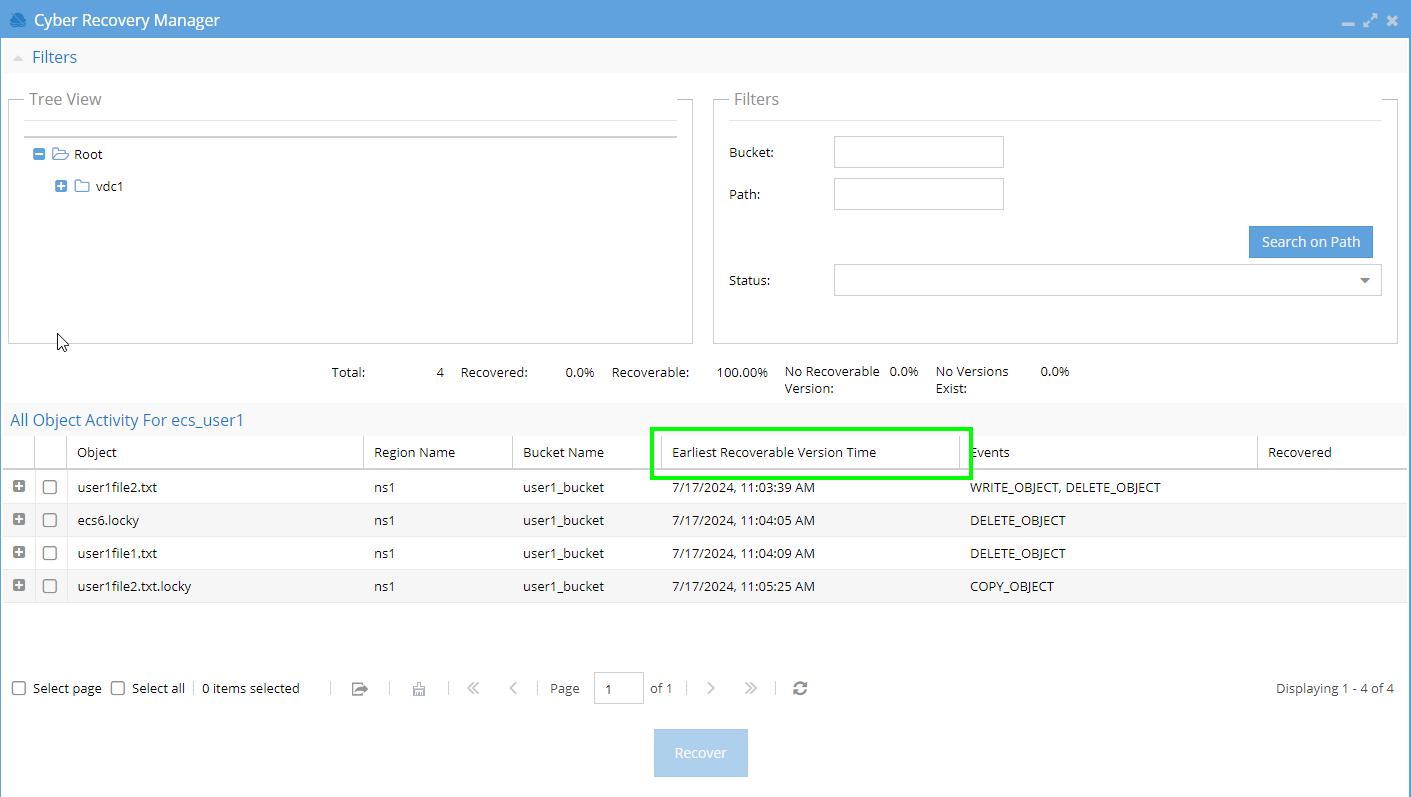
To display the “Earliest Recoverable Version Time” column in Recovery Manager, the Eyeglass /opt/superna/sca/data/system.xml file must contain the versioningEnabled property (inside the <process> tag) set to "true".
- If
versioningEnabledis set to false, the Bucket Versioning Status column will be displayed:
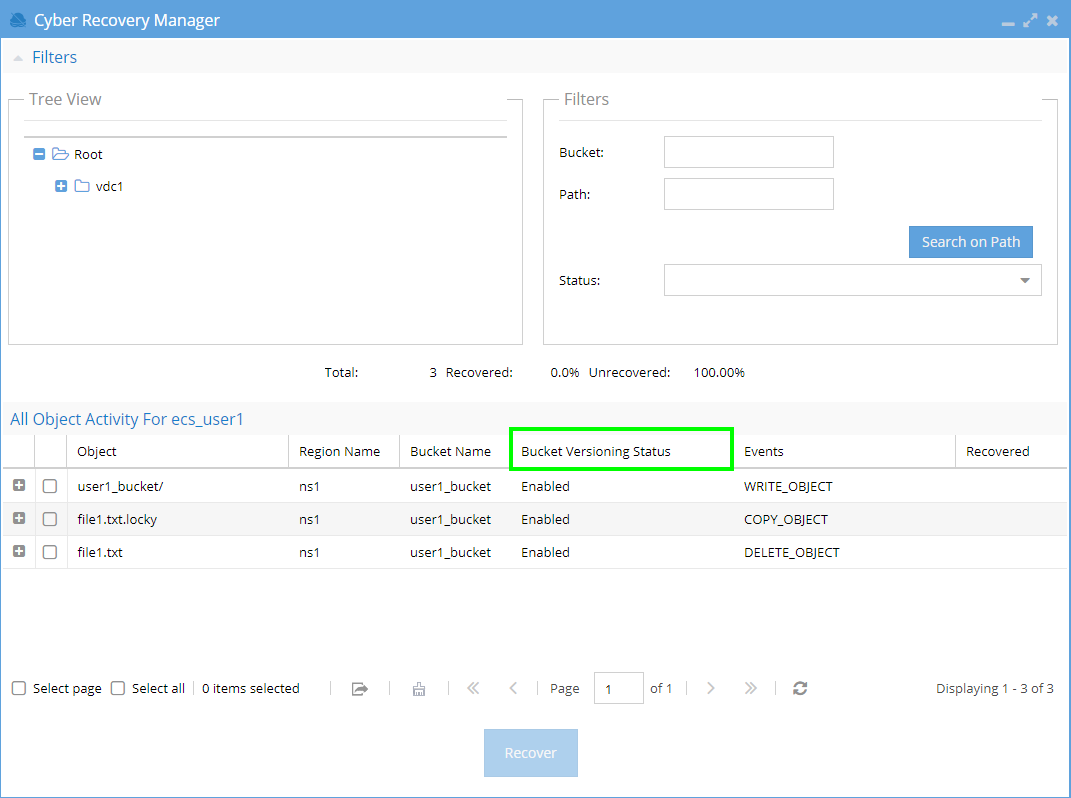
| Bucket Versioning | Bucket Versioning Status |
|---|---|
| OFF | Disabled |
| ON | Enabled |
| SUSPENDED (was updated from ON to OFF) | Suspended |
- If
versioningEnabledis set to true, the Earliest Recoverable Version Time column will be displayed:
earliest_recoverable
| Bucket Versioning | Bucket Versioning Status |
|---|---|
| OFF | NO_VERSIONS_EXIST |
| ON | <date_time_stamp> |
| SUSPENDED (was updated from ON to OFF) | NO_VERSIONS_EXIST |
For example:
-
A version of Object A exists in a bucket that has Versioning enabled.
-
A bad actor triggers a ransomware event.
-
Recovery Manager has access to the version of the file that existed before the ransomware event, therefore it can be restored.
If no such version exists, the object will be quarantined.
If a ransomware event is raised for a user and then the same user triggers another ransomware event, there is a small chance that the corrupted version might be chosen for restoration.
This may happen if:
-
The second ransomware event occurred within 1 hour of the previous event, and the file was corrupted 1 hour before the second event, and the bad actor modified the file within 1 hour before the second event.
OR
-
The second ransomware event occurred 1 hour after the first event, and the object was restored within 1 hour before the second event, and the bad actor wrote to the object again before it was restored.
Recovery can mean many things:
-
restored (if the file is not a bad extension, it is placed back in the share or bucket)
-
deleted (if the file is a bad extension, it is not placed back in the share or bucket)
For example, locky files will not be restored.
ECS Differences
-
Bucket users must be added to Inventory, to see their activity in the CRM.
-
ECS currently does not have a view in the new Cyber Recovery Manager UI.
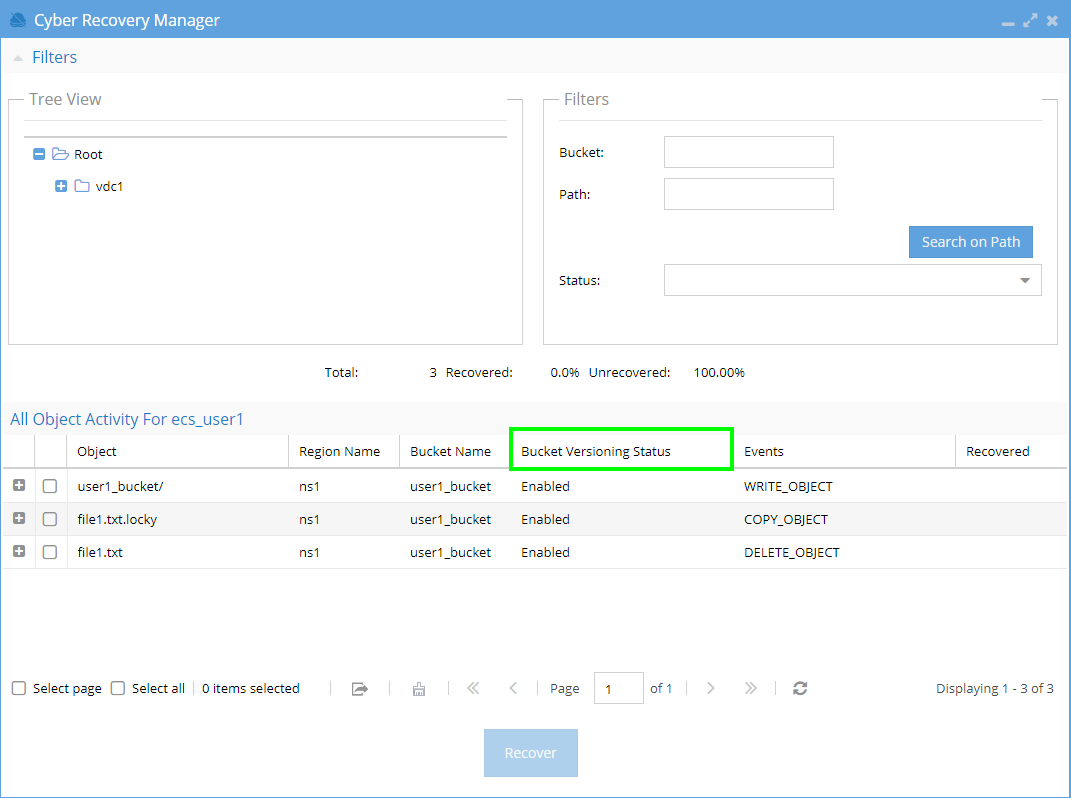
This section highlights the key differences between ECS and other platforms when using Cyber Recovery Manager. While the UI for Cyber Recovery Manager in ECS closely mirrors the PowerScale OneFS interface, there are a few important distinctions.
- In ECS, instead of displaying cluster information, the interface shows bucket and region details, along with versioning information for the bucket.
- The most significant difference between ECS and other platforms lies in the
system.xmlparameter<versioningEnabled>. This parameter can be set to either true or false:- When set to true, the Earliest Recoverable Version Time is displayed for the bucket, but UI loading times may be significantly slower.
- When set to false, the Bucket Versioning Status is displayed instead.
Basic Setup
-
Enable Versioning
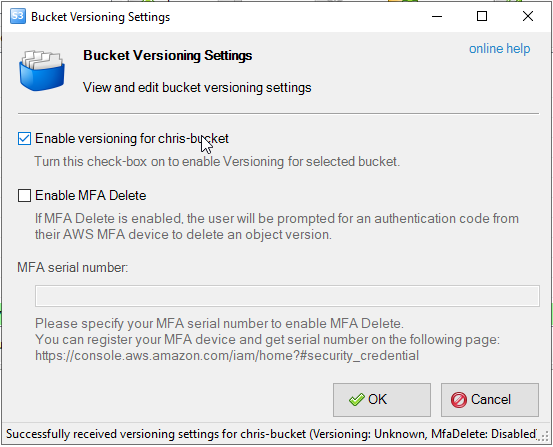
In S3 Browser, enable versioning on the bucket you are testing.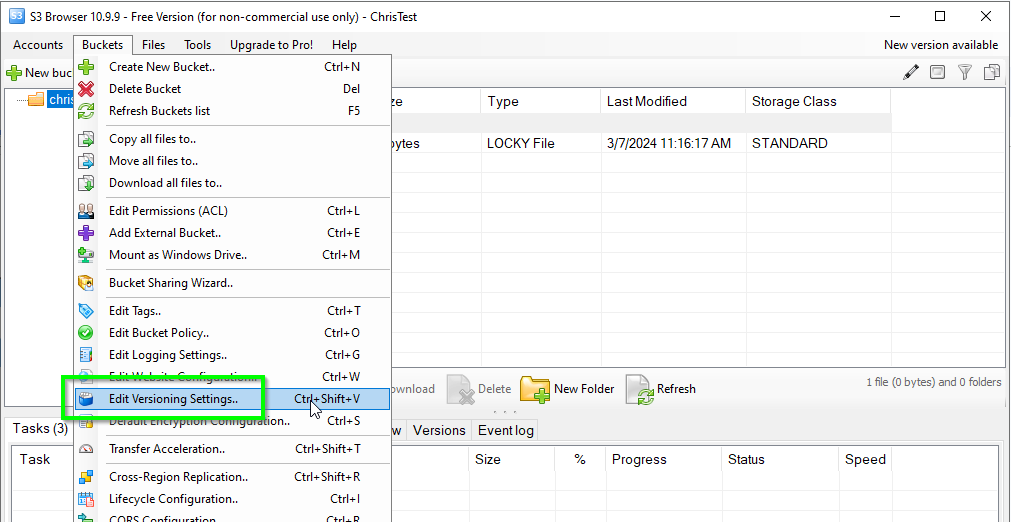
-
View File Versions
Ensure you can view file versions to confirm versioning is correctly set up.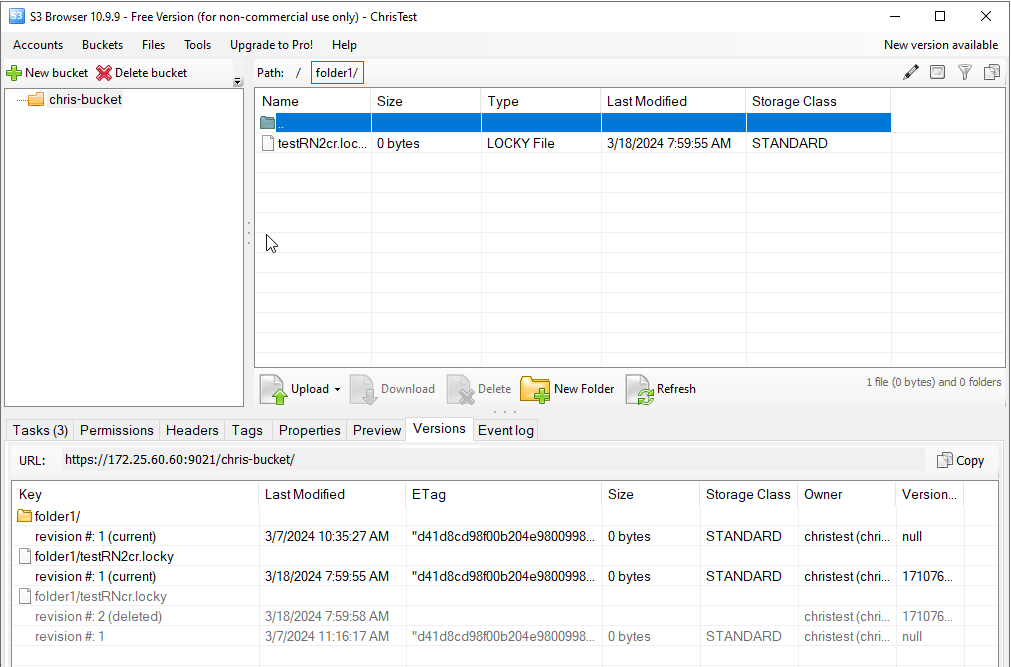
-
Eyeglass Configuration
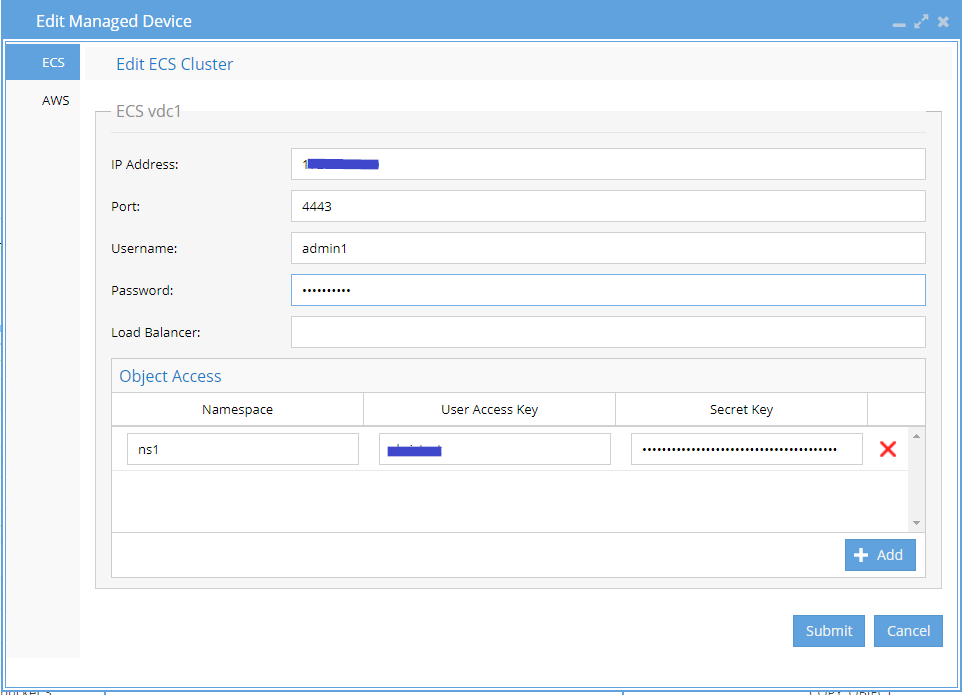
In Eyeglass, make sure your user is added to the node in Inventory View.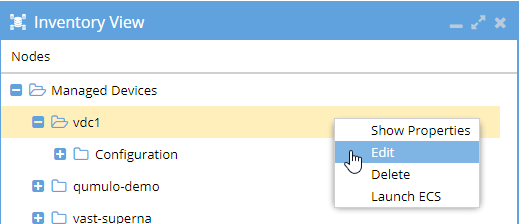
-
system.xml
versioningEnabledProperty
This property, located within the<process>tag in/opt/superna/sca/data/system.xml, interacts with the bucket versioning status and influences the Recovery Manager UI.
For more details, refer to the documentation at AWS/ECS Case: Recovering an Object.
Sorting and Filtering
- Similar to PowerScale OneFS, Recovery Items in ECS are sorted based on the timestamp of the first event (the oldest) associated with a Recovery Item.
- Recovery Items can also be filtered by bucket, path, and status.
Status Options
-
When
<versioningEnabled>is true, the status options include:- RECOVERED
- RECOVERABLE
- NO_RECOVERABLE_VERSION
- NO_VERSIONS_EXIST
- UNKNOWN
-
When
<versioningEnabled>is false, the status options are:- RECOVERED
- UNRECOVERED
Submitting a Recovery Job
When submitting a recovery job in ECS, it's important to note the following:
ECS does not have a RENAME_OBJECT event. Instead, it combines two events: DELETE_OBJECT and COPY_OBJECT. This means that the system deletes the old file and creates (copies) a new file with the updated name.
To ensure complete recovery, we recommend selecting both of these events when submitting a recovery job.
Example 2
- Original file:
present1.locky - Renamed to:
present2.locky
In this case, the DELETE_OBJECT event removes present1.locky, and the COPY_OBJECT event creates present2.locky. By selecting both events, you ensure that the renamed file is included in the recovery process.