Easy Auditor Database Install
Deploy the latest versions of Eyeglass and ECA OVF. After downloading, install the Easy Auditor for each, and run the installation.
In release 4.0, we introduced SQL-based Easy Auditor support for VAST and Qumulo clusters. This feature supports two SQL variants: PostgreSQL and MS SQL. You will need to select one of these options.
Database retention is only supported for PostgreSQL starting with the 4.0 release.
To get Easy Auditor running with your VAST Clusters, follow the steps below. For more detailed instructions, refer to the accompanying documentation.
Recommendation: We recommend creating an SQL user specifically for Eyeglass with general permissions to process tables (read, write, and alter the database). This user needs to be manually added to both Eyeglass and ECA, as these applications require the user credentials to decrypt and access the database.
Prerequisites - Easy Auditor
- A Linux server with SUSE 15.5 (recommended) and an installed database.
- Network access between the database server, Eyeglass, and ECA appliances.
VAST DB can not yet be used as the database for Easy Auditor. While it was introduced in a recent version of VAST, an external database is required to implement Easy Auditor. Future support and integration of VAST DB are under evaluation.
- Using an Existing SQL Database
- Installing a New PostgreSQL Server
- MS SQL Server - Settings and Commands
Using an Existing SQL Database
-
MSSQL Database:
- User:
Your Database User - Password:
Your Database Password - Database Name:
Your Database Name - IP Address:
Your Database IP Address - Ensure the database IP is reachable from both the Eyeglass and ECA appliances.
- User:
-
PostgreSQL Database:
- User:
Your Database User - Password:
Your Database Password - Database Name:
Your Database Name - IP Address:
Your Database IP Address - Ensure the database IP is reachable from both Eyeglass and ECA appliances.
- User:
Installing a New PostgreSQL Server
Easy Auditor: SQL Database Configuration Guide (PostgreSQL)
These steps are only required if you are installing Easy Auditor; they are not necessary for a Ransomware Defender only deployment.
1. Prerequisites
Before proceeding, ensure the following are configured:
- SQL Server: A Linux/Unix server with PostgreSQL installed. (Recommendation: Use Ubuntu as it often includes a pre-configured PostgreSQL installation.)
- Local User: A local user configured on the SQL server.
- Network Access: Ensure network connectivity between the SQL server, Eyeglass, and ECA nodes. Port 5432 (or your custom port) must be open.
- Sizing Review: Review the database sizing guide at the end of this document to estimate the required database size.
2. SQL Server Initial Configuration
Follow these steps to set up the database, user, and initial security settings.
2.1 Create Database and User
SSH to the SQL server and run the following commands as the postgres user to create the database and the dedicated user.
# SSH to SQL server as local user, e.g., 'eyeglass'
# ssh eyeglass@your_sql_server
Run command:
sudo su postgres
Run command:
psql
Execute the following SQL commands:
Run command:
CREATE DATABASE eyeglass;
Run command:
CREATE USER eyeglass;
Run command:
GRANT SELECT, INSERT, UPDATE, DELETE ON ALL TABLES IN SCHEMA public TO eyeglass;
Run command:
GRANT ALL PRIVILEGES ON DATABASE eyeglass TO eyeglass;
Run command:
ALTER DATABASE eyeglass OWNER TO eyeglass;
Run command:
ALTER ROLE eyeglass CREATEDB CREATEROLE;
Run command:
ALTER USER eyeglass WITH PASSWORD 'Choose_your_secure_password';
Change to a secure, customer-defined password
Verify user attributes (Create role, Create db):
Run command:
\du
Exit psql:
Run command:
\q
Exit Postgres user:
Run command:
exit
Restart PostgreSQL service:
Run command:
sudo systemctl restart postgresql
Check PostgreSQL service:
Run command:
sudo systemctl status postgresql
Expected output after running the SQL commands:
postgres=# CREATE DATABASE eyeglass;
CREATE DATABASE
postgres=# CREATE USER eyeglass;
CREATE ROLE
postgres=# GRANT SELECT, INSERT, UPDATE, DELETE ON ALL TABLES IN SCHEMA public TO eyeglass;
GRANT
postgres=# GRANT ALL PRIVILEGES ON DATABASE eyeglass TO eyeglass;
GRANT
postgres=# ALTER DATABASE eyeglass OWNER TO eyeglass;
ALTER DATABASE
postgres=# ALTER ROLE eyeglass CREATEDB CREATEROLE;
ALTER ROLE
postgres=# ALTER USER eyeglass WITH PASSWORD '********';
Expected output after running \du:
                                   List of roles
 Role name |                         Attributes
-----------+------------------------------------------------------------
 eyeglass  | Create role, Create DB
 postgres  | Superuser, Create role, Create DB, Replication, Bypass RLS
Expected output after restarting and checking the PostgreSQL service:
sqladmin@eupsql02:/etc/postgresql$ sudo systemctl restart postgresql
sqladmin@eupsql02:/etc/postgresql$ sudo systemctl status postgresql
● postgresql.service - PostgreSQL RDBMS
     Loaded: loaded (/usr/lib/systemd/system/postgresql.service; enabled; preset: enabled)
     Active: active (exited) since Fri 2025-12-05 14:54:23 UTC; 50s ago
    Process: 4726 ExecStart=/bin/true (code=exited, status=0/SUCCESS)
   Main PID: 4726 (code=exited, status=0/SUCCESS)
        CPU: 6ms

Dec 05 14:54:23 eupsql02 systemd[1]: Starting postgresql.service - PostgreSQL RDBMS...
Dec 05 14:54:23 eupsql02 systemd[1]: Finished postgresql.service - PostgreSQL RDBMS.
2.2 Configure Password Encryption
For enhanced security, configure the database to use a secure password encryption method like scram-sha-256.
# SSH to SQL server as local user
Run command:
sudo su postgres
Run command:
psql
Check current setting (optional):
Run command:
SHOW password_encryption;
Set to a secure encryption method:
Run command:
SET password_encryption = 'scram-sha-256';
Exit psql:
Run command:
\q
Exit Postgres user:
Run command:
exit
2.3 Validate listen_addresses
The listen_addresses parameter in postgresql.conf must be set to * to allow connections from the Eyeglass and ECA nodes.
Find the configuration file path:
Run command:
sudo su postgres
Run command:
psql
Run command:
SHOW config_file;
Note the file path (e.g., /etc/postgresql/14/main/postgresql.conf):
Run command:
\q
Exit Postgres user:
Run command:
exit
Edit the configuration file:
sudo vim /etc/postgresql/<Your DB version>/main/postgresql.conf
Locate listen_addresses (in CONNECTIONS AND AUTHENTICATION) and set it to *:
listen_addresses = '*'
Save and exit: ESC + wq!
3. Client Authentication (pg_hba.conf)
Add the IP addresses of the Eyeglass and ECA nodes to the pg_hba.conf file to allow client authentication.
Find the pg_hba.conf file path:
Run command:
sudo su postgres
Run command:
psql
Run command:
SHOW hba_file;
Note the file path (e.g., /etc/postgresql/14/main/pg_hba.conf):
Run command:
\q
Exit Postgres user:
Run command:
exit
Edit the configuration file:
sudo vim /etc/postgresql/<Your DB version>/main/pg_hba.conf
Add IPv4 entries for the Eyeglass and ECA nodes. Replace the placeholder IP addresses/networks and ensure the METHOD matches your encryption choice (e.g., scram-sha-256).
TYPE  DATABASE        USER            ADDRESS                 METHOD
host    all             eyeglass        eyeglass_IP/24          scram-sha-256
host    all             eyeglass        ECA1_IP/24              scram-sha-256
host    all             eyeglass        ECA2_IP/24              scram-sha-256
... add up to ECA6_IP/24 ...
Remove the default localhost line if present (first one in IPv4 connection).
Save and exit: ESC + wq!
Reload configuration and restart PostgreSQL:
sudo su postgres
psql
SELECT pg_reload_conf();
\q
Exit Postgres user:
Run command:
exit
sudo systemctl status postgresql
4. Performance Tuning (postgresql.conf)
These modifications are recommended for an SQL server with 16 vCPU and 64 GB RAM.
Edit the configuration file:
sudo su postgres
psql
Verify path:
SHOW config_file;
\q
exit
sudo vim /etc/postgresql/<Your DB version>/main/postgresql.conf
Add or modify the following settings:
Enabled by default: shared_buffers, max_wal_size, min_wal_size
shared_buffers = 16GB
work_mem = 128MB
maintenance_work_mem = 1GB
max_parallel_maintenance_workers = 8
wal_level = replica
wal_compression = on
wal_buffers = 16MB
max_wal_size = 8GB
min_wal_size = 1GB
temp_buffers = 128MB
backend_flush_after = 256kB
effective_io_concurrency = 32
maintenance_io_concurrency = 10
max_worker_processes = 16
max_parallel_workers_per_gather = 8
max_parallel_workers = 16
effective_cache_size = 32GB
default_statistics_target = 1000
Save and exit: ESC + wq!
Restart PostgreSQL for the changes to take effect:
sudo systemctl restart postgresql
5. SQL Database Retention Management
Configure data archival to manage database size and prevent running out of space. Events older than the retention period will be compressed and moved to cold storage.
Update system.xml file:
The cold storage configuration needs to be copied from /opt/superna/sca/conf/system.xml to /opt/superna/sca/data/system.xml.
The default cold storage path is /tmp. You must change this to an external path, such as a VAST or Qumulo NFS export, to prevent the Eyeglass VM from running out of space. Ensure the NFS export is mounted in Eyeglass first.
Ownership on the database path should be sca:users
Make sure to add your mount to /etc/fstab so it remounts after a reboot.
FQDN_OR_IP:/PATH_TO_RETNTION_STORAGE /mnt/retention nfs defaults,vers=3,tcp 0 0
Run mount -a
Configure Cold Storage Settings:
# SSH as admin to Eyeglass VM
ssh admin@eyeglass_vm_ip
sudo su
Create a local directory for the mount point if needed:
mkdir /home/admin/dbColdStorage
Edit the configuration file:
vim /opt/superna/sca/data/system.xml
Ensure the following flags are present and configured within the <easyauditor> tag:
| Flag | Default Value | Description | Required Action |
|---|---|---|---|
<sendRecordsToColdStoreDays> | 90 | Specifies the number of days before records are archived to cold storage. | Set this value according to the requirements. |
<coldStoreCompressionLevel> | 4 | Determines the level of compression applied to archived files. | Maintain the default value. |
<coldStorePath> | /tmp | The directory path where archived files are stored. | Crucially, change this path to a mounted Qumulo/VAST NFS export (e.g., /home/admin/dbColdStorage). |
Enable the Automatic Archival Process:
# Ensure you are still SSHed to Eyeglass as admin/root
igls admin schedules set --id="EasyAuditorColdStoreOldRecordsTask" --enabled=true
Restart sca service:
sudo systemctl restart sca
6. Add the SQL server to Eyeglass
Needs to happen AFTER eca cluster is up.
Skip if Ransomware Defender only.
SSH to Eyeglass.
Add the database configuration using the following command, replacing the placeholders with your actual database details:
igls adv sqldb add --ip Your_Database_IPAddress --port 5432 --username eyeglass --dbname Your_Database_Name --dbType POSTGRES --dbpass Your_Database_Password
Postgres supports several encryption methods, with SHA-256 and MD5 being the most popular. For added security, make sure your database is configured to use one of these methods.
Add to above command (example): --dbparams=encrypt=scram-sha-256
Verify the database was added:
igls adv sqldb
To confirm that the settings have synchronized, SSH into ECA1 and run the ecactl db view command. If cluster is up restart evtarchive services (ecactl cluster services restart --container evtarchive --all)
Verify tables (reports and userevents) are created in the postgres server:
sudo -u postgres psql -d eyeglass(or table name)
\dt
(to check permissions in db and tables)
Easy Auditor FAQ for Vast and Qumulo
1. What type of Database server should be used?
For optimal performance with our TurboAudit containers, it is recommended to use PostgreSQL.
2. What is the required Database size?
The required database size is influenced by two main factors: the volume of events per second and the desired retention period for data as hot storage within the SQL server. A general recommendation is to limit hot storage to a maximum of 3–6 months of data. Superna offers archive and restore capabilities for backing up and managing older, less frequently accessed data.
Database Size Projections
| Scenario | Events per Second | Events per Day (millions) | Bytes per Day (billions) | Size per Day (GB) |
|---|---|---|---|---|
| 1 | 1,500 | 129.6 | 64.8 | 60 |
| 2 | 2,500 | 216 | 108 | 100 |
| 3 | 5,000 | 432 | 130 | 200 |
While CPU and RAM requirements are generally stable, exceptionally high event rates may necessitate the allocation of additional resources.
MS SQL Server - Settings and Commands
For MS SQL, follow these steps to configure the necessary settings:
-
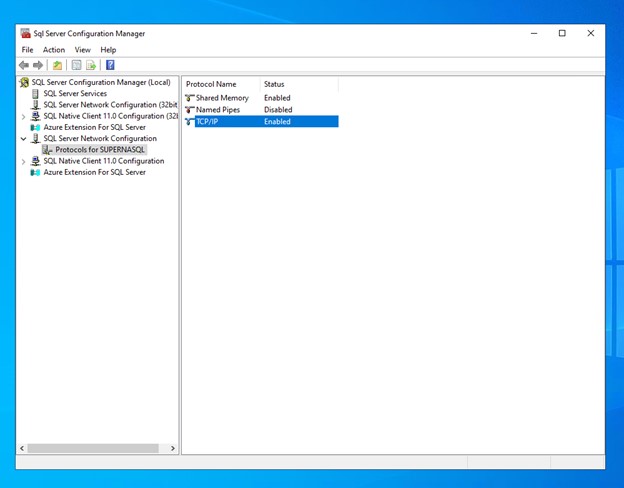
Enable the TCP/IP Protocol:
- You don't need to add the ECA and Eyeglass IP addresses individually on your server, but you must enable the TCP/IP Protocol if it hasn't been done already.
- This can be done through the SQL Server Configuration Manager.
-
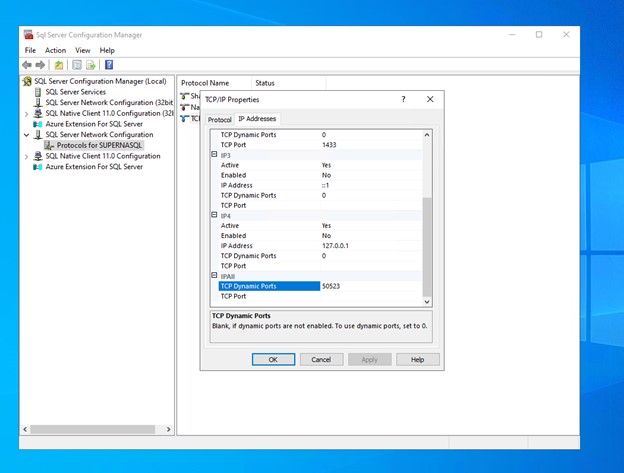
Enable Dynamic TCP Ports:
- After enabling TCP/IP, you need to enable dynamic TCP ports and set them to your desired value.
- The default static port is 1433.
Creating Tables on the MS SQL Server
To create the necessary tables on the MS SQL server, follow these steps:
-
Create the Database:
- The first step is to create the database where the Eyeglass data will be stored.
- Use the following SQL command:
CREATE DATABASE eyeglassdb;
GO -
Create the Login and User:
- After the database is created, you need to create a login and user that will access the database.
- First, switch to the newly created database:
USE eyeglassdb;- Then, create the login and for the user:
CREATE LOGIN eyeglassuser WITH PASSWORD = 'Choose_your_password';- Finally, create the user for the login:
CREATE USER eyeglassuser FOR LOGIN eyeglassuser;
GO -
Assign Permissions:
- The final step is to assign the necessary permissions to the user so they can perform operations on the database.
- Assign the
db_ownerrole to the user:
ALTER ROLE db_owner ADD MEMBER eyeglassuser;
GOinfoWhen creating the database, login, and user, replace
eyeglassdb,eyeglassuser, and'Choose_your_password'with your actual database name, username, and password.
ECA Environment Variables and Configuration
After completing the server setup, follow these steps to configure the environment variables on ECA. These settings will enable the use of the SQL server for saving events from VAST:
-
Enable VAST Auditing:
- Mount the VAST audit folder, similar to the RWD solution.
- Set the environment variable to enable SQL-based event archiving:
export ECA_EVTARCHIVE_USE_SQL=truewarningThis should be set to
trueonly if you plan to add a VAST cluster that supports Easy Auditor. If this is set totruebut the server is not configured correctly, theevtarchiveservice will restart in a loop. -
Configure the SQL Batch Size:
- Set the batch size for SQL performance. This defines the maximum number of events that can be written at once:
export ECA_EVTARCHIVE_SQL_BATCH_SIZE=10000- The value of
10000is near the optimal setting for efficient writing in both MSSQL and PostgreSQL.
-
Set the SQL Time Window:
- Define the time window in seconds for batching events:
export ECA_EVTARCHIVE_SQL_TIME_WINDOW_SECS=5- If the batch is not filled within this time, a write operation will be sent regardless.
Commands to Add SQL to Eyeglass and ECA
Once the environment variables are changed as described above, you can proceed to cluster up and add your configured servers to both Eyeglass and ECA separately. This allows them to connect and save/get user events and reports.
If the parameters for the server are incorrect, it will result in a connection error, and the server will be skipped. Additionally, at any given time, you can have only one server configured.
The DbType will be either POSTGRES or MSSQL.
ECA
Run the following command on your master ECA node:
ecactl db add --ip <IP on which SQL Server is hosted> --port <PORT> --username eyeglass --dbname eyeglass --db-type POSTGRES --dbparams encrypt=<dbParms needed to make connection>
You will be prompted for the password here.
Eyeglass
Run the following command on your Eyeglass. Make sure SCA is running:
igls adv sqldb add --ip <IP on which SQL Server is hosted> --port <PORT> --username <USERNAME> --dbname <DATABASE NAME> --dbparams=<dbParms needed to make connection> --dbType MSSQL --dbpass <PASSWORD>